Table of Contents
Advertisement
Quick Links
Advertisement
Table of Contents

Subscribe to Our Youtube Channel
Related Manuals for Kleenmaid ICT6021


Summary of Contents for Kleenmaid ICT6021
- Page 1 cooking collection Instructions for use and warranty details...
- Page 2 Once installation is complete, please read this instruction manual carefully and get to know the controls and the features of your new Kleenmaid appliance. These simple instructions will enable you to achieve excellent results from the very first time you use it.
-
Page 4: Table Of Contents
SUMMARY SAFETY ..................................5 ............................5 RECAUTIONS BEFORE USING ..............................5 SING THE APPLIANCE ......................6 RECAUTIONS NOT TO DAMAGE THE APPLIANCE ......................7 RECAUTIONS IN CASE OF APPLIANCE FAILURE ..............................7 THER PRECAUTIONS DESCRIPTION OF THE APPLIANCE ..........................8 ............................. -
Page 5: Safety
SAFETY Precautions before using • Unpack all the materials. • The installation and connecting of the appliance must be done by a qualified electrican. The manufacturer can not be responsible for damage caused by building-in or connecting errors. • The appliance must be installed in a proper worktop. •... -
Page 6: Precautions Not To Damage The Appliance
• In general do not place any metallic object except cooking pots on the glass surface. • Never cover the appliance with a cloth or a protection sheet. This may become very hot and catch fire. • This appliance is not intended for use by persons (including children) with reduced physical, sensory or mental capabilities, or lack of experience and knowledge, unless they have been given supervision or instruction concerning use of the appliance... -
Page 7: Precautions In Case Of Appliance Failure
Precautions in case of appliance failure • If a defect is noticed, switch off the appliance and turn off the electrical supply. • If the ceramic glass is cracked or fissured, you must disconnect the appliance at the switchboard and contact the after sales service. -
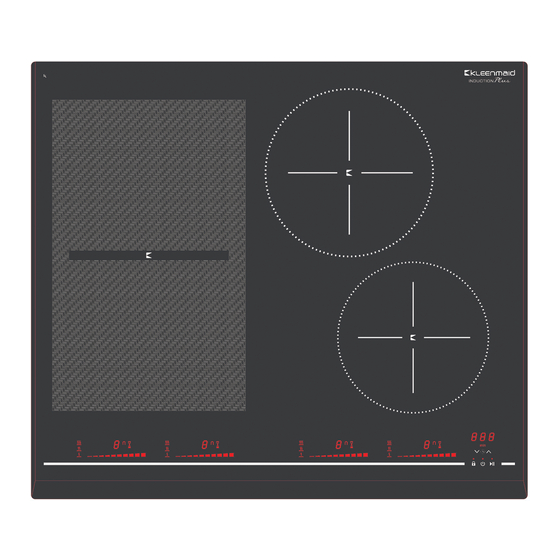
Page 8: Description Of The Appliance
2050 W 2900 W 3700 W 120 mm Rear Left 220x180 mm 2050 W 2900 W 3700 W 120 mm ICT6021 7400 W Rear Right 180 mm 1850 W 2300 W 3000 W 100 mm Front Right 180 mm 1850 W... -
Page 9: Use Of The Appliance
USE OF THE APPLIANCE Display Display Designation Description Zero The heating zone is activated. 1…9 Power level Selection of the cooking level. No pan detection No pan or inadequate pan. Heat accelerator Automatic cooking. Error message Electronic failure. Residual heat The heating zone is hot. -
Page 10: Power Selection Zone "Slider" And Timer Setting Zone
Power selection zone “SLIDER” and timer setting zone To select the power with the slider, slide your finger on the “SLIDER” zone. You can also directly access a particular level if you put your finger directly on the chosen level. Power selection zone “SLIDER”... -
Page 11: Booster Function
Booster function The Booster function [ P ] and the Double Booster [ ] adds a booster power to the selected heating zone. If this function is activated the heating zones work for 10 minutes with an ultra high Booster. Booster is useful for example to heat up rapidly big quantities of water, like rice, pasta or noodles •... -
Page 12: Automatic Cooking
• Egg timer function : Egg timer is an independent function. It stops as soon as a heating zone starts up. If the egg timer is on and the hob is switched off, the timer continues until time runs out. Action Control panel Display... -
Page 13: "Keep Warm" Function
“Keep warm” Function This function allows the cooktop to reach and automatically maintains at the temperature of approximately 42°C, approximately 70°C or approximately 94°C. This will avoid liquids overflowing and burning at the bottom of the pan. • To engage, to start the function « Keep warm » : Action Control panel Display... -
Page 14: Cooking Advice
COOKING ADVICE Pan quality Suitable materials: steel, enamelled steel, cast iron, ferromagnetic stainless-steel, aluminium with ferromagnetic bottom. Not suitable materials: aluminium and stainless-steel without ferromagnetic bottom, copper, brass, glass, ceramic, porcelain. The manufacturers specify if their products are compatible with induction. To check if pans are compatible: •... -
Page 15: Examples Of Cooking Power Setting
Examples of cooking power setting (the values below are indicative) 1 to 2 Melting Sauces, butter, chocolate, gelatine Reheating Dishes prepared beforehand 2 to 3 Simmering Rice, pudding, sugar syrup Defrosting Dried vegetables, fish, frozen products 3 to 4 Steam Vegetables, fish, meat 4 to 5 Water... -
Page 16: What To Do In Case Of A Problem
WHAT TO DO IN CASE OF A PROBLEM The hob or the cooking zone doesn’t start-up : • The connection to the network is wrong. • The protection fuse has disconnected. • The locking function is activated. • The sensitive keys are covered with grease or water. •... -
Page 17: Installation Instructions
Width Depth Ref. Thickness ICT6021 • Ensure that there is a distance of 50 mm between the hob and the wall or sides. • The hobs are classified as “Y” class for heat protection. Ideally the hob should be installed with plenty of space on either side. -
Page 18: Electrical Connection
ELECTRICAL CONNECTION • The installation of this appliance and the connection to the electrical supply should be performed by an authorised electrician. • After the installation, make sure that all the parts under tension are well protected. • The data regarding connection to the network are summarized on the rating label, underneath the hob. •... -
Page 19: Warranty And Service
Purchase even though this warranty is in place will not bind Compass Capital Services trading as Kleenmaid to repair the appliance at no charge under this warranty and will require the Purchaser to pay for the service costs in full. - Page 20 Other products available in the Kleenmaid range of appliances Washing machines Clothes dryers Dishwashers Ovens Cooktops Steam ovens Microwave ovens Built in espresso coffee machines Rangehoods Freestanding ovens Compass Capital Services Pty Limited trading as Kleenmaid ABN 96138214525 Level 2, 204 Botany Road Alexandria NSW 2015 E: help@kmaid.com.au...
Need help?
Do you have a question about the ICT6021 and is the answer not in the manual?
Questions and answers