Table of Contents
Advertisement
Quick Links
Advertisement
Table of Contents

Subscribe to Our Youtube Channel
Related Manuals for Hyundai power products HCOMP200-2


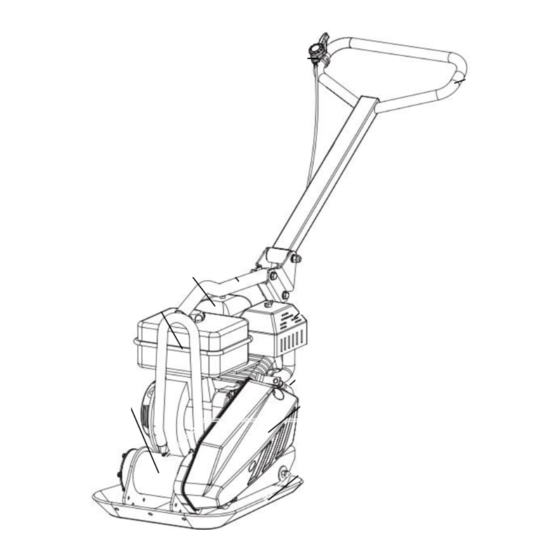
Summary of Contents for Hyundai power products HCOMP200-2
- Page 1 MODEL: HCOMP200-2...
-
Page 2: Table Of Contents
CONTENTS 1. SAFETY WARNING 2. ABOUT YOUR PRODUCT 3. ASSEMBLY 4. USE 5. MAINTENANCE 6. STORAGE 7. LIFT AND TRANSPORT 8. TROUBLE SHOOTING 9. DECLARATION OF CONFORMITY... -
Page 3: Safety Warning
1. SAFETY WARNINGS General Safety Rules Understand your Machine Read understand operator’s manual and labels affixed machine. Learn its application limitations as well the specific potential hazards peculiar to thoroughly familiar with controls and their proper operation. Know how to stop ... - Page 4 Fuel highly flammable, vapors can explode if ignited. Take precautions when using to reduce the chance of serious personal injury. When refilling draining fuel tank, use an approved fuel storage container while in a clean, well-ventilated outdoor area. Do not smoke, or allow sparks, open flames or other sources of ignition near the area while adding fuel or operating the unit.
- Page 5 the machine repaired before use. Many accidents are caused by poorly maintained equipment. Keep engine muffler free grass, leaves, excessive grease or carbon build up to reduce the chance of a fire hazard. Never douse or squirt the unit with water or any other liquid. Keep handles dry, clean and free from ...
- Page 6 SYMBOLS Read these instructions for use carefully. Wear eye protection. Wear hearing protection. Wear protective gloves. Wear safety footwear. forbidden remove or tamper with protection devices and safety devices. Keep away from rotating parts. Do not touch parts which are hot from operation. Serious burns may result. Do not smoke or have open flames.
-
Page 7: About Your Product
2. ABOUT YOUR PRODUCT Your new Vibratory Plate Compactor will more than satisfy your expectations. It has been manufactured under stringent quality standards to meet superior performance criteria. You will find it easy and safe to operate, and with proper care, it will give you many years of dependable service. - Page 8 Fuel Valve Control The fuel valve opens and closes the passage between the fuel tank and the carburetor. The fuel valve lever must be in the ON position for the engine to run. When the engine is not in use, leave the fuel valve lever in the OFF position to prevent carburetor flooding and to reduce the possibility of fuel leakage.
- Page 9 This high speed shaft revolution causes the rapid lifting and downward ramming motion of the machine as well as imparting a forward motion. Specifications Model HCOMP200-2 Plate Size 520 X 445 mm Centrifugal Force 13000 N...
-
Page 10: Assembly
3. ASSEMBLY a) Mount the handle to the chassis with the M10X95 bolt, washers and nut. b) Fix the throttle control to the upper handle as shown. Folding Wheels Kit Slide the wheels over the stub axles. Secure with hairpin retainers and flat washers. - Page 11 Three holes on the stub axle allow to adjust the distance between the wheels, pull out the pin first, adjust the wheels to the suitable distance, then tighten with the pin. iii. Pull up the spring bolt and put the upper pipe of the wheels bracket into the mounting bracket.
- Page 12 d) Engine Oil OIL HAS BEEN DRAINED FOR SHIPPING! Failure to fill engine sump with oil before starting engine will result in permanent damage and void engine warranty. Add oil according to Engine Manual.
-
Page 13: Use
4. USE a) Adding fuel: Fill the fuel tank as instructed in the separate Engine Manual; More detailed description of the engine operation and all related precautions and procedures can be found in the Engine Manual packed separately with the unit. b) Starting Engine Move the fuel valve lever to the “ON”... - Page 14 viii. While a certain amount of moisture in the soil is necessary, excessive moisture may cause soil particles to stick together and prevent good compaction. If soil is extremely wet, allow it to dry somewhat before compacting. If soil is so dry as to create dust c l o u d s w h i l e o p e r a t i n p l a t e , some moisture should be added to the ground material...
-
Page 15: Maintenance
5. MAINTENANCE a) Preventive Maintenance Turn off engine. Engine must be cool. Keep the engine’s throttle lever in its SLOW position, and remove spark plug wire from spark plug and secure. iii. Inspect the general condition of the plate compactor. Check for loose screws, m i s a l i g n m e n t b i n d i n g m o v i n g parts, cracked or... - Page 16 Push engine toward the back of the plate by turning the adjustment bolts A to remove any slack in V-belt(s). When adjusting the belt(s), make sure that the clutch pulley is in alignment with exciter pulley. iii. When the V-belt tension is correct, tighten the jam nuts B against the bracket. Tighten the engine mount bolts.
- Page 17 d) Replacing V-Belt(s) Both V-belts should be replaced at the same time because they will wear evenly through normal use. Work on one belt at a time. Loose 4 engine mount bolts (do not remove) only enough to move the engine forward.
- Page 18 iii. Remove the bolts that hold the deck to the housing. Lift entire deck with engine from housing. Remove pipe plug from top of exciter housing. Tilt housing upside down so oil drains from exciter. Examine oil for metal chips as a precaution to future problems.
- Page 19 Do not overfill - overfilling can result in excessive temperatures in the exciter. viii. Apply pipe sealant to pipe plug and reinstall into top of exciter housing. Reinstall deck, V-belt(s) and belt guard. Engine maintenance Refer to the Engine Manual included in your plate compactor for the information on engine maintenance.
-
Page 20: Storage
6. STORAGE If the plate compactor will not be used for a period longer than 30 days, following the steps below to prepare your unit for storage. 1) Drain the fuel tank completely. Stored fuel containing ethanol or MTBE can start to go stale in 30 days. - Page 21 7) Carefully fold the handle down. Do not allow control cables to become pinched or bent. 8) Store your plate compactor in upright position in a clean, dry building that has good ventilation.
-
Page 22: Lift And Transport
7. LIFT AND TRANSPORT See technical data for the weight of the machine. To avoid burns or fire hazards, let engine cool before lifting / transporting machine or storing indoors. The unit must be transported in the upright position to prevent fuel from spilling. Do not lay machine on its side or top. -
Page 23: Trouble Shooting
8. TROUBLE SHOOTING Problem Cause Remedy Engine fails to start. 1) Spark plug wire 1) Attach spark plug wire securely to disconnected. spark plug. 2) Out of fuel or stale fuel 2) Fill with clean, fresh gasoline. 3) Throttle control lever 3) Move throttle control lever to start not in correct starting position. -
Page 24: Declaration Of Conformity
Designation: VIBRATORY PLATE COMPACTOR (for applying energy to the loose soil or other materials to increase its density and load bearing capacity) Model: HCOMP200-2 Serial number: 20200910749-20200910856 The person is responsible for the technical file in EU: Olivier Patriarca... - Page 25 10. WARRANTY WARRANTY The manufacturer guarantees the product against defects in material and workmanship for a period of 2 years from the date of the original purchase. The warranty only applies if the product is for household use. The warranty does not cover breakdowns due to normal wear and tear. The manufacturer agrees to replace parts identified as defective by the designated distributor.
- Page 26 11. PRODUCT FAILURE WHAT TO DO IF MY MACHINE BREAKS DOWN? If you bought your product in a store: a) Empty the fuel tank. b) Make sure that your machine is complete with all accessories supplied, and clean! If this is not the case, the repairer will refuse the machine.
- Page 27 12. WARRANTY EXCLUSIONS THE WARRANTY DOES NOT COVER: • Start-up and setting up of the product. • Damage resulting from normal wear and tear of the product. • Damage resulting from improper use of the product. • Damage resulting from assembly or start-up not in accordance with the user manual. •...
Need help?
Do you have a question about the HCOMP200-2 and is the answer not in the manual?
Questions and answers