
Related Manuals for laerdal Serres


Summary of Contents for laerdal Serres
- Page 1 Laerdal Suction Unit Serres User Guide LSU Serres Cat.no 78 00 30 www.laerdal.com...
-
Page 3: Table Of Contents
Contents Important Information Intended Use Battery Cautions Overview User Interface Assembly - LSU Serres Suction Bag System Before Use Checklist After Use Checklist Emptying Empty LSU Serres Cleaning Clean the Cabinet Device Test Before Device Test Checklist Device Test Indicators... -
Page 4: Important Information
• Do not pump any cleaning solution or other liquids through the vacuum pump, i.e. through the Vacuum Connector. This can damage the LSU. • Use only parts and accessories supplied by Laerdal Medical or one of our authorised distributors to ensure that the LSU operates satisfactorily. -
Page 5: Battery Cautions
Battery Cautions • Only use batteries approved by Laerdal Medical. Other batteries will have problems related to the battery status indicator of the LSU, the battery operation time and safety. • The LSU must be charged between each clinical use. -
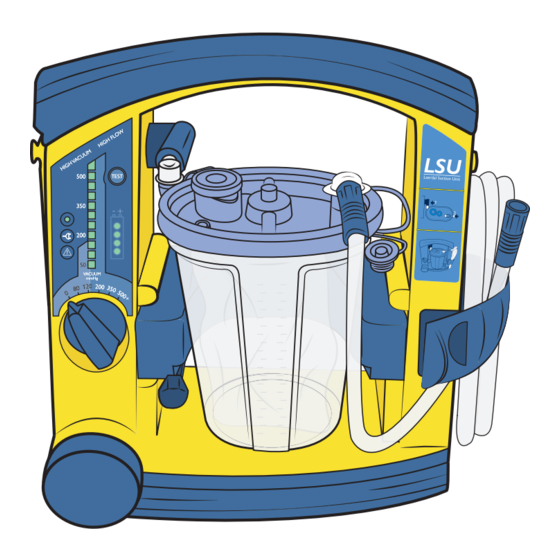
Page 6: Overview
Overview Vacuum Inlet Serres Vacuum Connector Patient Inlet Quick Reference Suction Tube Holder for Suction Tubing Canister Holder Battery Door Serres Suction Release Arm Bag with filter User Interface Canister... -
Page 7: User Interface
Overview User Interface Test Button Run the Device Power On Indicator Test program • Continuously lit - LSU is switched on. • Rapid flash (approx. Vacuum Indicator* twice per second) - Actual vacuum level Device Test in progress. during operation. •... -
Page 8: Assembly - Lsu Serres Suction Bag System
Assembly - LSU Serres Suction Bag System CLICK Note Turn the operating knob to 500+ mmHg. Block the Patient Inlet with your thumb and simultaneously push the lid down. The lid is properly installed when vacuum has reached 500 mmHg. Release the Patient Inlet and make sure that the bag is fully inflated. -
Page 9: Use
• Run Device Test. • Check that the Serres Vacuum Connector is properly connected to the LSU and to the canister. • Check that the lid of the canister is properly sealed: block patient inlet and turn on the LSU. -
Page 10: After Use Checklist
• Perform Device Test. See Device Test section. • Place the LSU on charge. Note The Serres Suction Bag system contains a hydrophilic filter that shuts off the vacuum if the canister is full or the LSU tips over. To restore the vacuum, replace the Suction bag. -
Page 11: Emptying
1000 ml, the LSU will not suction any more. If overflow of liquid from the bag into the pump is suspected, contact Laerdal Service. See Service and Maintenance section. Safely dispose of the Serres Suction bag and suction tube according to local protocols. -
Page 12: Cleaning
Clean the Serres canister if needed according to manufacturer’s instructions for use. Clean the Serres Vacuum Connector by wiping with a damp cloth or a sponge. Do not autoclave or attempt to disassemble. The Serres Vacuum Connector should be replaced regularly. -
Page 13: Device Test
Device Test The Device Test is a user initiated test program to identify whether the LSU operates satisfactorily or if it needs service. If the device is not in frequent use (i.e. less than once a month), the Device Test should be performed both on a monthly basis and after each Cleaning and Assembly process. -
Page 14: Run The Test
Device Test Run the Test 1. Press and hold the Test Button 2. Hold the Test Button in for 2 seconds. while turning the Operating Knob to 500+ mmHg. 3. The test will start immediately. 4. When LED 2 lights up, block the Patient During test mode, the Power On Suction Tubing with your thumb. - Page 15 Device Test 5. Keep the tubing blocked while LED 2, 3 and 4 light up. Release the tubing when LED 1 lights up again. Notes • If the tubing is not blocked within 2 minutes, the test will be interrupted.During interrupted device test, the Power On Indicator will flash slowly.
-
Page 16: Device Test - Evaluation
Device Test - Evaluation Evaluation of Device Test Results After the test is completed, the Vacuum Indicator will display the results. Press the Test Button to scroll through the results of each test to display the results. Test No. Test result indication Action if test failed Test 1 - •... -
Page 17: Device Test - Leakages
Device Test - Leakages Troubleshooting for Leakages If the device test has failed, check whether the system is leaking. Run the Device Test again blocking different parts in turn, until you find the failure. Test by blocking the Pump System Run the Device Test whilst blocking the outlet. -
Page 18: Battery
Battery The LSU can be operated from the internal battery, and can be operated or charged from one of the following external power sources: AC mains when used with the AC Power Cord: 100-240 VAC (50/60 Hz). DC mains when used with the DC Power Cord: 12-28 VDC. The LSU battery can also be charged in an optional External Battery Charger. -
Page 19: Charging
Battery Charge the Battery The internal rechargeable battery can be charged directly from external AC or DC power. Ensure the Operating Knob is set to “0”. Connect either external AC or DC power to the LSU and charging will start automatically. -
Page 20: Replace The Battery
Battery Replace the Battery CLICK CLICK Caution Use only batteries recommended by Laerdal Medical. When you discard the battery, dispose of safely in accordance with local protocols for Nickel Metal Hydride (NiMH) batteries. -
Page 21: Service And Maintenance
There are no user serviceable parts inside the cabinet. Do not open the LSU Cabinet. Wear and tear parts of the pump mechanism should be changed every third year. Refer servicing to personnel qualified by Laerdal Medical, or to Laerdal Medical or one of its authorised distributors. -
Page 22: Troubleshooting
If still faulty after charging completed, remove repeatedly. and replace the battery. The LSU oper- Serres Suction Bag is full. Remove and replace the Serres Suction Bag. ates, but little or no suction Patient Suction Tubing Replace the Suction Bag if the filter is blocked available. -
Page 23: Specifications
Specifications Classification Electrically powered medical suction equipment for field and transport use, according to ISO10079-1. High vacuum/high flow. The LSU is designed for use in road ambulances in accordance with IEC 60601-1-12. Not suitable for use in the presence of flammable liquids or gases. Internally powered/class ll equipment type BF, according to IEC 60601-1 The degree of protection provided by the chassis is according to IP34: •... - Page 24 Specifications Battery 12 VDC 2 Ah, NiMH, rechargeable Charging Time 3 hours for approx. 80% battery capacity, 4 hours for fully charged. Fuses The LSU has no fuses to be replaced by the user. Supply Mains When the unit is connected to SUPPLY MAINS through one of its power cords, SUPPLY MAINS voltages are present within the unit.
- Page 25 PVC coated Polyester Side Pouch PVC coated Polyester Shoulder Strap POM + Polyester Wallbracket Aluminium + Steel + PA with fibers Serres Canister Angled Connector Serres Canister Holder Serres Suction Bag PE + PP Serres Vacuum Connection PC + PBT...
- Page 26 Alternating Current Class II Equipment, according to IEC 60601-1 Type BF applied part, according to IEC 60601-1 Applied part of the LSU is the catheter (not supplied by Laerdal) which is connected to the catheter adaptor. IP34 The degree of protection provided by the chassis according to IP34...
- Page 27 • Portable RF communications equipment (including peripherals such as antenna cables and external antennas) should be used no closer than 30 cm (12 inches) to any part of the LSU, including cables specified by the Laerdal Medical. Otherwise, degradation of the performance of this equipment could result.
- Page 28 Specifications Electromagnetic Emissions Tests Emissions Test Standard or test method Compliance RF emissions CISPR 11 Group 1 Class B Harmonic emissions IEC 61000-3-2 Class A Voltage fluctuations/ IEC 61000-3-3 Complies flicker emissions Electromagnetic Immunity Tests Immunity Test Standard or test method Compliance Level Electrostatic discharge IEC 61000-4-2...
-
Page 29: Accessories And Parts
Accessories and Parts For latest version of Parts and Accessories, visit www.laerdal.com 78 00 30 XX LSU w/ Serres Suction Bag System Serres 57 151 Serres Suction Bag (1000 ml, Blue) 58 33 181 Serres Suction Tube (non-sterile CH25) 180 cm... - Page 31 Información importante Uso previsto Precauciones con la batería Descripción general Interfaz de usuario Montaje - LSU con sistema de bolsa de aspiración Serres Lista de verificación antes del uso Lista de verificación después del uso Vaciado Vaciar la LSU Serres...
-
Page 32: Información Importante
Información importante Uso previsto La Laerdal Section Unit (LSU) es un equipo médico de aspiración, portátil y con alimentación eléctrica, para aplicaciones de campo y en transportes. Está diseñado para su uso intermitente despejando secreciones, sangre o vómito de las vías respiratorias del paciente. -
Page 33: Precauciones Con La Batería
• Cargue siempre por completo la batería antes de almacenarla. • No almacene la batería cuando esté descargada. • No guarde la LSU con una batería descargada. • Laerdal recomienda cargar una batería de repuesto cada 6 meses cuando se conserva a temperatura ambiente a 25 °C. -
Page 34: Descripción General
Descripción general Entrada de vacío Conector de vacío Serres Entrada del paciente Referencia rápida Tubo de aspiración Soporte del tubo de aspiración Soporte de recipiente Puerta de la batería Bolsa de aspiración Varilla de apertura Serres con filtro Interfaz de usuario... -
Page 35: Interfaz De Usuario
Descripción general Interfaz de usuario Botón Comprobación Ejecutar el programa Indicador de encendido de comprobación del • Encendida continuamente - dispositivo. La LSU está encendida. • Parpadeo rápido (aprox. Indicador de vacío* dos veces por segundo) - Comprobación del Nivel de vacío real durante dispositivo en curso. -
Page 36: Montaje - Lsu Con Sistema De Bolsa De Aspiración Serres
Montaje - LSU con sistema de bolsa de aspiración Serres CLIC Nota Coloque el botón giratorio en la posición de 500+ mmHg. Bloquee la entrada del paciente con el pulgar y simultáneamente empuje la tapa hacia abajo. La tapa estará correctamente instalada si el vacío alcanza 500 mmHg. -
Page 37: Uso
• Ejecución de la comprobación del dispositivo. • Compruebe que el conector de vacío Serres se ha conectado correctamente a la LSU y al recipiente. • Compruebe que la tapa del recipiente está correctamente sellada: bloquee la entrada del paciente y encienda la LSU. -
Page 38: Lista De Verificación Después Del Uso
• Recargue la batería de la LSU. Nota El sistema de bolsa de aspiración Serres contiene un filtro hidrófilo que desconecta el vacío si se llena el recipiente o vuelca la LSU. Para restablecer el vacío, sustituya la bolsa de aspiración. -
Page 39: Vaciado
Laerdal. Vea la sección Servicio y mantenimiento. Deseche de forma segura la bolsa de aspiración Serres y el tubo de aspiración de acuerdo con los protocolos locales. -
Page 40: Limpieza
Conector de vacío Serres Las piezas desechables deben sustituirse después de cada uso Limpie el recipiente Serres si es necesario según las instrucciones de uso del fabricante. Limpie el conector de vacío Serres frotándolo con un paño húmedo o una esponja. -
Page 41: Comprobación Del Dispositivo
Comprobación del dispositivo La comprobación del dispositivo es un programa de comprobación iniciado por el usuario para identificar si la LSU funciona correctamente o es necesario repararla. Si el dispositivo no se utiliza con frecuencia (es decir, menos de una vez al mes), la comprobación del dispositivo deberá realizarse tanto todos los meses como después de cada proceso de limpieza y montaje. -
Page 42: Ejecución De La Comprobación
Comprobación del dispositivo Ejecución de la comprobación 1. Mantenga pulsado el botón 2. Mantenga pulsado el botón de Comprobación mientras gira el botón comprobación durante 2 segundos. giratorio hasta 500+ mmHg. 3. La comprobación comenzará 4. Cuando se ilumina el LED 2, bloquee inmediatamente. - Page 43 Comprobación del dispositivo 5. Mantenga el tubo bloqueado mientras se iluminan los LED 2, 3 y 4. Libere el tubo cuando vuelve a encenderse el LED 1. Notas • Si el tubo no se bloquea en un intervalo de 2 minutos, se interrumpirá la comprobación. Durante una comprobación del dispositivo interrumpida, el indicador de encendido parpadeará...
-
Page 44: Comprobación Del Dispositivo - Evaluación
Comprobación del dispositivo - Evaluación Evaluación de los resultados de la comprobación del dispositivo Una vez finalizada la comprobación, el indicador de vacío mostrará los resultados. Pulse el botón Comprobación para desplazarse por los resultados de cada comprobación y ver los resultados. N.º... -
Page 45: Comprobación Del Dispositivo - Fugas
Comprobación del dispositivo - Fugas Resolución de problemas de fugas Si la comprobación del dispositivo ha fallado, compruebe si el sistema tiene fugas. Ejecutar de nuevo la comprobación del dispositivo bloqueando diferentes partes por turnos, hasta que localice el fallo. Ejecutar la comprobación bloqueando el sistema de bombeo Ejecutar la comprobación del dispositivo mientras... -
Page 46: Batería
Batería Además de la batería interna, la LSU también funciona con alimentación externa y mientras se recarga la batería desde una de estas fuentes: Corriente alterna cuando se utiliza con el cable de alimentación de CA: 100-240 VCA (50/60 Hz). Corriente continua cuando se utiliza con el cable de alimentación de CC: 12-28 VCC. -
Page 47: Carga De La Batería
Batería Carga de la batería La batería interna se puede recargar directamente desde una fuente de alimentación de CA o CC externa. Asegúrese de que el botón giratorio está a “0”. La batería empieza a cargarse automáticamente al conectar la LSU a una fuente de alimentación de CA o CC externa. -
Page 48: Sustitución De La Batería
Batería Sustitución de la batería CLIC CLIC Precaución Utilice únicamente las baterías recomendadas por Laerdal Medical. Al desechar la batería, hágalo de forma segura y respetando los protocolos locales para baterías de níquel-metalhidruro (NiMH). -
Page 49: Servicio Y Mantenimiento
La carcasa no contiene piezas que el usuario pueda reparar. No abra la carcasa de la LSU. Observe que las piezas sujetas a desgaste del mecanismo de la bomba deben cambiarse cada tres años. El mantenimiento debe realizarlo personal cualificado por Laerdal Medical, Laerdal Medical o uno de sus distribuidores autorizados. -
Page 50: Resolución De Problemas
La LSU funciona, La bolsa de Retire y sustituya la bolsa de aspiración Serres. pero la potencia de aspiración Serres. aspiración es mínima El tubo de aspiración del Reemplace la bolsa de aspiración si el filtro o nula. -
Page 51: Especificaciones
Especificaciones Clasificación Equipo médico eléctrico de aspiración para aplicaciones de campo y móviles, según la norma ISO10079-1. Alto vacío/alto flujo. La LSU se ha diseñado para su uso en ambulancias de carretera según la norma IEC 60601-1-12. No adecuado para su uso en presencia de líquidos o gases inflamables. Equipo con alimentación interna/clase ll de tipo BF, según la norma IEC 60601-1 El nivel de protección que ofrece el chasis cumple la norma IP34: •... - Page 52 Especificaciones Batería 12 VCC 2 Ah, NiMH, recargable. Tiempo de carga 3 horas de aprox. 80% batería, 4 horas para carga completa. Fusibles La LSU no tiene fusibles que deba sustituir el usuario. Red eléctrica Cuando la unidad se conecta a la RED ELÉCTRICA mediante uno de sus cables de alimentación, hay tensiones de RED ELÉCTRICA en el interior de la unidad.
- Page 53 Poliéster recubierto de PVC Correa para el hombro POM + Poliéster Soporte de pared Aluminio + Acero + PA con fibras Recipiente Serres Conector acodado Soporte de recipiente Serres Bolsa de aspiración Serres PE + PP Conexión de vacío Serres PC + PBT...
- Page 54 Equipo de clase II, de acuerdo con la norma IEC 60601-1 Pieza aplicada de tipo BF, de acuerdo con la norma IEC 60601-1. La pieza aplicada de la LSU es el catéter (no suministrado por Laerdal) que se conecta al adaptador del catéter IP34 El nivel de protección que ofrece el chasis de acuerdo con la norma IP34...
- Page 55 Especificaciones Conformidad electromagnética La Laerdal Suction Unit está diseñada para el uso en los siguientes entornos: entorno de instalaciones entorno de asistencia sanitaria a domicilio y entorno de servicios médicos de urgencias. El funcionamiento esencial de la LSU se identifica como que la conexión de la manguera del paciente a la salida del escape.
- Page 56 Especificaciones Pruebas de emisiones electromagnéticas Prueba de emisiones Norma o método de comprobación Conformidad Emisiones de RF CISPR 11 Grupo 1, clase B Emisiones de armónicos IEC 61000-3-2 Clase A Fluctuaciones de tensión/ IEC 61000-3-3 Conforme emisiones intermitentes Pruebas de inmunidad electromagnética Comprobación de Norma o método Nivel de conformidad...
-
Page 57: Accesorios Y Piezas
Accesorios y piezas Para saber cuál es la última versión de las piezas y accesorios, visite www.laerdal.com 78 00 30 XX LSU con sistema de bolsa de aspiración Serres Serres 57 151 Bolsa de aspiración Serres (1 000 ml, azul) 58 33 181 Tubo de aspiración Serres (no estéril CH25) 180 cm... - Page 59 Indice Informazioni importanti Uso previsto Precauzioni per le batterie Panoramica Interfaccia utente Montaggio - Sistema sacca aspirazione LSU Serres Utilizzo Elenco di controllo pre-utilizzo Utilizzo Elenco di controllo post-utilizzo Svuotamento Svuotamento dell'unità LSU Serres Pulizia Pulizia del contenitore Test del dispositivo...
-
Page 60: Informazioni Importanti
• Non pompare alcuna soluzione detergente o altri liquidi attraverso la pompa di ventilazione, ossia nel raccordo di aspirazione perché si potrebbe danneggiare l'unità LSU. • Utilizzare solo parti e accessori forniti da Laerdal Medical o da uno dei distributori autorizzati per assicurare che l’unità LSU funzioni in modo soddisfacente. -
Page 61: Precauzioni Per Le Batterie
• Caricare sempre completamente la batteria prima dello stoccaggio. • Non stoccare la batteria quando è scarica. • Non stoccare l’unità LSU con una batteria scaricata. • Laerdal consiglia di caricare una batteria di ricambio ogni 6 mesi, se conservata a temperatura ambiente a 25 °C. -
Page 62: Panoramica
Panoramica Ingresso aspirazione Raccordo aspirazione Serres Ingresso paziente Riferimento veloce Tubo di aspirazione Supporto per tubo di aspirazione Supporto per contenitore Sportello batteria Sacca di aspirazione Dispositivo di Serres con filtro Interfaccia Contenitore sblocco utente... - Page 63 Panoramica Interfaccia utente Pulsante Test Indicatore Power On Esecuzione del programma di test del dispositivo • Sempre acceso: unità LSU accesa. Indicatore aspirazione* • Lampeggio rapido Livello di aspirazione effettivo (circa due volte al durante il funzionamento. secondo) - Test del Ciascun segmento dispositivo in corso.
-
Page 64: Montaggio - Sistema Sacca Aspirazione Lsu Serres
Montaggio - Sistema sacca aspirazione LSU Serres CLIC Nota Ruotare la manopola di funzionamento oltre 500 mmHg. Bloccare l'ingresso del paziente con il pollice e contemporaneamente spingere il coperchio verso il basso. Il coperchio è installato correttamente quando il vuoto raggiunge 500 mmHg. Rilasciare l'ingresso del paziente e... -
Page 65: Utilizzo
• Esecuzione del test del dispositivo. • Verificare che il raccordo di aspirazione Serres sia collegato correttamente all'unità LSU e al contenitore; • Verificare che il coperchio del contenitore sia ben sigillato: bloccare l'ingresso del paziente e accendere l’unità... -
Page 66: Elenco Di Controllo Post-Utilizzo
• Mettere l’unità LSU in carica. Nota Il sistema della sacca di aspirazione Serres contiene un filtro idrofilo che arresta l'aspirazione se il contenitore è pieno o se l'unità LSU si rovescia. Per ripristinare l’aspirazione, sostituire la sacca di aspirazione. -
Page 67: Svuotamento
LSU non aspirerà più. Se si sospetta una fuoriuscita di liquido dal sacco alla pompa, contattare il servizio di assistenza Laerdal. Fare riferimento alla sezione Servizio e manutenzione. Smaltire in maniera sicura la sacca e il tubo di aspirazione Serres attenendosi ai protocolli locali. -
Page 68: Pulizia
Pulire il contenitore Serres, se necessario, secondo le istruzioni del produttore. Pulire il raccordo di aspirazione Serres con un panno umido o una spugna. Non sottoporre a ciclo autoclave o tentare lo smontaggio. Il raccordo di aspirazione Serres deve essere sostituito regolarmente. -
Page 69: Test Del Dispositivo
Test del dispositivo Il test del dispositivo è un programma di test avviato dall'utente per identificare se l’unità LSU funziona in modo soddisfacente o se ha bisogno di assistenza. Se il dispositivo non è utilizzato frequentemente (meno di una volta al mese), il test del dispositivo deve essere eseguito su base mensile e dopo ogni procedura di pulizia e montaggio. -
Page 70: Esecuzione Del Test
Test del dispositivo Esecuzione del test 1. Premere e tenere premuto il 2. Tenere premuto il pulsante Test per pulsante Test mentre si posiziona la 2 secondi. manopola di funzionamento su più di 500 mmHg. 3. Il test inizierà immediatamente. 4. - Page 71 Test del dispositivo 5. Tenere il tubo bloccato mentre i LED 2, 3 e 4 si accendono. Rilasciare il tubo quando il LED 1 si riaccende. Note • Se il tubo non viene bloccato entro 2 minuti, il test sarà interrotto. In caso di test del dispositivo interrotto, l'indicatore Power On lampeggerà...
-
Page 72: Test Del Dispositivo - Valutazione
Test del dispositivo - Valutazione Valutazione dei risultati dei test sul dispositivo Dopo aver completato il test, l'indicatore del vuoto visualizzerà i risultati. Premere il pulsante Test per far scorrere i risultati di ciascun test e visualizzarli. Num. test Indicazione risultato test Azione se il test non è riuscito Test 1 - •... -
Page 73: Test Del Dispositivo - Perdite
Test del dispositivo - Perdite Risoluzione di problemi relativi a perdite Se il test del dispositivo non è riuscito, controllare se il sistema presenta perdite. Eseguire nuovamente il test del dispositivo bloccando le varie parti a turno, finché si identifica il guasto. Eseguire il test bloccando la pompa del sistema Eseguire il test del dispositivo mentre si blocca l’uscita. -
Page 74: Batteria
Batteria È possibile utilizzare l’unità LSU con batteria interna, che può essere usata o caricata da una delle seguenti fonti di alimentazione esterna: rete CA se utilizzata con il cavo di alimentazione CA: 100-240 VCA (50/60 Hz). rete CC se utilizzata con il cavo di alimentazione CC: 12-28 VCC. La batteria dell’unità... -
Page 75: Ricarica
Batteria Carica della batteria La batteria interna ricaricabile può essere caricata direttamente da una fonte di corrente esterna CA o CC. Verificare che la manopola di funzionamento sia impostata su "0". Collegare l'alimentazione CA o CC esterna all’unità LSU e la ricarica si avvierà automaticamente. -
Page 76: Sostituzione Della Batteria
Batteria Sostituzione della batteria CLIC CLIC Attenzione Usare esclusivamente batterie consigliate da Laerdal Medical. Smaltire la batteria in maniera sicura, attenendosi ai protocolli locali per le batterie a nichel-metallo idruro (NiMH). -
Page 77: Servizio E Manutenzione
Non aprire la struttura dell'unità LSU. Le parti usurabili e soggette a strappi del meccanismo della pompa devono essere cambiate ogni tre anni. Rivolgersi a personale qualificato di Laerdal Medical o a Laerdal Medical o a uno dei distributori autorizzati. -
Page 78: Risoluzione Dei Problemi
L'unità LSU La sacca di aspirazione Rimuovere e sostituire la sacca di funziona, ma Serres è piena. aspirazione Serres. l'aspirazione Tubo di aspirazione Sostituire la sacca di aspirazione se il filtro è disponibile è... -
Page 79: Specifiche
Specifiche Classificazione Attrezzature di aspirazione medica elettriche per uso sul campo e durante trasporto, secondo lo standard ISO10079-1 Aspirazione elevata/flusso elevato. L’unità LSU è progettata per l'uso in ambulanze stradali secondo la norma IEC 60601-1-12. Non adatta all'uso in presenza di liquidi o gas infiammabili. Apparecchiatura ad alimentazione interna/classe II di tipo BF, in conformità... - Page 80 Specifiche Batteria 12 VCC 2 Ah, NiMH, ricaricabile Tempo di ricarica 3 ore per circa l’80% della capacità della batteria, 4 ore per la ricarica completa. Fusibili L'unità LSU non dispone di fusibili sostituibili dall'utente. Rete di alimentazione Quando l'unità è collegata alla RETE DI ALIMENTAZIONE tramite uno dei cavi di alimentazione, le tensioni della RETE DI ALIMENTAZIONE sono presenti all'interno dell'unità.
- Page 81 Poliestere rivestito in PVC Cinghia per tracolla POM + poliestere Supporto da parete Alluminio + acciaio + PA con fibre Contenitore Serres Raccordo angolato Supporto contenitore Serres Sacca di aspirazione Serres PE + PP Connessione ventosa Serres PC + PBT...
- Page 82 Corrente alternata Apparecchiatura di classe II, secondo lo standard IEC 60601-1 Parte applicata di tipo BF, secondo lo standard IEC 60601-1 La parte applicata dell'unità LSU è il catetere (non fornito da Laerdal) che è collegato al proprio adattatore. IP34 Grado di protezione fornita dallo chassis secondo il grado di protezione IP34 Il prodotto è...
- Page 83 • Le apparecchiature di comunicazione RF portatili (incluse le periferiche come i cavi dell'antenna e le antenne esterne) devono essere utilizzate a una distanza minima di 30 cm da qualsiasi parte dell’unità LSU, compresi i cavi specificati da Laerdal Medical. In caso contrario, potrebbe verificarsi un degrado delle prestazioni dell'apparecchiatura.
- Page 84 Specifiche Test di emissioni elettromagnetiche Test di emissioni Standard o metodo di test Conformità Emissioni RF CISPR 11 Gruppo 1 classe B Emissioni armoniche IEC 61000-3-2 Classe A Fluttuazioni di tensione/flicker IEC 61000-3-3 Conforme Test di immunità elettromagnetica Test immunità Standard o metodo di test Livello di conformità...
-
Page 85: Parti E Accessori
Parti e accessori Per l'ultima versione delle parti e degli accessori, visitare il sito www.laerdal.com 78 00 30 XX Unità LSU con sistema sacca aspirazione Serres Serres 57 151 Sacca aspirazione Serres (1000 ml, blu) 58 33 181 Tubo aspirazione Serres (non sterile CH 25) 180 cm... - Page 87 Table des matières Informations importantes Utilisation prévue Mises en garde relatives à la batterie Présentation générale Interface utilisateur Assemblage - Système de poche d'aspiration Serres Utilisation Liste de vérification avant utilisation Utilisation Liste de vérification après utilisation Vidange Vidange du LSU Serres...
-
Page 88: Informations Importantes
• Ne pas pomper de solution nettoyante ou d'autres liquides, quels qu'ils soient, avec la pompe à vide, c'est‑à‑dire dans le connecteur de vide, sous peine d'endommager le LSU. • Utiliser exclusivement les pièces détachées et accessoires fournis par Laerdal Medical ou l'un de nos distributeurs agréés afin de garantir le bon fonctionnement du LSU. -
Page 89: Mises En Garde Relatives À La Batterie
• Ne pas stocker la batterie lorsqu'elle est déchargée. • Ne pas stocker le LSU avec une batterie déchargée. • Laerdal recommande de charger une batterie de secours tous les 6 mois en cas de stockage à température ambiante à 25 °C. -
Page 90: Présentation Générale
Présentation générale Entrée du vide Connecteur de vide Serres Arrivée patient Référence rapide Tubulure d'aspiration Support pour tubulure d'aspiration Support à bocal Couvercle du logement de la batterie Poche d'aspiration Levier de déverrouillage Serres avec filtre Interface utilisateur Bocal... -
Page 91: Interface Utilisateur
Présentation générale Interface utilisateur Bouton Test Voyant d'alimentation Exécution du • Allumé en continu - programme de tests Le LSU est allumé. du dispositif • Clignotement rapide (environ deux fois par Indicateur de vide* seconde) - Test du Niveau de vide réel pendant dispositif en cours. -
Page 92: Assemblage - Système De Poche D'aspiration Serres
Assemblage - Système de poche d'aspiration Serres CLIQUER Remarque Tourner le bouton de commande sur 500+ mmHg. Boucher l'arrivée patient avec le pouce tout en appuyant sur le couvercle. Le couvercle est correctement installé lorsque le vide atteint 500 mmHg. Dégager l'arrivée patient et veiller à ce que la poche soit complètement gonflée. -
Page 93: Utilisation
• Réaliser le test du dispositif. • Vérifier que le connecteur de vide Serres est correctement raccordé au LSU et au bocal. • Vérifier que le couvercle du bocal est bien étanche : bloquer l'arrivée patient et allumer le LSU. -
Page 94: Liste De Vérification Après Utilisation
• Mettre le LSU en charge. Remarque Le système de poche d'aspiration Serres contient un filtre hydrophile qui bloque le vide si le bocal est plein ou si le LSU se renverse. Pour rétablir le vide, remplacer la poche d'aspiration. -
Page 95: Vidange
En cas de suspicion de débordement du liquide de la poche dans la pompe, il convient de contacter le service Laerdal. Voir la section Réparations et maintenance. Jeter avec précaution la tubulure d'aspiration et le système de poche d'aspiration Serres selon les protocoles locaux. -
Page 96: Nettoyage
Nettoyer le bocal Serres, si nécessaire, conformément au mode d'emploi du fabricant. Nettoyer le connecteur de vide Serres en l'essuyant à l'aide d'un chiffon ou d'une éponge humide. Ne pas passer à l'autoclave, ni tenter de le démonter. Le connecteur de vide Serres doit être remplacé... -
Page 97: Test Du Dispositif
Test du dispositif Le test du dispositif est un programme de tests initié par l'utilisateur, qui permet de déterminer si le LSU fonctionne correctement ou s'il nécessite des réparations. Si le dispositif n'est pas souvent utilisé (à savoir moins d'une fois par mois), le test du dispositif doit être effectué... -
Page 98: Réalisation Du Test
Test du dispositif Réalisation du test 1. Appuyer sur le bouton Test et le 2. Maintenir le bouton Test enfoncé maintenir enfoncé tout en tournant le pendant 2 secondes. bouton de commande sur 500+ mmHg. 3. Le test démarre immédiatement. 4. - Page 99 Test du dispositif 5. Laisser la tubulure bloquée pendant que les DEL 2, 3 et 4 s'allument. Dégager la tubulure lorsque la DEL 1 se rallume. Remarques • Si la tubulure n'est pas bloquée dans un délai de 2 minutes, le test sera interrompu. Lorsque le test du dispositif est interrompu, le voyant d'alimentation clignote lentement.
-
Page 100: Test Du Dispositif - Évaluation
Test du dispositif - Évaluation Évaluation des résultats du test du dispositif Une fois le test réalisé, l'indicateur de vide affiche les résultats. Pour parcourir les résultats de chaque test et les afficher, appuyer sur le bouton Test. Test n° Indications des Action à... -
Page 101: Test Du Dispositif - Fuites
Test du dispositif - Fuites Dépannage en cas de fuites En cas d'échec du test du dispositif, vérifier si le système fuit. Réaliser à nouveau le test du dispositif en obstruant tour à tour différentes pièces jusqu'à l'identification de la défaillance. -
Page 102: Batterie
Batterie Le LSU peut fonctionner à partir de la batterie interne, ou bien fonctionner ou être chargé à partir de l'une des sources d'alimentation externe suivantes: Alimentation CA avec le cordon d'alimentation CA : 100-240 VCA (50/60 Hz). Alimentation CC avec le cordon d'alimentation CC : 12-28 VCC. Il est également possible de charger la batterie du LSU à... -
Page 103: Charge De La Batterie
Batterie Charge de la batterie La batterie interne rechargeable peut être chargée directement à partir d'une source d'alimentation externe, en courant alternatif ou courant continu. S'assurer que le bouton de commande est en position « 0 ». Brancher le cordon externe CA ou le cordon externe CC sur le LSU. La mise en charge commence automatiquement. -
Page 104: Remplacement De La Batterie
Batterie Remplacement de la batterie CLIQUER CLIQUER Mise en garde Utiliser uniquement des batteries recommandées par Laerdal Medical. Jeter la batterie confor‑ mément aux protocoles locaux applicables aux batteries nickel‑hydrure métallique (NiMH). -
Page 105: Réparations Et Maintenance
La coque ne comporte aucune pièce réparable par l'utilisateur. Ne pas ouvrir la coque du LSU. Les pièces abîmées et usées du mécanisme de la pompe doivent être changées tous les trois ans. Adresser toute demande de réparation au personnel qualifié de Laerdal Medical, ou à Laerdal Medical ou ses distributeurs agréés. -
Page 106: Dépannage
Le LSU La poche d'aspiration Retirer et remplacer la poche d'aspiration fonctionne, mais Serres est pleine. Serres. l'aspiration est La tubulure d'aspiration Remplacer la poche d'aspiration si le filtre nulle ou faible. -
Page 107: Caractéristiques Techniques
Caractéristiques techniques Classification Appareil d'aspiration électrique, à usage médical, destiné à être utilisé au cours du transport ou sur site selon la norme ISO 10079-1. Niveau de vide élevé/débit d'air élevé. Le LSU est destiné à être utilisé pendant les trajets en ambulance, conformément à la norme CEI 60601-1-12. - Page 108 Caractéristiques techniques Batterie 12 VCC 2 Ah, NiMH rechargeable Temps de charge 3 heures pour une batterie à environ 80 % de sa capacité, 4 heures pour une batterie pleine. Fusibles Aucun fusible du LSU n'est à remplacer par l'utilisateur. Alimentation secteur Lorsque l'unité...
- Page 109 Poche latérale de rangement Polyester enduit de PVC Bandoulière POM + Polyester Support mural Aluminium + Acier + PA avec fibres Bocal Serres Connecteur coudé Support à bocal Serres Poche d'aspiration Serres PE + PP Connecteur de vide Serres PC + PBT...
- Page 110 Équipement de classe II, conforme à la norme CEI 60601-1 Pièce appliquée de type BF, conformément à la norme CEI 60601-1. La pièce appliquée du LSU est la sonde d'aspiration (non fournie par Laerdal) qui est connecté à l'adaptateur correspondant.
- Page 111 Caractéristiques techniques Conformité électromagnétique Le Laerdal Suction Unit (LSU) est destiné à être utilisé dans les environnements suivants : établissements de santé et services médicaux d'urgence. Les performances essentielles du LSU sont indiquées par le branchement du tuyau raccordé au patient sur l'orifice d'évacuation d'air. Ce branchement peut être empêché...
- Page 112 Caractéristiques techniques Test d'émissions électromagnétiques Test d'émissions Norme ou méthode de test Conformité Émissions RF CISPR 11 Groupe 1 Classe B Émissions harmoniques CEI 61000-3-2 Classe A Fluctuations de la tension/ CEI 61000-3-3 En conformité émissions de scintillement Tests d'immunité électromagnétique Essai d'immunité...
-
Page 113: Pièces Détachées Et Accessoires
LSU avec système de poche d'aspiration Serres Serres 57 151 Poche d'aspiration Serres (1 000 ml, bleue) 58 33 181 Tubulure d'aspiration Serres (non stérile CH25) de 180 cm 78 12 06 Connecteur de vide Serres 78 04 12 Tubulure patient jetable de 180 cm... - Page 115 Inhoud Belangrijke informatie Beoogd gebruik Aandachtspunten batterij Overzicht Gebruikersinterface Montage - LSU met Serres-aspiratiezak Gebruik Checklist voor gebruik Gebruik Checklist na gebruik Ledigen LSU Serres ledigen Reinigen De behuizing reinigen Apparaattest Checklist voorafgaand aan apparaattest Indicatoren apparaattest De test uitvoeren...
-
Page 116: Belangrijke Informatie
• Pomp geen reinigingsmiddel of andere vloeistoffen door de vacuümpomp, m.a.w. de vacuümconnector. Dit kan de LSU beschadigen. • Gebruik uitsluitend door Laerdal Medical of door één van de erkende distributeurs geleverde onderdelen en accessoires om te zorgen dat de LSU naar behoren werkt. -
Page 117: Aandachtspunten Batterij
• Berg de batterij niet op als deze leeg is. • Berg de LSU niet op met een lege batterij. • Laerdal raadt aan om een reservebatterij iedere 6 maanden op te laden als deze bewaard wordt bij een kamertemperatuur van 25 °C. -
Page 118: Overzicht
Overzicht Vacuümingang Serres-vacuümconnector Patiëntingang Beknopte handleiding Aspiratieslang Houder voor aspiratieslang Recipiënthouder Batterijklep Serres-aspiratiezak Ontgrendelingsarm met filter Gebruikersinterface Recipiënt... -
Page 119: Gebruikersinterface
Overzicht Gebruikersinterface Testknop Het testprogramma Aan-uitlampje van het apparaat • Brandt - LSU is ingeschakeld. uitvoeren • Snel knipperen (ca. twee keer per seconde) Vacuümindicator* - Apparaattest wordt Werkelijk vacuümniveau uitgevoerd. tijdens gebruik. Ieder volledig • Langzaam knipperen brandende segment staat (ca. -
Page 120: Montage - Lsu Met Serres-Aspiratiezak
Montage - LSU met Serres-aspiratiezak KLIK Opmerking Zet de aan-uitknop op 500+ mmHg. Blokkeer de patiëntingang met uw duim en duw tegelijkertijd het deksel omlaag. Het deksel is correct geplaatst als er een vacuüm is bereikt van 500 mmHg. Laat de... -
Page 121: Gebruik
• Voer de apparaattest uit. • Controleer of de Serres-vacuümconnector correct is aangesloten op de LSU en de recipiënt. • Controleer of het deksel van de recipiënt correct is afgesloten: blokkeer de patiëntingang en schakel de LSU in. Er wordt vacuüm opgebouwd als alle onderdelen correct zijn aangesloten. -
Page 122: Checklist Na Gebruik
• Voer een apparaattest uit. Zie de sectie Apparaattest. • Laad de LSU op. Opmerking De LSU met Serres-aspiratiezak heeft een hydrofiele filter die het vacuüm uitschakelt als de recipiënt vol is of als de LSU omvalt. Om het vacuüm te herstellen, vervangt u de aspiratiezak. -
Page 123: Ledigen
Als u vermoedt dat er vloeistof uit de aspiratiezak in de pomp is terecht gekomen, neem dan contact op met uw plaatselijke vertegenwoordiger van Laerdal. Zie sectie Service en onderhoud. Gooi de Serres-aspiratiezak en aspiratieslang op een veilige manier en volgens de plaatselijke voorschriften weg. -
Page 124: Reinigen
De wegwerponderdelen moeten na ieder gebruik worden vervangen. Reinig de Serres-recipiënt indien nodig volgens de gebruiksinstructies van de fabrikant. Reinig de Serres-vacuümconnector door deze met een vochtige doek of spons af te vegen. Niet autoclaveren en niet uit elkaar proberen te halen. De Serres-vacuümconnector moet regelmatig worden vervangen. -
Page 125: Apparaattest
Apparaattest De apparaattest is een door de gebruiker geïnitieerd testprogramma om te achterhalen of de LSU naar behoren werkt of dat er onderhoud vereist is. Als het apparaat niet regelmatig wordt gebruikt (minder dan eenmaal per maand), dan moet de apparaattest maandelijks en na ieder reinigings- en montageproces worden uitgevoerd. -
Page 126: De Test Uitvoeren
Apparaattest De test uitvoeren 1. Houd de testknop ingedrukt 2. Houd de testknop 2 seconden ingedrukt. en draai de aan-uitknop naar 500+ mmHg. 3. De test wordt meteen uitgevoerd. 4. Als controlelampje 2 gaat branden, blokkeert Tijdens de testmodus knippert het u de aspiratieslang van de patiënt met uw duim. - Page 127 Apparaattest 5. Houd de slang geblokkeerd als controlelampje 2, 3 en 4 gaan branden. Laat de slang los als controlelampje 1 weer gaat branden. Opmerkingen • Als de slang niet binnen 2 minuten wordt geblokkeerd, wordt de test onderbroken. Tijdens een onderbroken apparaattest knippert het aan-uitlampje langzaam.
-
Page 128: Apparaattest - Evaluatie
Apparaattest - Evaluatie De resultaten van de apparaattest evalueren Als de test is voltooid, worden de resultaten weergegeven op de vacuümindicator. Druk de testknop in om door de resultaten van de tests te bladeren en ze weer te geven. Testnummer Indicatie testresultaat Actie indien test niet geslaagd Test 1 –... -
Page 129: Apparaattest - Lekkages
Apparaattest - Lekkages Probleemoplossing bij lekkages Als de apparaattest niet geslaagd is, controleert u of het systeem lekt. Voer de apparaattest nog een keer uit en blokkeer om de beurt verschillende onderdelen, totdat u de fout hebt gevonden. Test door het pompsysteem te blokkeren Voer de apparaattest uit terwijl u de uitgang blokkeert. -
Page 130: Batterij
Batterij De LSU kan worden gebruikt met de interne batterij, en kan worden gebruikt of opgeladen met een van de volgende externe voedingsbronnen: AC-stopcontact indien gebruikt met het AC-stroomsnoer: 100-240 VAC (50/60 Hz). DC-stopcontact indien gebruikt met het DC-stroomsnoer: 12-28 VDC. De batterij van de LSU kan ook worden opgeladen in een optionele externe batterijlader. -
Page 131: Opladen
Batterij De batterij opladen De interne oplaadbare batterij kan rechtstreeks opgeladen worden via AC/DC-stroom. Zorg dat de aan-uitknop op '0’ staat. Sluit externe AC/DC-stroom aan op de LSU en het opladen zal automatisch starten. Tijdens het opladen geeft de indicator voor de batterijstatus de batterijcapaciteit bij benadering weer. -
Page 132: De Batterij Vervangen
Batterij De batterij vervangen KLIK KLIK Opgelet Gebruik alleen door Laerdal Medical aanbevolen batterijen. Als u de batterij weggooit, doet u dit in overeenstemming met de lokale voorschriften voor nikkel-metaalhybride (NiMH) batterijen. -
Page 133: Service En Onderhoud
Controleer de bevestigingsbeugels regelmatig op slijtage. Vervang ze als ze versleten zijn. Garantie De LSU wordt geleverd met vijf (5) jaar beperkte garantie*. Zie de bijgesloten 'Laerdal algemene garantie’ voor de algemene voorwaarden. De garantie is ook beschikbaar op www.laerdal.com. -
Page 134: Probleemoplossing
Als het probleem nog steeds niet is opgelost nadat de LSU is opgeladen, verwijdert en vervangt u de batterij. De LSU werkt, Serres-aspiratiezak is vol. Verwijder en vervang de Serres-aspiratiezak. maar er is weinig of geen aspiratie. Aspiratieslang van de Vervang de aspiratiezak als de filter geblokkeerd patiënt gedraaid of... -
Page 135: Specificaties
Specificaties Classificatie Elektrisch aangedreven medische aspiratietoestellen voor veld- en transportgebruik, in overeenstemming met ISO10079-1. Hoog vacuüm/hoge flow. De LSU is bedoeld voor gebruik in ambulances in overeenstemming met IEC 60601-1-12. Niet geschikt voor gebruik in aanwezigheid van ontvlambare vloeistoffen of gassen. Intern aangedreven/klasse ll apparatuur, type BF, in overeenstemming met IEC 60601-1 De door het chassis geboden beschermingsgraad is in overeenstemming met IP34: •... - Page 136 Specificaties Batterij 12 VDC 2 Ah, NiMH, oplaadbaar Laadtijd 3 uur voor circa 80% batterijcapaciteit, 4 uur om volledig op te laden. Zekeringen De LSU heeft geen zekeringen die door de gebruiker vervangen moeten worden. Netvoeding Als de eenheid op de NETVOEDING is aangesloten via één van de netsnoeren, zijn NETVOEDINGSSPANNINGEN aanwezig in de eenheid.
- Page 137 Vacuümconnector Silicone Adapter aspiratiekatheter Houder voor adapter aspiratiekatheter Draagtas Polyester met PVC-laag Zijvak Polyester met PVC-laag Schouderriem POM + polyester Muurbeugel Aluminium + staal + PA met vezels Serres-recipiënt Hoekconnector Houder Serres-recipiënt Serres-aspiratiezak PE + PP Serres-vacuümverbinding PC + PBT...
- Page 138 (RoHS 2). Waarschuwing: Delen van dit product zijn bedoeld voor gebruik door één patiënt. Niet hergebruiken. Hergebruik geeft een verhoogd risico op kruisbesmetting, verminderde resultaten en/of verminderd functioneren. Laerdal Medical is niet verantwoordelijk voor de gevolgen van hergebruik. Productiedatum Fabrikant...
- Page 139 Specificaties Elektromagnetische conformiteit De Laerdal Suction Unit is bedoeld voor gebruik in de volgende omgevingen: professionele zorginstellingen en ambulancediensten. De essentiële prestaties van de LSU worden geïdentificeerd als de aansluiting van de patiëntslang op de uitlaatopening. Dit wordt voorkomen door codering van de uitlaat en het identificeren van de uitgang via een etiket op het apparaat.
- Page 140 Specificaties Elektromagnetische emissietests Emissietests Norm of testmethode Naleving RF-emissie CISPR 11 Groep 1, klasse B Harmonische emissie IEC 61000-3-2 Klasse A Spanningsschommelingen/ IEC 61000-3-3 In overeenstemming flikkering Elektromagnetische immuniteitstests Immuniteitstest Norm of testmethode Nalevingsniveau Elektrostatische ontlading IEC 61000-4-2 ± 8 kV contact ±...
-
Page 141: Accessoires En Onderdelen
Accessoires en onderdelen Ga voor de nieuwste onderdelen en accessoires naar www.laerdal.com 78 00 30 XX LSU met Serres-aspiratiezak Serres 57 151 Serres-aspiratiezak (1000 ml, blauw) 58 33 181 Serres-aspiratieslang (niet-steriel CH25) 180 cm 78 12 06 Serres-vacuümconnector 78 04 12 Patiëntaspiratieslang voor eenmalig gebruik 180 cm... - Page 143 Inhaltsverzeichnis Wichtige Informationen Verwendungszweck Sicherheitshinweise zur Batterie Übersicht Bedienungsoberfläche Montage – LSU-Serres-Absaugbeutelsystem Verwendung Checkliste vor dem Gebrauch Verwendung Checkliste nach dem Gebrauch Ausleeren LSU-Serres-System leeren Reinigung Reinigung des Gehäuses Gerätetest Checkliste vor dem Durchführen des Gerätetests Gerätetestanzeigen Ausführen des Tests Gerätetest –...
-
Page 144: Wichtige Informationen
Laerdal Medical oder einem seiner autorisierten Händler geliefert wurde. • Übergelaufene Absaugflüssigkeit kann das Gerät beschädigen. Wenn vermutet wird, dass Flüssigkeit vom Kanister in die Pumpe übergelaufen ist, wenden Sie sich an Ihren Laerdal Medical-Vertreter vor Ort. -
Page 145: Sicherheitshinweise Zur Batterie
Wichtige Informationen Akku Sicherheitshinweise • Verwenden Sie ausschließlich von Laerdal Medical zugelassene Batterien. Bei Verwendung anderer Batterien können Probleme mit der Batterieladestandsanzeige der LSU und mit der Batteriebetriebszeit sowie Sicherheitsprobleme auftreten. • Die LSU muss nach jeder klinischen Verwendung aufgeladen werden. -
Page 146: Übersicht
Übersicht Vakuum-Zuleitung Serres-Vakuum-Anschluss Patienten-Zuleitung Kurzbeschreibung Absaugschlauch Halter für Absaugschlauch Kanisterhalter Batterieabdeckung Serres-Absaugbeutel mit Filter Bedienungsoberfläche Entriegelungsarm Kanister... -
Page 147: Bedienungsoberfläche
Übersicht Bedienungsoberfläche Test-Taste Zeigt an, dass das Gerät Ausführen des eingeschaltet ist Gerätetestprogramms • Leuchtet dauerhaft: LSU ist eingeschaltet. Saugleistungsanzeige* • Schnelles Blinken Tatsächliche Vakuumstufe (ca. zweimal pro Sekunde): während des Betriebs. Jedes Gerätetest läuft. vollständig erleuchtete • Langsames Blinken (ca. -
Page 148: Montage - Lsu-Serres-Absaugbeutelsystem
Montage – LSU-Serres-Absaugbeutelsystem KLICK Hinweis Drehen Sie den Bedienknopf auf 500+ mmHg. Schließen Sie die Patientenzuleitung mit dem Finger und drücken Sie gleichzeitig den Deckel nach unten. Der Deckel ist ordnungsgemäß eingesetzt, wenn das Vakuum 500 mmHg erreicht hat. Öffnen Sie die Patientenzuleitung,... -
Page 149: Verwendung
Batterie betreiben möchten, überprüfen Sie, ob die Batterie eingesetzt ist. • Führen Sie den Gerätetest aus. • Prüfen Sie, ob der Serres-Vakuum-Anschluss ordnungsgemäß an die LSU und an den Kanister angeschlossen ist. • Prüfen Sie, ob der Kanisterdeckel ordnungsgemäß abgedichtet ist: Blockieren Sie die Patientenzuleitung, und schalten Sie die LSU ein. -
Page 150: Checkliste Nach Dem Gebrauch
• Führen Sie den Gerätetest durch. Siehe Abschnitt „Gerätetest“. • Laden Sie die LSU auf. Hinweis Das Serres-Absaugbeutelsystem enthält einen hydrophilen Filter, der das Vakuum abschaltet, wenn der Kanister voll ist oder die LSU umkippt. Tauschen Sie den Absaugbeutel zum Wiederherstellen des Vakuums aus. -
Page 151: Ausleeren
1.000-ml-Marke erreicht, beendet die LSU den Absaugvorgang. Wenn vermutet wird, dass Flüssigkeit vom Beutel in die Pumpe übergelaufen ist, wenden Sie sich an den Kundendienst von Laerdal. Vgl. Abschnitt Service und Wartung. Entsorgen Sie den Serres-Absaugbeutel und den Absaugschlauch gemäß den... -
Page 152: Reinigung
Der Serres-Kanister muss bei Bedarf entsprechend der Gebrauchsanweisung des Herstellers gereinigt werden. Reinigen Sie den Serres-Vakuum-Anschluss, indem Sie ihn mit einem feuchten Tuch oder einem Schwamm abwischen. Er darf weder autoklaviert noch zerlegt werden. Der Serres-Vakuum-Anschluss muss regelmäßig ausgewechselt werden. -
Page 153: Gerätetest
Gerätetest Der Gerätetest ist ein vom Benutzer initiiertes Testprogramm, mit dessen Hilfe herausgefunden werden kann, ob die LSU zufriedenstellend arbeitet oder ob sie eine Wartung/Reparatur benötigt. Wenn das Gerät nur selten benutzt wird (z. B. weniger als einmal im Monat), sollte der Gerätetest sowohl monatlich als auch nach jeder Reinigung und Montage durchgeführt werden. -
Page 154: Ausführen Des Tests
Gerätetest Ausführen des Tests 1. Drücken und halten Sie den TEST-Knopf, 2. Halten Sie den TEST-Knopf während Sie den Bedienknopf auf zwei Sekunden lang gedrückt. 500+ mmHg drehen. 3. Der Test wird direkt gestartet. Im 4. Sobald LED 2 aufleuchtet, blockieren Testmodus blinkt die Ein-Anzeige schnell. - Page 155 Gerätetest 5. Blockieren Sie den Schlauch, während LED 2, 3 und 4 aufleuchten. Lassen Sie den Schlauch los, wenn LED 1 erneut aufleuchtet. Hinweise • Wird der Schlauch nicht innerhalb von 2 Minuten blockiert, wird der Test unterbrochen. Während der Unterbrechung des Gerätetests blinkt die Ein-Anzeige langsam. •...
-
Page 156: Gerätetest - Auswertung
Gerätetest – Auswertung Auswertung der Ergebnisse des Gerätetests Nach Abschluss des Tests zeigt die Vakuumanzeige die Ergebnisse an. Drücken Sie den TEST-Knopf, um die einzelnen Testergebnisse nacheinander aufzurufen. Test-Nr. Anzeige Testergebnis Maßnahmen bei fehlgeschlagenem Test Test 1: • Überprüfen Sie, ob Blockaden vorliegen Blockierungen (verdrehte Schläuche, verstopfter oder blockierter Filter im Einsatz), und führen... -
Page 157: Gerätetest - Leckagen
Gerätetest – Leckagen Fehlersuche nach Leckagen Falls das System den Gerätetest nicht bestanden hat, überprüfen Sie es auf Leckagen. Führen Sie den Gerätetest erneut durch und blockieren Sie dabei abwechselnd verschiedene Teile, bis Sie den Fehler finden. Test durch Blockieren des Pumpsystems Führen Sie den Gerätetest durch, während Sie den Auslass blockieren. -
Page 158: Batterie
Batterie Die LSU kann sowohl über die eingebaute Batterie betrieben als auch über die folgenden externen Stromquellen aufgeladen oder betrieben werden: Wechselspannung bei Gebrauch des Wechselstromkabels: 100–240 VAC (50/60 Hz). Gleichstrom bei Gebrauch des Gleichstromkabels: 12–28 VDC. Die LSU-Batterie kann zudem in einem als optionales Zubehör erhältlichen externen Batterieladegerät aufgeladen werden. - Page 159 Batterie Batterie laden Die interne wiederaufladbare Batterie kann direkt über eine externe Wechsel- oder Gleichstromquelle aufgeladen werden. Stellen Sie den Betriebsknopf auf „0“. Schließen Sie die LSU an eine externe Wechsel- oder Gleichstromquelle an. Der Ladevorgang wird automatisch gestartet. Während des Aufladens zeigt die Batteriezustandsanzeige die ungefähr erreichte Batteriekapazität an.
-
Page 160: Auswechseln Der Batterie
Batterie Auswechseln der Batterie KLICK KLICK Sicherheitshinweis Verwenden Sie ausschließlich von Laerdal Medical empfohlene Batterien. Entsorgen Sie leere Batterien entsprechend den örtlichen Bestimmungen für versiegelte Bleisäure- oder Nickel-Metallhydrid (NiMH)-Batterien. -
Page 161: Service Und Wartung
Innerhalb des Gehäuses befinden sich keine Teile, die vom Benutzer selbst gewartet bzw. repariert werden können. Das LSU-Gehäuse darf nicht geöffnet werden. Verschleißteile des Pumpenmechanismus sollten alle drei Jahre ersetzt werden. Überlassen Sie den Service einem durch Laerdal Medical qualifizierten Personal, Laerdal Medical oder einem unserer autorisierten Händler. Befestigungsklammern Die Befestigungsklammern sind dafür vorgesehen, die LSU in der optional erhältlichen... -
Page 162: Fehlerbehebung
Wenn der Fehler nach dem Aufladen nicht Vorderseite blinken behoben ist, ersetzen Sie die Batterie. wiederholt auf. Die LSU läuft, es erfolgt Serres-Absaugbeutel Entfernen und ersetzen Sie den Serres- jedoch wenig oder gar ist voll. Absaugbeutel. keine Absaugung. Der Patienten-... -
Page 163: Technische Daten
Technische Daten Klassifizierung Elektrisch betriebenes, medizinisches Absauggerät für den präklinischen Einsatz gemäß ISO 10079-1. Hohes Vakuum/hoher Durchfluss. Die LSU darf gemäß IEC 60601-1-12 in Rettungswagen eingesetzt werden. Nicht in der Nähe von entflammbaren Flüssigkeiten oder Gasen einsetzen. Interne Stromversorgung/Geräteklasse II, Typ BF, gemäß IEC 60601-1 Das Gehäuse entspricht der Schutzklasse IP34: •... - Page 164 Technische Daten Batterie 12 VDC 2 Ah, NiMH, wiederaufladbar Ladezeit 3 Stunden für eine Batteriekapazität von ca. 80 %, 4 Stunden für eine vollständige Ladung. Sicherungen Die LSU verfügt über keine Sicherungen, die vom Benutzer ausgewechselt werden können. Stromanschluss Wenn das Gerät über eines der Netzkabel mit dem STROMANSCHLUSS verbunden ist, ist im Gerät NETZSTROMspannung vorhanden.
- Page 165 Entriegelungsarm für Kanisterhalter Bedienungsoberfläche Polyester Vakuum-Anschluss Silikon Absaugkatheter-Adapter Halter für Absaugkatheter-Adapter Tragetasche PVC-beschichtetes Polyester Seitentasche PVC-beschichtetes Polyester Schulterriemen POM + Polyester Wandhalter Aluminium + Stahl + faserverstärkter PA Serres-Kanister Abgewinkelter Anschluss Serres-Kanisterhalter Serres-Absaugbeutel PE + PP Serres-Vakuumanschluss PC + PBT...
- Page 166 Warnhinweis: Teile dieses Produkts sind nur für die einmalige Anwendung am Patienten bestimmt. Nicht wiederverwenden. Eine Wiederverwendung führt zu einem erhöhten Kreuzkontaminationsrisiko, einer Verschlechterung der Leistungsfähigkeit und/oder zu einer Gerätestörung. Laerdal Medical ist für etwaige Folgen aus einer Wiederverwendung nicht verantwortlich. Herstellungsdatum...
- Page 167 • Bei der Verwendung tragbarer RF-Kommunikationsgeräte (einschließlich Peripheriegeräte, wie Antennenkabel und externe Antennen) muss ein Mindestabstand von 30 cm zu allen Bereichen der LSU eingehalten werden. Dies gilt auch für die von Laerdal Medical angegebenen Kabel. Anderenfalls kann es zu einem Leistungsabfall dieses Geräts kommen.
- Page 168 Technische Daten Elektromagnetische Emissionstests Emissionstest Standard- der Testmethode Übereinstimmung RF-Emission CISPR 11 Gruppe 1 Klasse B Oberwelle Emission IEC 61000-3-2 Klasse A Spannungsschwankungen/ IEC 61000-3-3 Stimmt überein Flimmeremissionen Elektromagnetische Sicherheitstests Störfestigkeitsprüfung Standard der Testmethode Übereinstimmungspegel Elektrostatische Entladung IEC 61000-4-2 ± 8 kV Kontakt ±...
-
Page 169: Zubehör Und Ersatzteile
78 00 30 XX LSU mit Serres-Absaugbeutel-System Serres 57 151 Serres-Absaugbeutel (1.000 ml, blau) 58 33 181 Serres-Absaugschlauch (nicht steril CH25) 180 cm 78 12 06 Serres-Vakuum-Anschluss 78 04 12 Einmal-Patientenschlauch 180 cm 57 300 Serres-Kanister (1.000 ml, transparent) 78 04 51 Halter für Serres-Kanister... - Page 172 © 2021 Laerdal Medical AS. All rights reserved. Manufactured in China for: Laerdal Medical AS P.O. Box 377, Tanke Svilandsgate 30, 4002 Stavanger, Norway T: (+47) 51 51 17 00 Printed in China www.laerdal.com...
Need help?
Do you have a question about the Serres and is the answer not in the manual?
Questions and answers