Advertisement
Advertisement
Table of Contents

Related Manuals for laerdal SimMan


Summary of Contents for laerdal SimMan
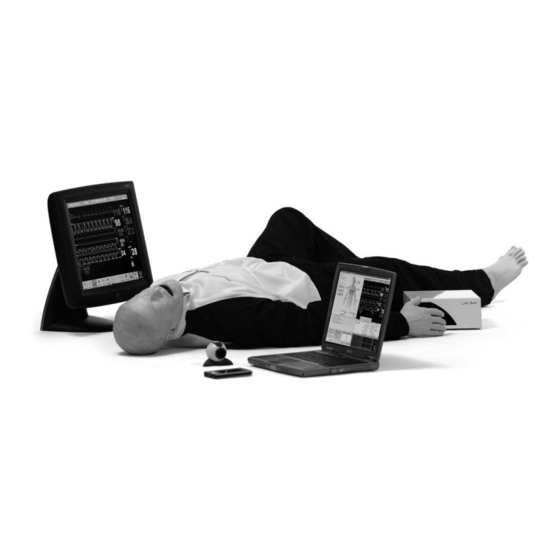
- Page 1 SimMan Directions for Use www.laerdal.com...
-
Page 2: Cautions And Warnings
INKED LINES OF ANY KIND. gloves. Students should wash their hands prior to using the simulator and wear gloves when using the simulator. Treat SimMan as you would a real patient. Limited Warranty Use of a defibrillator for training purposes represents an operational hazard equivalent to use of a defibrillator on a real patient since it... -
Page 3: Table Of Contents
PARTS / ACCESSORIES LIST ......14 Introduction SimMan is a full body, adult manikin that allows the simulation of Basic and Advanced Life Support Skills and Assessment to develop both individual and team skills. -
Page 4: Items Included
- Chest Tube Insertion Modules (6) If your system is not pre-installed, pay close attention to software - Interchangeable pupil set [case containing 3 pairs of pupil inserts set-up. Your SimMan will not operate correctly if the software is (normal, constricted, dilated)] not properly installed. - Page 5 13) Repeat with the other leg. If you have purchased Laerdal SimMan with a Compressor Unit, 14) Gently replace the belly. attach one end of the double lumen tube into the compressor and To remove leg(s), reverse the procedure.
- Page 6 Option 2: Regulator Unit e) Auscultation sounds - Lung If you have purchased Laerdal SimMan with the Regulator Unit, - Heart attach one end of the double lumen tube to the “Air/CO out to - Bowel f) Vocal sounds Manikin” outlet on the regulator and the other to the right axillary - Numerous vocal sounds are available (moan, vomit, cough, etc.)
-
Page 7: In Use
Laryngeal Mask Airway (LMA) - The Laerdal SimMan will allow use of b) A speaker located in the head allows the instructor to speak the LMA Classic, LMA Unique and LMA Fastrach. Although a #5 LMA through the SimMan (to simulate a patient) or use pre-defined... - Page 8 Insert Pads a) SimMan contains a left thigh pad, gluteal , gluteal, ventro-gluteal and right deltoid insert pads. b) The pads can be used for intramuscular and subcutaneous injection practice.
- Page 9 Simulated Operating software Patient Monitor. Auscultation gap can also be simulated. The SimMan SW is started by clicking the SimMan icon on the computer desktop. After entry of password (optional) and Blood pressure settings are controlled using the computer or selecting a profile, the SimMan starts up in the default mode...
- Page 10 If you paused a running scenario, click on the play Pre-programmed or saved scenarios can be started, paused, halted ( ) button from the main SimMan GUI to resume the simulation. or debriefed from the “Scenario Control Center” found in the lower For more information on the Debrief viewer, refer to the help files.
-
Page 11: Maintenance
The PDA comes pre-installed with some SimMan configurations. 1) Remove skin at torso sides. If your PDA is pre-installed, turn the PDA on and select the SimMan 2) Lift the chest plate exposing its underside. Pocket icon from the Programs menu to start the PDA application. - Page 12 4) Remove bladder from site cavity by pulling it from top side supplied with manikin, by applying firmly with fingertip while of chest plate. stretching skin. Chest Drain - Left Mid-Axillary Site To replace chest tube insertion module: 1) Remove skin at torso side and left shoulder. 2) Remove chest tube insertion module from mid-axillary side of manikin.
-
Page 13: Troubleshooting
fingers as with a glove. Then, roll the skin up the arm. 2) Reattach arm when finished. Troubleshooting Refer to www.laerdal.com for more information. Technical data The product is CE-marked and in compliance with essential requirements of council directive 89/336/EEC; EMC – directive. -
Page 14: Parts / Accessories List
200-03050 Pupils set 38 11 02 Fastener for Neck Skin (pkg. 10) 211-10050 211-10150 38 11 06 38 11 00 38 11 01 Head Assy Head Skin 200-00250 Teeth Upper Rigid Head Assy, Head Skin, Cricothyroid Membrane (polyester) without bronchial with airway Tape (1 roll) branches... - Page 15 38 13 00 211-20050 SimMan Nursing Wound 38 04 35 P P u u l l s s e e O O x x i i m m e e t t r r y y P P r r o o b b e e...
- Page 16 © 2006 Laerdal Medical AS. All rights reserved Printed in US N0207 rev E...
Need help?
Do you have a question about the SimMan and is the answer not in the manual?
Questions and answers