Advertisement
Quick Links
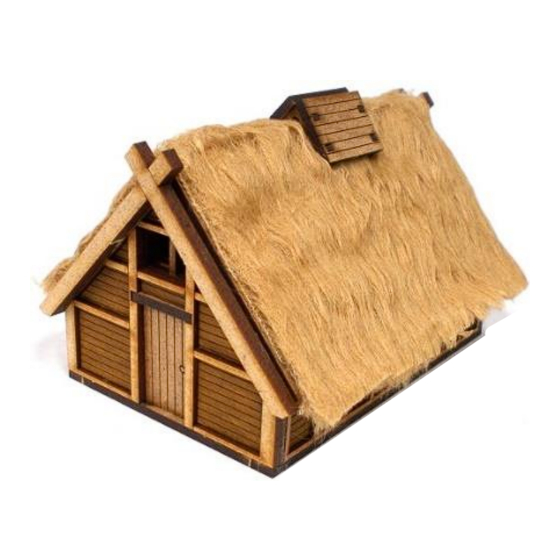
20mm Dark Age House #4
B20-DA-004
Please read these instructions fully before starting construction.
PVA or equivalent glue will be required to stick sections together.
Sand paper can be used to gently clean any joints.
A sharp modelling knife will be required to remove sections from the sprue. Please use knives with due
care and remember to cut away from yourself at all times.
During the construction of this model, you may find it convenient to use pegs / elastic bands to hold
pieces in place while you allow glue to dry.
We suggest you spray / paint the insert pieces while they are still on the sprue prior to assembling the
model.
Remove the base, side walls and end walls from
the sprue.
Take the door and lintel.
Take the frames from the sprue.
Glue the walls to the base (note the position of the
end window in relation to the doorway.
Place the bottom lug of the door into the hole in
the base. Put the door lintel on top of the door and
slide it into position (as shown)
Glue the front frame into position, gently sliding it
around the lintel. Then add the other frames.
Advertisement

Related Manuals for BLOTZ B20-DA-004


Summary of Contents for BLOTZ B20-DA-004
- Page 1 20mm Dark Age House #4 B20-DA-004 Please read these instructions fully before starting construction. PVA or equivalent glue will be required to stick sections together. Sand paper can be used to gently clean any joints. A sharp modelling knife will be required to remove sections from the sprue. Please use knives with due care and remember to cut away from yourself at all times.
- Page 2 Take the pieces which form the roof. Take the pieces which form the roof. Note the “top” of the roof is marked with a “T”. Note the “top” of the roof is marked with a “T”. Then glue the other side of the roof into place. Take the two end beams.
- Page 3 Glue the smoke hole cover to the roof. The finished model.
Need help?
Do you have a question about the B20-DA-004 and is the answer not in the manual?
Questions and answers