Advertisement
Materials Included:
Part #
Description
1
4" sq. x 84"
2
1 3/4" sq. x 31 5/8" Top rails
3
1 3/4" sq. x 31 5/8" Middle rails
4
1 3/4" sq. x 27" Bottom rails
5
1 1/2" x 5 1/2" x 94" Beams
6
4" sq. Post insert caps
7
4" sq. Trim caps
8
23 3/4" x 48" Square lattice
9
1 1/2" x 5 1/2" x 38" Cross filters
10
7/8" x 1 1/2" x 10 3/8" Spindles
11
45 3/8" Lattice channels
12
1 1/2" x 5 1/2" Pergola end caps
13
Hardware kit (Includes):
1 1/2" Self-tapping screws
3" Self-tapping screws
Tube of vinyl cement
Materials (Optional):
- Aussie Auger mounting kit
- Trim kit
-
(sold separately).
- 4" sq. treated wood posts.
- Pre-mix concrete
especially when attaching a gate).
Opening
or 120"
Posts
(Std)
(Pro)
(Sold Separately).
(recommended for added stability,
80"
24"
Post layout for installation.
Fairfield Grande Arbor
Assembly & Mounting Instructions
General Information:
- Read instructions through carefully before
beginning assembly.
- Identify each component from material list.
- When assembling components, place on a
non-abrasive surface to avoid scratches.
- Do not use excessive force when assembling
components.
- In the event of missing or defective parts,
please call our customer service department
Quantity
4
Tools Required:
2
- Cordless drill & #2 Robertson bit
2
- Tape measure
2
- Level
2
- Shovel
4
- Pencil
4
2
7
10
Part 5
4
18
12
30
86"
1
(Fig. 2)
Part 12
Part 6
111"
Part 7
Part 2
Part 10
Part 3
78 1/2"
Part 1
Part 11
80"
Part 8
Part 4
88"
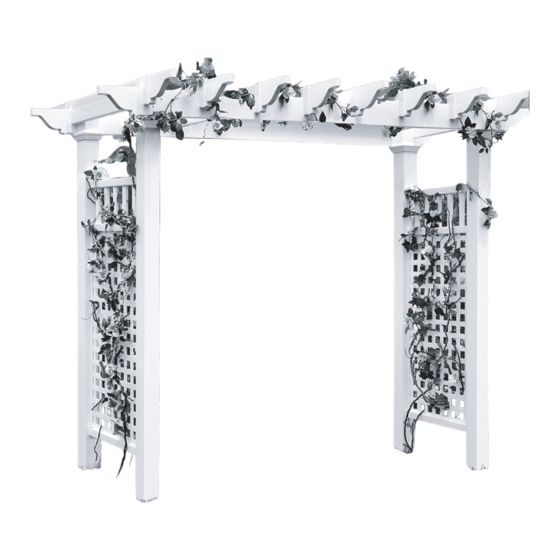
(Fig. 1)
Product dimensions & part
identification.
Ver 1.07
Part 9
55"
32"
Advertisement
Table of Contents

Subscribe to Our Youtube Channel
Related Manuals for New England Arbors Fairfield Grande Arbor


Summary of Contents for New England Arbors Fairfield Grande Arbor
- Page 1 Fairfield Grande Arbor Assembly & Mounting Instructions General Information: - Read instructions through carefully before beginning assembly. - Identify each component from material list. - When assembling components, place on a non-abrasive surface to avoid scratches. - Do not use excessive force when assembling components.
- Page 2 Lay out one of the posts (part 1) and center the lattice channel (part 11) between two of the holes in the post. Using three 1 1/2” screws, fasten the channel to the post at both ends and in the middle.
- Page 3 Lay out the two 94” beams (part 5) parallel to one another. Measure 1 1/4” and 2 3/4” in from each end of both beams and put a mark. Place two of the cross filters (part 9) onto each end of the beams, and position them between the marks.
- Page 4 Place your arbor in the desired location and check the distances between posts as shown in (Fig. 2) on the front cover. Mark post locations on the ground. Note: If you have purchased our Arbor mounts, please refer to their instructions to complete the installation.
Need help?
Do you have a question about the Fairfield Grande Arbor and is the answer not in the manual?
Questions and answers