Advertisement
Quick Links
Advertisement

Related Manuals for New England Arbors Brandenburg Pergola


Summary of Contents for New England Arbors Brandenburg Pergola
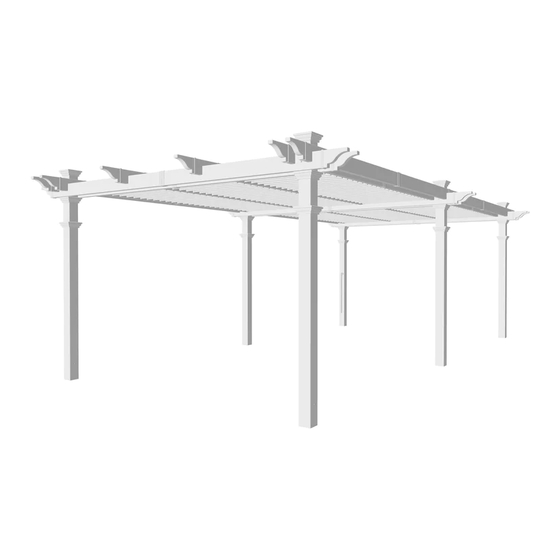
- Page 1 12 x 12 Brandenburg Pergola A S S E M B L Y G U I D E Ver 2.2-Oct 22-19 www.newenglandarbors.com...
- Page 2 …………………………………………………………..........175 in [445 cm] Top View 139 in [353 cm] 139 in [353 cm] 144 in [366 cm] 144 in [366 cm] Side View Front View 12 x 12 Brandenburg Pergola www.newenglandarbors.com...
- Page 3 - if there is any. Also utility or sprinkler line location is important to identify prior to excavating holes if necessary. You should also check to verify local building codes, ordinances, neighbour- hood covenants, or height restrictions regarding this type of structure. www.newenglandarbors.com 12 x 12 Brandenburg Pergola...
- Page 4 Brandenburg Pergola Materials Overview www.newenglandarbors.com 1. Post Caps (4) - 10699-1 11. Turn Bar Holder (1) - 10957 - Found in Box 7 2. Main Column Tops (4) - 10930 12. Pre-assembled Louver Bars (Right) - With Long Louver Bar (3) - 10986 3.
- Page 5 * Bolt Down Brackets are used only for installing the pergola on an existing surface such as concrete or wood deck. The pergola is not to be installed on concrete pavers, patio stones or interlocking brick. 12 x 12 Brandenburg Pergola...
- Page 6 • Framing Square • Wood Stakes (4) (temporary support for string line) CONCRETE - Ready Mix Purchase • Step Ladders (2) Purchase Purchase • Wrench / Socket Set Purchase Separately Separately Separately Separately Not to Scale 12 x 12 Brandenburg Pergola...
- Page 7 4x4 wood post slightly to get the vinyl post started over the wood post. Before installing your wood posts in the ground, please check to confirm this and correct at this stage if necessary. 12 x 12 Brandenburg Pergola...
- Page 8 “build out” the 4x4 posts near the bottom and the top using 1/2” x 3 1/2” x 12” shims. Follow instructions as illustrated. 6 in 12 x 12 Brandenburg Pergola...
- Page 9 Using the predrilled hole as a template, drive a 1/2” hole through the wood post. Make sure to drill straight through to the hole on the opposite side of the post. 12 x 12 Brandenburg Pergola...
- Page 10 These holes will align with the hole on the posts. section. Both ends of main support beam section should extend approximately 6” over the pressure treated wood. Glue and attach the Decorative End Caps onto the ends as shown. 12 x 12 Brandenburg Pergola...
- Page 11 Rafter Assembly To accomodate the notches on the rafters, first the wood inserts must be notched out as shown below: 144 in 3½ in 3½ in 7 in (min) 7 in (min) Six will be needed. 12 x 12 Brandenburg Pergola...
- Page 12 Ensure the wood insert is not Using four 1 1/2” screws provided, fasten the Rafter Joiners, protruding into the notched Rafters, and Wood together as shown. area of the Rafter. Repeat for all six rafters. 12 x 12 Brandenburg Pergola...
- Page 13 Fasten the main support beams onto the Posts using the 4” screws provided (8 screws per post) through the pre-drilled holes. Place the rafters onto the main support beams as shown. Space the middle two rafters 42” apart (Critical for louver placement) www.newenglandarbors.com 12 x 12 Brandenburg Pergola...
- Page 14 Fasten the Rafters to the Posts using the 4” screws provided (4 per post). Fasten a 4” screw at each intersection where the Beams and Rafters intersect as shown. 24 screws will be needed. *Important: Make sure the distances between rafters are 42” . 12 x 12 Brandenburg Pergola...
- Page 15 Each pre-assembled louver bars are labelled with a lettered sticker “A”, “B”, “C”, and “D”. When assembling, match louver bar A with B, and C with D. There will be 3 A’s, 3 B’s, 3 C’s, and 3 D’s as shown below: 12 x 12 Brandenburg Pergola...
- Page 16 Note the distance to the first bolt; the larger gap would go at the outside whereas the smaller gap would go towards the middle bar assembly. www.newenglandarbors.com 12 x 12 Brandenburg Pergola...
- Page 17 Repeat for all six sub-sections. At this point, you should have three full sections of Louvers as shown below: Do not attach with nuts at this point 12 x 12 Brandenburg Pergola...
- Page 18 Fasten the Short Louver Bar using two nuts as shown. Do not over tighten. You will need to raise the middle section momentarily to do this step. Note: check that the holes are closer to the bottom as shown. 12 x 12 Brandenburg Pergola...
- Page 19 From the top, fasten the steel brackets in place using 5/8” screws. A total of 12 screws will be needed. Repeat for the underside of the steel brackets. Another 12, 5/8” screws will be needed. Bottom View www.newenglandarbors.com 12 x 12 Brandenburg Pergola...
- Page 20 Louver Assembly Repeat for other two rows. Place the Post Caps onto the posts. www.newenglandarbors.com 12 x 12 Brandenburg Pergola...
- Page 21 Mount with the slot on the top and closer to the post as shown. Fasten with two 2 1/2” screws provided. Hang the Turn Bar as shown. Slot on the top and closer to the post. 12 x 12 Brandenburg Pergola...
- Page 22 Only loosen the nut a quarter of a turn at a time as it may come off. If your area experiences heavy snow, make sure to keep the louvers in the OPEN position. The accumulation of snow will cause the louvers to buckle and collapse. www.newenglandarbors.com 12 x 12 Brandenburg Pergola...
- Page 23 Shorten the distance between these two posts To shorten the pergola, affected parts are shown with the dotted line . Cut equally on both halves of the beam, away from the pre- drilled holes. pre-drilled hole 12 x 12 Brandenburg Pergola...
- Page 24 M O D I F I C AT I O N S www.newenglandarbors.com Below is an example of resizing the pergola: [In this example, the new dimensions are 120” (10’) x 102” (8’-6”)] All 72 louver boards are cut down by 6” All 4 Beams are cut down by 9”...
Need help?
Do you have a question about the Brandenburg Pergola and is the answer not in the manual?
Questions and answers