
Related Manuals for New England Arbors Colonial Privacy Screen


Summary of Contents for New England Arbors Colonial Privacy Screen
- Page 1 ASSEMBLY GUIDE The Colonial & Camden Privacy Screen Écran d’intimité Colonial & Camden 7 1/2’X8’ (229CMx266CM) VER 1.4 07/09/19...
-
Page 2: Table Of Contents
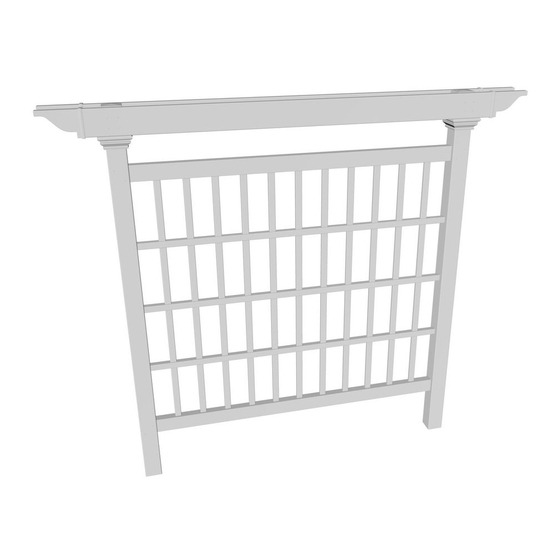
IN THIS GUIDE MATERIALS OVERVIEW DESCRIPTION DU MATERIEL MATERIALS BREAKDOWN VENTILATION DES MATERIEL ADDITIONAL MATERIALS SUPPLÉMENTAIRE MATERIEL STEP 1 ÉTAPE 1 STEP 2 ÉTAPE 2 STEP3 ÉTAPE 3 STEP 4 ÉTAPE 4 STEP 5 ÉTAPE 5 WWW.NEWENGLANDARBORS.COM WWW.NEWENGLANDARBORS.CO.UK VER 1.4 01/09/19... - Page 3 MATERIALS OVERVIEW DESCRIPTION DU MATERIEL 1. Post Cap - (x2) 14103 Composite/ 10824 White PVC 5. Vertical Spindles - (x11) 14106 Composite/ 10229 White PVC Capuchons de poteaux - (x2) 14103 Composite/10824 PVC Blanc Tiges verticales - (x11) 14106 Composite/ 10229 PVC Blanc 2.
- Page 4 MATERIALS BREAK DOWN VENTILATION DES MATERIEL DECORATIVE POST CAPS POST TRIM BEAM END CAPS Capuchons de poteaux CAPS (X2) Embouts de poutres décoratifs Capuchons de garniture (X4) de poteaux (X2) HORIZONTAL RAILS Barres horizontales (X2) VERTICAL SPINDLES Tiges verticales (X11) HORIZONTAL SPINDLES Tiges horizontales (X3)
-
Page 5: Supplémentaire Materiel
ADDITIONAL MATERIALS LIST SUPPLÉMENTAIRE MATERIEL SCREW - 20032 - 2 1/2” (6.35CM) X28 GLUE - 20029 - 1 1/2 OZ COLLE ADDITIONAL MATERIALS TO BE PURCHASED AUTRES MATERIEL À ACHETER 4x4x6 Ft (10x10x182cm) Pressure Treated Wood for Posts. Cut in two 36” (91cm) lengths. Purchase at local building centre. QUANTITY: x1 Bois traité... -
Page 6: Step 1
Step 1 ÉTAPE 1 SCREEN ASSEMBLE ECRAN DE MONTAGE 2 1/2” (6.35CM) X8 Layout the horizontal spindles with all the routed holes in line as shown in 1A) with three vertical spindles positioned at either end and in the middle. Disposez les broches horizontales avec tous les trous acheminés alignés comme indiqué... -
Page 7: Étape 2
Step 2 ÉTAPE 2 INSTALLING TRIM AND POST CAPS INSTALLATION DES CAPUCHONS DE GARNITURE ET DE POTEAU Slide the two post trim caps down the post as shown, followed by the two post caps. The trim caps can sit on the horizontal rail for now and apply a thin bead of glue around the edge, underneath the post cap and fit it into place. -
Page 8: Step 3
Step 3 ÉTAPE 3 ASSEMBLING AND INSTALLATION OF BEAMS MONTAGE ET INSTALLATION DE POUTRES Apply a small amount of glue to the inside of the end cap as shown and insert onto the beam. Allow 30 seconds for the glue to set and a few more minutes to cure. Repeat for second beam. - Page 9 Step 4 ÉTAPE 3 ASSEMBLING AND INSTALLATION OF BEAMS MONTAGE ET INSTALLATION DE POUTRES Fasten the beam onto the posts using eight screws as shown (four at each post). Repeat steps for the second beam. Fixez la poutre sur les poteaux en utilisant huit vis comme illustré (quatre pour chaque poteau).
-
Page 10: Étape 4
Step 5 ÉTAPE 4 WOOD POST INSTALLATION INSTALLATION DE POTEAU EN BOIS Within your desired area, dig two, 8” (20 cm) diameter x 24“ (60 cm) deep holes, 76” apart from each other center to center. Dans la zone souhaitée, creusez deux trous de 8 ”(20 cm) de diamètre sur 24”... - Page 11 Step 6 ÉTAPE 5 WOOD POST AND VINYL COLUMN ASSEMBLY POTEAU EN BOIS ET ENSEMBLE DE COLONNE DE VINYLE With a helper, place the privacy screen posts into the holes and level it both vertically and horizontally. Note: for asthestics purposes, the screws on the posts should be facing away.
Need help?
Do you have a question about the Colonial Privacy Screen and is the answer not in the manual?
Questions and answers