Table of Contents
Advertisement
Quick Links
Advertisement
Table of Contents

Related Manuals for Graco 226-237 Series


Summary of Contents for Graco 226-237 Series
- Page 1 Parts...
- Page 2 WARNING FOR PROFESSIONAL USE ONLY. OBSERVE ALL WARNINGS. Read and understand all instruction manuals before operating equipment. EQUIPMENT MISUSE HAZARD ’ General Safety Pressure Relief Procedure To reduce the risk of serious bodily injury, including splashing Any misuse of the equipment or accessories, such as over- in the eyes or on the skin, or injury from moving parts, always pressurizing, modifying parts, using incompatible chemicals follow this procedure whenever you shut off the pump, when...
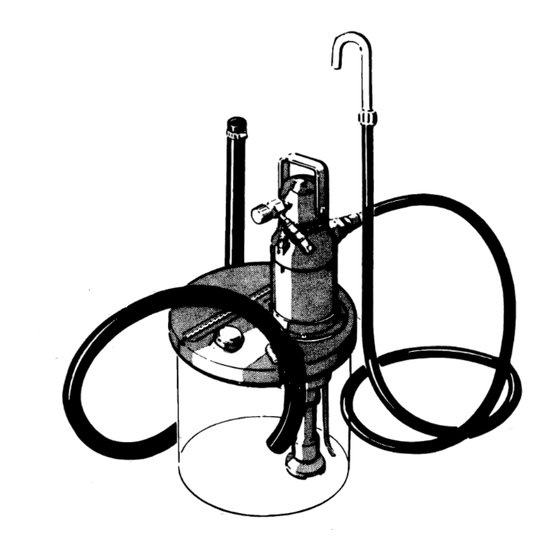
- Page 3 K E Y A Air Line Filter Bleed-Type Master Air Valve D Pump Outlet Port Fountain Air Hose G Solvent Port 10 Air Control Valve 16 Intake Strainer 19 Air Line Coupler 99 Bypass Tube 61 Mounting Collar 96 Cover Plug 97 Hose Guard 70 Nozzle 72 Supply Hose...
- Page 4 WARNING Place the cover and pump on the ink pail. Hook the curved nozzle (70) on the supply hose (72) onto the ink Pressure Relief Procedure fountain. Insert the return hose (74) in the return port of To reduce the risk of serious bodily injury, in- the cover.
- Page 5 Flushing Shutdown and Care of the Pump At the end of the day, always follow the Pressure Raise the hinged part of the pail cover and hook the noz- Relief Procedure on page 4. zle of the supply hose to the pail. Use the handle (54) to lift the pump out of the pail and operate it until as much Flush the system as often as necessary to prevent ink ink as possible has been pumped out.
-
Page 6: Troubleshooting
..~ T R O U B L E S H O O T I N G C H A R T WARNING Always follow the Pressure Relief Procedure on page 7 before performing any service. NOTE: Check all possible remedies before disassembling pump. - Page 7 WARNING Remove the retaining ring (261, stop ring (451, and valve plate (46) from the intake valve housing (37). Pressure Relief Procedure To reduce the risk of serious bodily injury, in- The valve plate and stop ring may be inverted during reassembly if they are worn.
- Page 8 4. Carefully slide the piston rod (43) into the displace- 8. Remove the two screws (20) and washers (22) ment rod (18). Screw the displacement rod cap (57) holding the air cap (9) to the piston rod (43). Inspect the o-rings (31,351 under the air cap. Insert a l/4 in. into the displacement rod (18).
-
Page 9: Working Pressure
AIR POWERED AGITATOR 205-588 GROUNDING CLAMP 103-538 For mixing and reducing viscosity of paint by agitation. GROUND WIRE 208-950 To install agitator: remove shaft from agitator motor 25 ft Is (7.6 m) (loosen lower setscrew in coupling); mount agitator in inspection port of paint pail cover as shown in figure and tighten setscrews on port;... - Page 10 Pump Repair Kit 207, (Must be purchased separately) Consists of: Ref No. Ink Pump Model 226-237, Series A “40...
-
Page 11: Parts List
PARTS LIST Model 226-237 Pump, Series A Includes items l-76 PART DESCRIPTION REF PART DESCRIPTION NO. NO. “166-169 .ROD, air piston items 2-58, Series G Includes 75, 76 ““166-170 166-172 Includes items 3-8 . PLATE, valve 101-245 ..SCREW, socket hd, cap; No. 6-32 166-174 thd size;... -
Page 12: Technical Data
TICULAR PURPOSE, WITH RESPECT TO ACCESSORIES, EQUIPMENT, MATERIALS, OR COMPONENTS SOLD BUT NOT MANUFAC- TURED BY GRACO. These items sold, but not manufactured by Grace (such as electric motor, switches, hose, etc.), are subject to the warran- ty, if any, of their manufacturer. Grace will provide purchaser with reasonable assistance in making any claim for breach of these warranties. - Page 13 3X6–805 Rev. G Supersedes Rev. E and PCN F Parts Change Notice Some parts in Rev. E of manual 306–805 have changed but have not yet been changed in the instruction manual. Please note the changes below and mark them in your manual or keep this sheet with your manual.
Need help?
Do you have a question about the 226-237 Series and is the answer not in the manual?
Questions and answers