
Related Manuals for cytiva ReadyToProcess Mixer 20/50


Summary of Contents for cytiva ReadyToProcess Mixer 20/50
- Page 1 ReadyToProcess™ Mixer 20/50 Operating Instructions Original instructions cytiva.com...
-
Page 2: Table Of Contents
Replacement of fuses ........................... 62 Communications and data acquisition ....................63 Cleaning before planned service ......................66 Troubleshooting ....................67 Troubleshooting guide ..........................68 Alarms ................................71 Reference information ..................75 Specifications ..............................76 ReadyToProcess Mixer 20/50 Operating Instructions 28964134 AF... - Page 3 Declaration of Hazardous Substances (DoHS) ................88 Spare parts, accessories and ordering information ................. 90 Health and Safety Declaration Form ...................... 91 Appendix A: ReadyToProcess Mixer 20/50 theory of operation ......93 Index ........................... 96 ReadyToProcess Mixer 20/50 Operating Instructions 28964134 AF...
-
Page 4: Introduction
1 Introduction Introduction About this chapter This chapter contains important information about ReadyToProcess Mixer™ 20/50 and scope of the manual. In this chapter Section See page Important user information About this manual ReadyToProcess Mixer 20/50 Operating Instructions 28964134 AF... -
Page 5: Important User Information
ReadyToProcess Mixer 20/50 is an instrument for mixing, warming, and reconstituting materials contained in sealed plastic bags. ReadyToProcess Mixer 20/50 is intended for research use only, and shall not be used in any clinical or in vitro procedures, or for diagnostic purposes. -
Page 6: About This Manual
This manual provides information needed to install, operate and maintain the product in a safe way. Scope of this manual This manual is valid for ReadyToProcess Mixer 20/50 instrument, including MIXER20/50EHT and MIXER20/50EHT-L. Detailed information regarding bioprocessing bags, M*Bag, or other disposable consumables is not covered. -
Page 7: Safety Instructions
All users must read and understand the entire contents of this general safety chapter, and the specific safety precau- tions information in each subsequent chapter of this manual to become aware of the hazards involved. ReadyToProcess Mixer 20/50 Operating Instructions 28964134 AF... -
Page 8: Safety Precautions
2 Safety instructions 2.1 Safety precautions Safety precautions Introduction ReadyToProcess Mixer 20/50 is powered by mains voltage and handles materials that can be hazardous. Before installing, operating or maintaining the system, you must be aware of the hazards described in this manual. - Page 9 Risk of spillage. Disconnect the power supply when handling the M*Bag. WARNING Spillage risk. If liquid is spilled on instrument, disconnect the power source and contact a Cytiva service representative. CAUTION Pinch hazard. Do not insert any body parts between the rocker base and MIXKIT bag tray.
- Page 10 Flammable liquids and explosive environment WARNING ReadyToProcess Mixer 20/50 is not designed to handle flammable liquids. WARNING ReadyToProcess Mixer 20/50 is not approved for work in a poten- tially explosive atmosphere. ReadyToProcess Mixer 20/50 Operating Instructions 28964134 AF...
- Page 11 Installing and moving the instrument WARNING The instrument must not be used for any application other than specified by the manufacturer. Only use M*Bags or Cytiva approved bags on the instrument. Dispose of used bags according to local laws and regulations.
- Page 12 WARNING Electrical shock hazard. All repairs should be done by service personnel authorized by Cytiva. Do not open any covers or replace parts unless specifically stated in the user documentation. WARNING Disconnect power. Always disconnect power from the instru- ment before replacing fuses.
- Page 13 MIXKIT bag tray and M*Bag can become hot, specifically when the heater is set to maximum temperature (55°C). CAUTION Leakage risk of biological substances. Before every use, check the integrity of all tubing and connections. ReadyToProcess Mixer 20/50 Operating Instructions 28964134 AF...
- Page 14 2 Safety instructions 2.1 Safety precautions CAUTION Only M*Bag approved by Cytiva for ReadyToProcess Mixer 20/50 may be used together with the equipment. CAUTION Leakage risk of biological substances. Always enter the correct M*Bag size in the system software settings. Failure to do this may cause overpressure and subsequent rupture of the M*Bag.
- Page 15 WARNING Use only approved parts. Only spare parts and accessories that are approved or supplied by Cytiva may be used for maintaining or servicing the product. CAUTION Do not apply liquid directly to the instrument.
-
Page 16: Labels And Symbols
Electrical rating: • Voltage (VAC Frequency Electrical rating: Frequency (Hz) Electrical rating: Max. power (VA) Max Power Fuse rating Fuse rating: number of fuses, type F (fast), trip current (A), maximum voltage (V) ReadyToProcess Mixer 20/50 Operating Instructions 28964134 AF... - Page 17 Warning! Indicates a hot surface and that care must be exercised to prevent injury. This symbol indicates risk of pinch injury. This sign is located near the rocker. ReadyToProcess Mixer 20/50 Operating Instructions 28964134 AF...
-
Page 18: Emergency Procedures
• The operation settings remain stored in the touch panel control (backup batteries has a life of 5 to 10 years) • If the AUTOSTART option is set to ON, the opera- tion is automatically resumed on power up. ReadyToProcess Mixer 20/50 Operating Instructions 28964134 AF... -
Page 19: Danger Zones
Pinch hazard. Do not insert any body parts between the rocker base and MIXKIT bag tray. A danger zone exists around ReadyToProcess Mixer 20/50 30.5 cm (12 inches) from each side of the unit. The danger zone must be kept clear of obstructions. Clean spills immediately to not cause a slip hazard which could lead to injury. - Page 20 2 Safety instructions 2.4 Danger zones Area Description Keep clear of all obstructions. ReadyToProcess Mixer 20/50 Operating Instructions 28964134 AF...
-
Page 21: Instrument Description
3 Instrument description Instrument description About this chapter This chapter gives an overview of ReadyToProcess Mixer 20/50, and a brief description of its function. In this chapter Section See page Configuration Illustrations Control software ReadyToProcess Mixer 20/50 Operating Instructions 28964134 AF... -
Page 22: Configuration
ReadyToProcess Mixer 20/50. Standard bioprocessing bags or specialized M*Bag from Cytiva can be used. The rocking motion of ReadyToProcess Mixer 20/50 rapidly mixes the contents of the sealed plastic bag without shear. Mixing to homogeneity typically takes less than one minute. -
Page 23: Illustrations
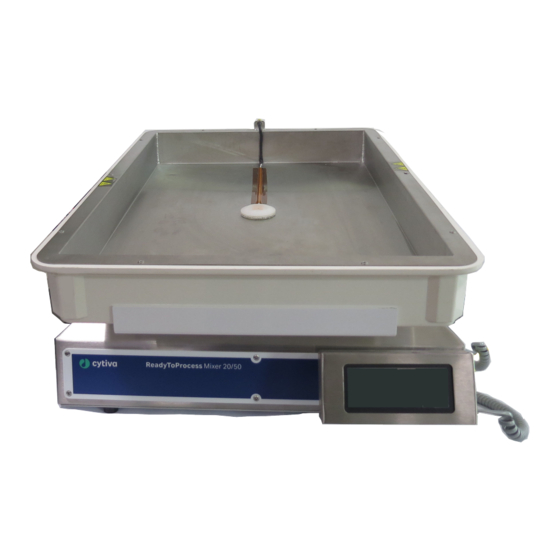
The illustration below shows the front and left side of the instrument. Part Description MIXKIT bag tray MIXKIT top plate Rocking unit Safety switch front Mixer base unit Safety switch back side Rubber bellow Lifting handle (2) Detachable touch screen ReadyToProcess Mixer 20/50 Operating Instructions 28964134 AF... - Page 24 3 Instrument description 3.2 Illustrations ReadyToProcess Mixer 20/50 rear view The illustration below shows the rear of ReadyToProcess Mixer 20/50 instrument. Part Description DATAPORT 1 and 2 (MODBUS) FEED PUMP jack (DB9 connector) HARVEST PUMP jack (DB9 connector) ALARM ANALOG OUT jack (DB15 connector)
- Page 25 3 Instrument description 3.2 Illustrations ReadyToProcess Mixer 20/50 side view The illustration below shows the side of the instrument. Part Description Temp connector Display connector ReadyToProcess Mixer 20/50 Operating Instructions 28964134 AF...
-
Page 26: Control Software
3 Instrument description 3.3 Control software Control software Introduction ReadyToProcess Mixer 20/50 is equipped with embedded software for control and supervision. In this section Section See page 3.3.1 The main screen 3.3.2 General screen functions ReadyToProcess Mixer 20/50 Operating Instructions 28964134 AF... -
Page 27: The Main Screen
3.3.1 The main screen ReadyToProcess Mixer 20/50 instrument is controlled by a touch screen. Tapping the buttons and setpoint (black background) fields depicted on the touch screen allows the user to start/stop a run and enter parameters. The functions available on the main screen (MIXER EH) vary depending on the specific instrument configuration. -
Page 28: General Screen Functions
Tap the ALARM button to open the ALARMS screen. For more information about alarms, see Section 8.2 Alarms, on page 71 BACK Tap the BACK button to return to main screen from current screen. ReadyToProcess Mixer 20/50 Operating Instructions 28964134 AF... -
Page 29: Installation
This chapter provides information required to enable users and service personnel to unpack, install, move, and transport the instrument. In this chapter Section See page Site requirements Unpacking Set up the rocking unit Set up the temperature control system Moving the instrument ReadyToProcess Mixer 20/50 Operating Instructions 28964134 AF... -
Page 30: Site Requirements
18 kg 30 to 46 kg Make sure that at least 30.5 cm of work space is left free around the unit. See Section 2.4 Danger zones, on page 19 for more information. ReadyToProcess Mixer 20/50 Operating Instructions 28964134 AF... - Page 31 Access to power switch and power cord with plug. Do not block access to the power switch and power cord. The power switch must always be easy to access. The power cord with plug must always be easy to disconnect. ReadyToProcess Mixer 20/50 Operating Instructions 28964134 AF...
-
Page 32: Unpacking
ReadyToProcess Mixer 20/50, assistance from another person is highly recommended when lifting or moving the equipment. Use the handles on the sides of the rocker when possible. Do not lift ReadyToProcess Mixer 20/50 with the MIXKIT bag tray attached. ReadyToProcess Mixer 20/50 Operating Instructions 28964134 AF... -
Page 33: Set Up The Rocking Unit
4 Installation 4.3 Set up the rocking unit Set up the rocking unit ReadyToProcess Mixer 20/50 rocking unit imparts a smooth wave motion to the bag contents. Follow the steps below to set up the rocking unit. Step Action Unpack the rocking unit. Locate the touch panel controller and plug it into the side panel using the provided coiled cord. - Page 34 Power must be cycled OFF and ON to reset the safety switch. The touch panel will blink red and display SAFETY BUMPER HIT indicating that the machine has stopped due to a fault. ReadyToProcess Mixer 20/50 Operating Instructions 28964134 AF...
-
Page 35: Set Up The Temperature Control System
Temperature control is optional. Temperature control requires MIXKIT20EH or MIXKIT50EH bag tray. These bag trays have a stainless steel interior with internal heater and contain attached power and sensor cords. Follow the steps below to assemble ReadyToProcess Mixer 20/50. Step Action... - Page 36 If temperature control is to be used: • Plug the heater cable into the HEATER connector on the rear panel (see ReadyToProcess Mixer 20/50 rear view, on page 24). • Connect the yellow temperature sensor cable to the Temp connector on the side panel of the stainless steel holder.
-
Page 37: Moving The Instrument
4 Installation 4.5 Moving the instrument Moving the instrument Follow the steps below to move ReadyToProcess Mixer 20/50. Step Action Disconnect the instrument from the power source. Remove the MIXKIT bag tray. The instrument must be moved without bag tray and cell bag on top. -
Page 38: Preparation
Do not fill the M*Bag more than the specified capacity. CAUTION Heavy object. The filled M*Bag is heavy and must be lifted with care. This also applies to optional equipment such as calibration weights. ReadyToProcess Mixer 20/50 Operating Instructions 28964134 AF... - Page 39 Action Fill the mixing bag with the desired liquid. The bag can be frozen and thawed on ReadyToProcess Mixer 20/50 if equipped with a heating system. Note: Do not fill the mixing bag completely. A larger fill volume damps out the wave motion and drastically reduces the mixing efficiency.
-
Page 40: Operation
About this chapter This chapter provides the information required to operate the instrument in a safe way. In this chapter Section See page Start the instrument Operation settings Perform a run Procedures after a run ReadyToProcess Mixer 20/50 Operating Instructions 28964134 AF... -
Page 41: Start The Instrument
Step Action Switch the main power switch located at the rear of the instrument on (I), see ReadyToProcess Mixer 20/50 rear view, on page Check that the touch screen lights up and that the instrument initializes correctly. a. The MIXKIT bag tray starts tilting slowly towards the rear. It contacts the rear safety switch (white touchbar) and then moves towards the front until it hits the front safety switch. -
Page 42: Operation Settings
The ALARMS screen opens. For more information on how to handle alarms, see Section 8.2 Alarms, on page Tap the SETUP button to edit instrument setup parameters. Result: The Access SETUP screen opens. ReadyToProcess Mixer 20/50 Operating Instructions 28964134 AF... - Page 43 When the rocking is stopped, the (Sample position) machine moves to the set sample position (in degrees tilt relative to the horizontal). The sample posi- tion can be set to an angle range of 0° to 12°. ReadyToProcess Mixer 20/50 Operating Instructions 28964134 AF...
- Page 44 Tap the WEIGHT button (only for MIXER20/50EHT-L). Result: The WEIGHT setup screen with the following options opens: ReadyToProcess Mixer 20/50 Operating Instructions 28964134 AF...
- Page 45 50 to 500 g. PUMP ACT N/C means that the contact closes when activated. N/O means that the contact opens when activated. Tap the OPTIONS button. Result: The OPTIONS screen opens. ReadyToProcess Mixer 20/50 Operating Instructions 28964134 AF...
- Page 46 (set to 1 to 254), then tap RESET to apply the changes made in the MODBUS address. Section 7.5 Communications and data acquisition, on page 63 for more information. ReadyToProcess Mixer 20/50 Operating Instructions 28964134 AF...
- Page 47 Six channels of analog output are provided. The channels can be assigned and the outputs can be configured for 0 to 5 V or 1 to 5 V. See Section 7.5 Communications and data acquisition, on page 63 for more information. ReadyToProcess Mixer 20/50 Operating Instructions 28964134 AF...
-
Page 48: Perform A Run
• The rock angle has a general optimum value of 10°. To change the angle, see section below. Note: Section 8.2 Alarms, on page 71 for description of alarms during run. Set rock speed and rock angle Follow the steps below to set the rocking speed and rocking angle. ReadyToProcess Mixer 20/50 Operating Instructions 28964134 AF... - Page 49 Tap the STOP button (appears in the same position as the ROCK button) to stop rocking. Set weight setpoint For weight control of ReadyToProcess Mixer 20/50, it needs to have a load cell (i.e., MIXER 20/50EHT-L). Follow the steps below to set the weight set point.
- Page 50 The FEED pump does not turn on if the net weight is higher than the high alarm limit. Result: The button changes to OFF and the indicator Feeding appears. The feed pump runs until the net weight is above the setpoint. ReadyToProcess Mixer 20/50 Operating Instructions 28964134 AF...
- Page 51 Follow the steps below to set the temperature set points for the bag and the MIXKIT bag tray. Step Action In the main screen (MIXER EH), tap the HEATER button. Result: The HEATER screen opens. ReadyToProcess Mixer 20/50 Operating Instructions 28964134 AF...
- Page 52 Tap the HEAT button (5) to start heating. Note: The current heater output is shown in the bar graph (4). Tap the STOP button (appears in the same position as the HEAT button) to stop heating. ReadyToProcess Mixer 20/50 Operating Instructions 28964134 AF...
-
Page 53: Procedures After A Run
This also applies to optional equipment such as calibration weights. Tip: For easy removal of the bag from the instrument it is recommended to lift the MIXKIT bag tray together with the bag. ReadyToProcess Mixer 20/50 Operating Instructions 28964134 AF... - Page 54 Place the MIXKIT bag tray with the bag adjacent to a trolley. Lift the bag to a trolley and transport the bag, to the desired location. Place the MIXKIT bag tray back on ReadyToProcess Mixer 20/50. ReadyToProcess Mixer 20/50 Operating Instructions 28964134 AF...
-
Page 55: Maintenance
This chapter provides information to enable users and service personnel to clean and maintain the product. In this chapter Section See page General maintenance Calibration Safety switch inspection Replacement of fuses Communications and data acquisition Cleaning before planned service ReadyToProcess Mixer 20/50 Operating Instructions 28964134 AF... -
Page 56: General Maintenance
Safety precautions WARNING Electrical shock hazard. All repairs should be done by service personnel authorized by Cytiva. Do not open any covers or replace parts unless specifically stated in the user documentation. WARNING Disconnect power. Always disconnect power from the instru- ment before replacing any component on the instrument, unless stated otherwise in the user documentation. - Page 57 After every 6000 hours of operation, it is recommended that the machine is serviced. Tap SETUP in the main menu (MIXER EH) to determine the total operating hours, which are displayed on the last line of the screen. Contact your Cytiva representative for more information.
-
Page 58: Calibration
The temperature sensor built into the MIXKIT bag tray (PAN) can only be calibrated using a Pt100 simulator. Follow the instructions below to calibrate the temperature sensor. Step Action Calibrate the sensor using a Pt100 simulator. ReadyToProcess Mixer 20/50 Operating Instructions 28964134 AF... - Page 59 Start rocking and trip the safety switch by placing a 3/8" ID × 5/8" OD tubing under the rocker platform. Result: The unit should stop and move to a level position. Verify that the level position is 0.0° ± 0.5°. ReadyToProcess Mixer 20/50 Operating Instructions 28964134 AF...
-
Page 60: Safety Switch Inspection
Safety precautions WARNING Electrical shock hazard. All repairs should be done by service personnel authorized by Cytiva. Do not open any covers or replace parts unless specifically stated in the user documentation. CAUTION Pinch hazard. Do not insert any body parts between the rocker base and MIXKIT bag tray. - Page 61 Note: If the instrument does not react as described, stop the inspection and contact your Cytiva technical support representative. Do not use the equip- ment: the safety switches may not be working properly. Turn off the power to the instrument.
-
Page 62: Replacement Of Fuses
Remove the old fuses and insert new fuses into the fuse drawer. For correct type and rating, see Section 9.1 Specifications, on page Push the fuse drawer back into the power inlet module. Connect the power cord and turn on the instrument. ReadyToProcess Mixer 20/50 Operating Instructions 28964134 AF... -
Page 63: Communications And Data Acquisition
7 Maintenance 7.5 Communications and data acquisition Communications and data acquisition Introduction Two options for data communications are built into ReadyToProcess Mixer 20/50: • Analog: ALARM ANALOG OUT (DB15 connector) • Digital: DATAPORT, MODBUS (RJ11 connector) WARNING Installing the computer. The computer must be installed and used according to the instructions provided by the manufacturer of the computer. - Page 64 RJ11-6 telephone ports. Both ports are wired internally in parallel to facilitate daisy-chain wiring. The RS-485 data ports are mainly used to connect ReadyToProcess Mixer 20/50 to other instruments using a single RS485 cable. The digital data port can also be used for data acquisition and supervisory control.
- Page 65 Plug one end of the RS-485 cable to a MODBUS Master. Plug the other end of the RS-485 cable into ReadyToProcess Mixer 20/50 DATAPORT 1. Plug an RS-485 cable in to ReadyToProcess Mixer 20/50 DATAPORT 2. Plug the other end of the RS-485 cable in to the DATAPORT 1 of another ReadyToProcess Mixer 20/50 unit.
-
Page 66: Cleaning Before Planned Service
Health and safety declaration forms Health and safety declaration forms are available for copying or printing in the Refer- ence information chapter of this manual, or on digital media supplied with the user documentation. ReadyToProcess Mixer 20/50 Operating Instructions 28964134 AF... -
Page 67: Troubleshooting
It also describes how to acknowledge alarms and view the alarm history. If the suggested actions in this guide do not solve the problem, or if the problem is not covered by this guide, contact your Cytiva representative for advice. In this chapter Section... -
Page 68: Troubleshooting Guide
The heater cable is Make sure that the blue heater cable is plugged into the HEATER connector on the disconnected rear of ReadyToProcess Mixer 20/50. ReadyToProcess Mixer 20/50 Operating Instructions 28964134 AF... - Page 69 Possible cause Corrective action The AUTOSTART Make sure that the AUTOSTART ReadyToProcess Mixer 20/50 does option (SETUP →OPTIONS) is set option is set to OFF not restart automatically after to ON power failure. ReadyToProcess Mixer 20/50 Operating Instructions 28964134 AF...
- Page 70 Bag surface temperature sensor is failed or unplugged LOADFAIL The weight sensor failed (only for for MIXER20/50EHT-L) LOWWTALM Low weight alarm HIWTALM High weight alarm HARVALM Harvest pump alarm FEEDALM Feed pump alarm ReadyToProcess Mixer 20/50 Operating Instructions 28964134 AF...
-
Page 71: Alarms
If the AUTOACK feature is set to ON in the SETUP →OPTIONS screen, then all alarms are automatically acknowledged. No warnings are generated but the alarm is still logged. ReadyToProcess Mixer 20/50 Operating Instructions 28964134 AF... - Page 72 The audible alarm sound stops. Tap the BACK button on the ALARMS screen. Result: The main screen with a green background is displayed and the ALARM button disappears, as shown in the image below. ReadyToProcess Mixer 20/50 Operating Instructions 28964134 AF...
- Page 73 Follow the steps below to handle the alarm. Step Action Tap the ALARM button on the main screen. Result: The ALARMS screen opens. This action also acknowledges the alarm. ReadyToProcess Mixer 20/50 Operating Instructions 28964134 AF...
- Page 74 Tap the desired alarm to highlight it. b. Tap the HELP button to display the help screen. Check the alarm number and solve the alarm issue. See Alarm messages, on page 70 for a list of alarm numbers. ReadyToProcess Mixer 20/50 Operating Instructions 28964134 AF...
-
Page 75: Reference Information
About this chapter This chapter contains technical data, regulatory and other information. In this chapter Section See page Specifications Recycling information Regulatory information Spare parts, accessories and ordering information Health and Safety Declaration Form ReadyToProcess Mixer 20/50 Operating Instructions 28964134 AF... -
Page 76: Specifications
100 to 120 V~ or 220 to 240 V~ Maximum voltage fluctuation ± 10% from the nominal voltage Frequency 50 to 60 Hz Maximum power 630 VA Fuse specification T6.3AL 250 V (2×) ReadyToProcess Mixer 20/50 Operating Instructions 28964134 AF... - Page 77 Requirement Allowed location Indoor use only Ambient temperature 15°C to 35°C Storage temperature -20°C to +60°C Relative humidity tolerance 20% to 95%, non-condensing Atmospheric pressure 84 to 106 kPa (840 to 1060 mbar) ReadyToProcess Mixer 20/50 Operating Instructions 28964134 AF...
- Page 78 Glycerin Satisfactory Satisfactory Glycolic acid Satisfactory Satisfactory Lactic acid Satisfactory Satisfactory Sodium chloride saturated Satisfactory Satisfactory Sodium hyperchlorite Satisfactory Satisfactory Cellbags with DOOPT sensors should not be exposed to ethanol concentrations above 10% ReadyToProcess Mixer 20/50 Operating Instructions 28964134 AF...
-
Page 79: Recycling Information
Disposal of batteries Waste batteries and accumulators must not be disposed of as unsorted municipal waste and must be collected separately. Follow applicable local regulations for recy- cling of batteries and accumulators. ReadyToProcess Mixer 20/50 Operating Instructions 28964134 AF... -
Page 80: Regulatory Information
See page 9.3.1 Contact information 9.3.2 European Union and European Economic Area 9.3.3 Great Britain 9.3.4 Eurasian Economic Union (Евразийский экономический союз) 9.3.5 North America 9.3.6 Regulatory statements 9.3.7 Declaration of Hazardous Substances (DoHS) ReadyToProcess Mixer 20/50 Operating Instructions 28964134 AF... -
Page 81: Contact Information
The table below summarizes the required manufacturing information. Requirement Information Name and address of manufacturer Cytiva Sweden AB Björkgatan 30 SE 751 84 Uppsala Sweden Telephone number of manufacturer + 46 771 400 600 ReadyToProcess Mixer 20/50 Operating Instructions 28964134 AF... -
Page 82: European Union And European Economic Area
• used according to the Operating Instructions or user manuals, and • used in the same state as it was delivered, except for alterations described in the Operating Instructions or user manuals. ReadyToProcess Mixer 20/50 Operating Instructions 28964134 AF... -
Page 83: Great Britain
• used according to the Operating Instructions or user manuals, and • used in the same state as it was delivered, except for alterations described in the Operating Instructions or user manuals. ReadyToProcess Mixer 20/50 Operating Instructions 28964134 AF... -
Page 84: Eurasian Economic Union (Евразийский Экономический Союз)
Telephone: +7 985 192 75 37 E-mail: rucis@cytiva.com Информация о производителе и импортере В следующей таблице приводится сводная информация о производителе и импортере, согласно требованиям Технических регламентов Таможенного союза и (или) Евразийского экономического союза. ReadyToProcess Mixer 20/50 Operating Instructions 28964134 AF... - Page 85 Member States of the Customs Union of the Eurasian Economic Union Данный знак о Евразийском соответствии указывает, что изделие одобрено для использования на рынках государств-членов Таможенного союза Евразийского экономического союза ReadyToProcess Mixer 20/50 Operating Instructions 28964134 AF...
-
Page 86: North America
Note: The user is cautioned that any changes or modifications not expressly approved by Cytiva could void the user’s authority to operate the equip- ment. This equipment has been tested and found to comply with the limits for a Class A digital device, pursuant to part 15 of the FCC Rules. -
Page 87: Regulatory Statements
This section shows regulatory statements that apply to regional requirements. EMC emission, CISPR 11: Group 1, Class A statement NOTICE This equipment is not intended for use in residential environments and may not provide adequate protection to radio reception in such environments. ReadyToProcess Mixer 20/50 Operating Instructions 28964134 AF... -
Page 88: Declaration Of Hazardous Substances (Dohs)
EFUP shall be done in accordance with the Product Maintenance Procedures. This product must not be disposed of as unsorted municipal waste, and must be collected separately and handled properly after decommissioning. ReadyToProcess Mixer 20/50 Operating Instructions 28964134 AF... - Page 89 Indicates that this hazardous substance contained in at least one of the homogeneous materials used for this part is above the limit requirement in GB/T 26572 • Data listed in the table represents best information available at the time of publication. ReadyToProcess Mixer 20/50 Operating Instructions 28964134 AF...
-
Page 90: Spare Parts, Accessories And Ordering Information
9 Reference information 9.4 Spare parts, accessories and ordering information Spare parts, accessories and ordering information For correct ordering information on spare parts and accessories, visit cytiva.com contact your local Cytiva representative. ReadyToProcess Mixer 20/50 Operating Instructions 28964134 AF... -
Page 91: Health And Safety Declaration Form
Service Ticket #: To make the mutual protection and safety of Cytiva service personnel and our customers, all equipment and work areas must be clean and free of any hazardous contaminants before a Service Engineer starts a repair. To avoid delays in the servicing of your equipment, complete this checklist and present it to the Service Engineer upon arrival. - Page 92 To make sure the mutual protection and safety of Cytiva personnel, our customers, transportation personnel and our environment, all equipment must be clean and free of any hazardous contaminants before shipping to Cytiva. To avoid delays in the processing of your equipment, complete this checklist and include it with your return.
-
Page 93: Appendix A: Readytoprocess Mixer 20/50 Theory Of Operation
A. ReadyToProcess Mixer 20/50 theory of operation Appendix A ReadyToProcess Mixer 20/50 theory of operation Mixing requires the movement of liquid Q = fluid pumped (lpm) T = Q/V where V is the fluid volume T is the number of turnovers Mixing time can be correlated to the number of times the fluid is turned over (T). - Page 94 ReadyToProcess Mixer 20/50 ReadyToProcess Mixer 20/50 uses wave motion to mix. It is well known that waves contain tremendous energy. Wave motion can move large volumes of liquid, sweeping up solids and dispersing them.
- Page 95 When the liquid volume exceeded 75% of the total volume of the bag, mixing effi- ciency was substantially reduced. This is the reason why the maximum operating volume in, for example, the 20L ReadyToProcess Mixer 20/50 is 15 liters (=75% of total volume).
-
Page 96: Index
48 general screen functions, 28 ReadyToProcess Mixer 20/50 , 30 illustrations, 23 Dimensions, 30 main screen, 27 Specifications, 30 temperature, 51 Weight, 30 Intended use of product, 5 Recycling information, 79 decontamination, 79 ReadyToProcess Mixer 20/50 Operating Instructions 28964134 AF... - Page 97 18 Specifications, 30 Troubleshooting, 67–70 alarm number, 70 general problems, 68 power failure, 69 speed control, 69 temperature control, 68, 69 Typographical conventions, 6 UK, 83 conformity, 83 UKCA, 83 marking, 83 ReadyToProcess Mixer 20/50 Operating Instructions 28964134 AF...
- Page 98 Cytiva and the Drop logo are trademarks of Global Life Sciences IP Holdco LLC or an affiliate doing business as Cytiva. ReadyToProcess is a trademark of Global Life Sciences Solutions USA LLC or an affiliate doing business as Cytiva.
Need help?
Do you have a question about the ReadyToProcess Mixer 20/50 and is the answer not in the manual?
Questions and answers