Table of Contents
Advertisement
Quick Links
Advertisement
Table of Contents
Troubleshooting

Related Manuals for cytiva miniVE


Summary of Contents for cytiva miniVE
- Page 1 Operating Instructions Original instructions cytiva.com...
-
Page 2: Table Of Contents
European Union and European Economic Area ................61 8.4.3 Eurasian Economic Union Евразийский экономический союз ....................62 8.4.4 Declaration of Hazardous Substances (DoHS) ................64 Health and Safety Declaration Form ...................... 66 Index ........................... 68 miniVE Operating Instructions 29281778 AB... -
Page 3: Introduction
1 Introduction Introduction About this chapter This chapter contains important user information, descriptions of safety notices, regu- latory information, and intended use of the miniVE system. In this chapter Section See page About this manual Important user information miniVE Operating Instructions 29281778 AB... -
Page 4: About This Manual
The Operating Instructions provide you with the information needed to install, operate and maintain the product in a safe way. Scope of this manual The Operating Instructions cover the miniVE instrument. The illustration below shows the miniVE instrument. Illustrations The images and annotations in this document are for illustrative purposes only. The configuration of individual products may vary, and therefore illustrations may not reflect the actual system delivered. -
Page 5: Important User Information
Blot Module is primarily intended for blotting of proteins and nucleic acids at laboratory-scale. The system can be used for a variety of research purposes to fulfill the needs of the users in academia and in life sciences industry. - Page 6 Notes and tips Note: A note is used to indicate information that is important for trouble-free and optimal use of the product. Tip: A tip contains useful information that can improve or optimize your proce- dures. miniVE Operating Instructions 29281778 AB...
-
Page 7: Safety Instructions
Before installing, operating or maintaining the product, all users must read and understand the entire contents of this chapter to become aware of the hazards involved. In this chapter Section See page Safety precautions Labels Emergency procedures miniVE Operating Instructions 29281778 AB... -
Page 8: Safety Precautions
2.1 Safety precautions Safety precautions Introduction miniVE is powered by an external power supply and handles materials that are consid- ered hazardous material. Before installing, operating or maintaining the system, you must be aware of the hazards described in this manual. - Page 9 WARNING Use only approved parts. Only spare parts and accessories that are approved or supplied by Cytiva may be used for maintaining or servicing the product. WARNING The safety lid must be in place before connecting the power leads to a power supply.
- Page 10 The facility must comply with the national code of practice for biosafety. Using flammable liquids WARNING A fume hood or similar ventilation system shall be installed when flammable or noxious substances are used. miniVE Operating Instructions 29281778 AB...
- Page 11 Make sure that there is access to the instrument power supply cord at all times. WARNING Disconnect power. Always disconnect power from the instru- ment before replacing any component on the instrument, unless stated otherwise in the user documentation. miniVE Operating Instructions 29281778 AB...
- Page 12 Maintenance WARNING Decontaminate before maintenance. To avoid personnel being exposed to potentially hazardous substances, make sure that the miniVE is properly decontaminated and sanitized before mainte- nance or service. WARNING Disconnect power. Always disconnect power from the instru- ment before performing any maintenance task.
-
Page 13: Labels
Do not open any covers or replace parts unless specifically stated in the user documentation. Warning! High Voltage. Always make sure that the system is disconnected from electric power before removing the lid. miniVE Operating Instructions 29281778 AB... -
Page 14: Emergency Procedures
To restart the run after an emergency shutdown or power failure, follow these steps: Step Action Make sure all connections are in place. Start the power supply as described in the power supply's User Manual. miniVE Operating Instructions 29281778 AB... -
Page 15: System Description
3 System description System description About this chapter This chapter gives an overview of the miniVE instrument, and a brief description of its function. In this chapter Section See page Instrument overview Detailed description miniVE Operating Instructions 29281778 AB... -
Page 16: Instrument Overview
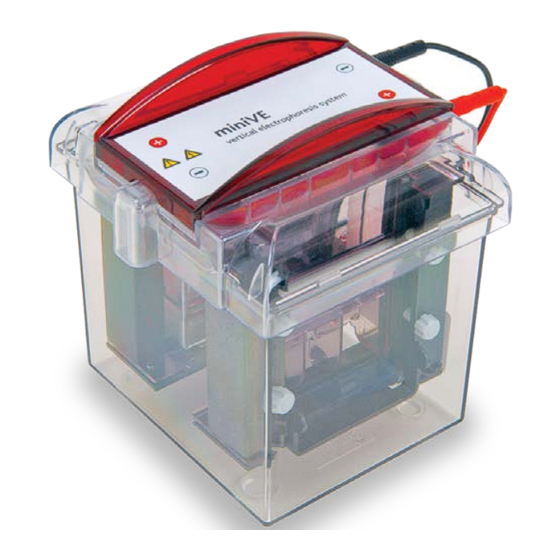
Instrument overview Introduction to miniVE The miniVE is a vertical electrophoresis electrotransfer instrument. This section gives an overview of the miniVE, and the optional miniVE Blot Module. Illustration of the instrument The illustration below shows the miniVE instrument. miniVE is powered using a separate power supply. -
Page 17: Detailed Description
The illustration below shows the locations and gives brief descriptions of the miniVE instrument. Part Function Color-coded leads Safety lid Electrophoresis module Banana plug connectors Tank miniVE requires a power supply with a minimum rating of 50 mA and 250 V. miniVE Operating Instructions 29281778 AB... - Page 18 3 System description 3.2 Detailed description Illustration of miniVE Blot Module The illustration below shows the locations of the optional miniVE Blot Module. Part Function Black cathode side of blotting module Red anode side of blotting module miniVE Operating Instructions 29281778 AB...
-
Page 19: Installation
Inspect all visible parts for damage or missing pieces. If any damage is observed, record this on the receiving documents and inform your Cytiva representative. Make sure to keep all packing material for damage claims or to use should it become necessary to return the unit. -
Page 20: Operation
Any liquid on the equipment must be dried off before connecting the power supply. CAUTION Never introduce anti-freeze or any organic solvent into any part of the instrument. Organic solvents will cause irreparable damage to the instrument. miniVE Operating Instructions 29281778 AB... - Page 21 After initial monitoring, do not leave the unit unattended for more than 30 min before checking the progress of the bands and the buffer level. In this chapter Section See page Electrophoresis module Electrotransfer module miniVE Operating Instructions 29281778 AB...
-
Page 22: Electrophoresis Module
For instructions on using the blot module, see Section 5.2 Electrotransfer module, on page In this section Section See page 5.1.1 Prepare the electrophoresis module 5.1.2 Pre-cast gels 5.1.3 Final electrophoresis assembly 5.1.4 Electrophoresis run 5.1.5 After electrophoresis miniVE Operating Instructions 29281778 AB... -
Page 23: Prepare The Electrophoresis Module
Loosen all four screws 4 to 5 turns in counterclockwise direction, as shown in the illustration in step 1. Do not attempt to remove the screws from the clamps. Swing the clamps outward to open the module. Lay the module flat on a bench. miniVE Operating Instructions 29281778 AB... - Page 24 Take care to “square” the three sealing sides of the sandwich. Hold the sand- wich and gently tap the bottom against a flat surface. Note: Make sure to take extra care to align all components when assembling the sandwich, to ensure a good seal. miniVE Operating Instructions 29281778 AB...
- Page 25 Turn each screw (alternating to keep the pressure even) until the clamps are loosely secured and will allow the spacers to be adjusted, if necessary. Repeat step 3 and 4 for the clamp on the other side. miniVE Operating Instructions 29281778 AB...
- Page 26 Do not overtighten, as the plates may crack. Check the spacer alignment. Misalignment can cause leaks. The spacer must not protrude out The glass plate must not be resting of the sandwich or be recessed on the spacer "T". into it. miniVE Operating Instructions 29281778 AB...
- Page 27 When hanging the module on the tank, either fill the tank or hang the second module on the other side as a counterbalance. Pour resolving gel Follow the instructions below to pour the resolving gel. WARNING Acrylamide is a neurotoxin. Always wear gloves and observe all laboratory safety procedures. miniVE Operating Instructions 29281778 AB...
- Page 28 If an overlay was applied, rinse the sandwich several times with double- distilled water to remove it. Invert the module to drain. To ensure seamless contact between the resolving and stacking gels, remove residual liquid by blotting one corner of the gel with a lint-free tissue. miniVE Operating Instructions 29281778 AB...
- Page 29 Insert a comb (at a slight angle to prevent trapping air) into the sandwich, allowing the comb sides to rest on the spacers. Allow a minimum of one hour for the gel to polymerize. miniVE Operating Instructions 29281778 AB...
-
Page 30: Pre-Cast Gels
Center the cassette within the guide rail at both sides of the module (1). Swing each clamp into position over the sides of the cassette. miniVE Operating Instructions 29281778 AB... - Page 31 Move the sealing plate into the half open position to prepare for electropho- resis. Apply gentle inward pressure to both tabs and lock them into the lower notch. See the illustration in step 1 of section Prepare final assembly, on page miniVE Operating Instructions 29281778 AB...
-
Page 32: Final Electrophoresis Assembly
2 cm from the bottom of the module, is completely submerged. To prevent buffer from entering the upper buffer chamber, verify that the buffer level is not above the maximum level. miniVE Operating Instructions 29281778 AB... - Page 33 The lid is symmetrical and fits in either orienta- tion. Plug the color-coded leads into the jacks of an approved power supply (red to red, black to black). The minimum power supply rating is 250 V, 50 mA, constant current or constant voltage. miniVE Operating Instructions 29281778 AB...
-
Page 34: Electrophoresis Run
5.1.4 Electrophoresis run 5.1.4 Electrophoresis run Introduction This section describes how to run gels in miniVE. NOTICE After initial monitoring, do not leave the unit unattended for more than 30 min before checking the progress of the bands and the buffer level. -
Page 35: After Electrophoresis
If using pre-cast gels, follow the manufacturers instructions. Carefully lift the gel from the plate and lay it into a tray containing stain, fixa- tive, or transfer buffer. Clean the unit as described in Chapter 6 Maintenance, on page miniVE Operating Instructions 29281778 AB... -
Page 36: Electrotransfer Module
For instructions on using the electrophoresis module, see Section 5.1 Electropho- resis module, on page In this section Section See page 5.2.1 Prepare the electrotransfer module 5.2.2 Final electrotransfer assembly 5.2.3 Electrotransfer run 5.2.4 After electrotransfer miniVE Operating Instructions 29281778 AB... -
Page 37: Prepare The Electrotransfer Module
Chill approximately 2 L of deionized water to 4°C. Fill the tank with chilled water (this serves as passive cooling during electro- transfer). Prepare transfer stack components Follow the instructions below to prepare the components of the transfer stack. miniVE Operating Instructions 29281778 AB... - Page 38 Electrophoretic transfer can be performed on up to four mini gels at one time, if two gels are placed in each of two modules. Note: Always wear gloves when handling membranes to avoid leaving finger- prints. miniVE Operating Instructions 29281778 AB...
- Page 39 Center a packing sponge (1) on the black cathode side. Place one piece of wet filter paper (2) on the sponge. Position the equilibrated gel (3) on the filter paper. Wet the gel surface with a few drops of transfer buffer. miniVE Operating Instructions 29281778 AB...
- Page 40 Fold the empty half of the cup over the stack and press the halves together to snap the module closed. The transfer stack should be held firmly in place when the cup is closed. Replace old and compressed sponges, if needed, to fill the cup. miniVE Operating Instructions 29281778 AB...
-
Page 41: Final Electrotransfer Assembly
To avoid rapid evaporation, the buffer temperature should not exceed 75°C. Passive cooling is recommended if the transfer will be longer than one hour, if biological activity must be retained, or if transferring nucleic acids. miniVE Operating Instructions 29281778 AB... - Page 42 Place the safety lid on the tank. The lid is symmetrical and fits in either orien- tation. Plug the color-coded leads into the jacks of an approved power supply: red to red, black to black. miniVE Operating Instructions 29281778 AB...
-
Page 43: Electrotransfer Run
5.2.3 Electrotransfer run Introduction This section describes how to run and electrotransfer using the miniVE Blot Module. Run an electrotransfer Electrophoretic transfer conditions for blotting proteins in Towbin buffer: 25 V for 1 to 2 hours, 300 to 400 mA. -
Page 44: After Electrotransfer
Remove the membrane from the stack with a blunt forceps. Process the membrane according to your protocol or allow the membrane to air dry prior to storage. Clean the unit as described in Chapter 6 Maintenance, on page miniVE Operating Instructions 29281778 AB... -
Page 45: Maintenance
CAUTION Handle the glass components with care! Wear appropriate personal protective equipment (PPE). CAUTION When lifting and moving the instrument be careful not to drop it. This may cause injury. miniVE Operating Instructions 29281778 AB... - Page 46 • not autoclave or heat any part above 75°C. • not immerse the safety lid in any liquid. • not expose miniVE to organic solvents, abrasives, strong cleaning solutions, or strong acids or bases to clean the chambers. • not soak the laminated gasket.
-
Page 47: Troubleshooting
If the suggested actions in this guide do not solve the problem, or if the problem is not covered by this guide, contact your Cytiva representative for advice. Safety precautions WARNING Turn all power supply controls off and disconnect the power leads before removing the safety lid. -
Page 48: Electrophoresis Troubleshooting
Prechill the buffer. Decrease the current or voltage setting. Run the gel in the cold room. Protein streaks verti- Particles in sample Centrifuge or filter sample before cally loading to remove particles. Dialyze or desalt the sample. miniVE Operating Instructions 29281778 AB... - Page 49 Joule heating. Reagent quality Use only the highest-quality reagents. Only use freshly deionized urea. Poor stacking Use only gels that were recently prepared. Check pH values of the resolving- and stacking-gel solutions. Do not back-titrate buffers. miniVE Operating Instructions 29281778 AB...
- Page 50 2.5 times the height of the sample in the well. Reagent quality Dispose of outdated acrylamide solutions and use only the highest grade of acrylamide. Sample preparation When preparing samples, avoid using solutions with high salt concentrations. miniVE Operating Instructions 29281778 AB...
-
Page 51: Electrotransfer Troubleshooting
For native gels, increase the net charge on the protein by changing to a transfer buffer with a different pH. Lower pH (<6–7) increases the posi- tive charge on proteins; higher pH (>6–7) increases the negative charge on proteins. miniVE Operating Instructions 29281778 AB... - Page 52 Add 10% to 20% methanol to the transfer buffer to enhance binding to nitrocellu- lose. Membrane parameters Wear gloves when handling membranes. Store membranes at ambient temperature out of direct sunlight to keep the membranes acti- vated. miniVE Operating Instructions 29281778 AB...
- Page 53 Check both membranes for protein(s). Check if too much sample is available for the binding surface area by applying two membranes instead of one. If “blow through” occurs, reduce the sample load. miniVE Operating Instructions 29281778 AB...
-
Page 54: Reference Information
8 Reference information Reference information About this chapter This chapter lists the technical specifications of the miniVE. The chapter also includes ordering information and the Health and Safety Declaration form for service. In this chapter Section See page Specification Ordering information... -
Page 55: Specification
1.6 L with one module in place 1.4 L with two modules in place Electrotransfer module Characteristic Description Number of gels 2 blotting modules Maximum power 15 W per blotting module Maximum current 400 mA Buffer required 350 mL per module miniVE Operating Instructions 29281778 AB... - Page 56 8 Reference information 8.1 Specification Characteristic Description Maximum tank volume (for passive 1.7 L with one module in place cooling) 1.2 L with two modules in place miniVE Operating Instructions 29281778 AB...
-
Page 57: Ordering Information
8 Reference information 8.2 Ordering information Ordering information For product codes and information about how to order, please see cytiva.com miniVE Operating Instructions 29281778 AB... -
Page 58: Recycling Information
Waste electrical and electronic equipment must not be disposed of as unsorted munic- ipal waste and must be collected separately. Please contact an authorized representa- tive of the manufacturer for information concerning the decommissioning of the equipment. miniVE Operating Instructions 29281778 AB... -
Page 59: Regulatory Information
8 Reference information 8.4 Regulatory information Regulatory information Introduction This section lists the regulations and standards that apply to the miniVE instrument In this section Section See page 8.4.1 Contact information 8.4.2 European Union and European Economic Area 8.4.3 Eurasian Economic Union Евразийский... -
Page 60: Contact Information
Manufacturing information The table below summarizes the required manufacturing information. Requirement Information Name and address of manufacturer Cytiva Sweden AB Björkgatan 30 SE 751 84 Uppsala Sweden Telephone number of manufacturer + 46 771 400 600 miniVE Operating Instructions 29281778 AB... -
Page 61: European Union And European Economic Area
• used according to the Operating Instructions or user manuals, and • used in the same state as it was delivered, except for alterations described in the Operating Instructions or user manuals. miniVE Operating Instructions 29281778 AB... -
Page 62: Eurasian Economic Union
Информация о производителе и импортере В следующей таблице приводится сводная информация о производителе и импортере, согласно требованиям Технических регламентов Таможенного союза и (или) Евразийского экономического союза. Требование Информация Информацию об изготовлении Наименование, адрес и номер См. телефона производителя miniVE Operating Instructions 29281778 AB... - Page 63 Member States of the Customs Union of the Eurasian Economic Union Данный знак о Евразийском соответствии указывает, что изделие одобрено для использования на рынках государств-членов Таможенного союза Евразийского экономического союза miniVE Operating Instructions 29281778 AB...
-
Page 64: Declaration Of Hazardous Substances (Dohs)
This symbol indicates that this electrical and electronic product does not contain any hazardous substances above the maximum concentration value established by the Chinese standard GB/T 26572 , and can be recycled after being discarded, and should not be casually discarded. miniVE Operating Instructions 29281778 AB... - Page 65 Indicates that this hazardous substance contained in at least one of the homogeneous materials used for this part is above the limit requirement in GB/T 26572 • Data listed in the table represents best information available at the time of publication. miniVE Operating Instructions 29281778 AB...
-
Page 66: Health And Safety Declaration Form
Service Ticket #: To make the mutual protection and safety of Cytiva service personnel and our customers, all equipment and work areas must be clean and free of any hazardous contaminants before a Service Engineer starts a repair. To avoid delays in the servicing of your equipment, complete this checklist and present it to the Service Engineer upon arrival. - Page 67 To make sure the mutual protection and safety of Cytiva personnel, our customers, transportation personnel and our environment, all equipment must be clean and free of any hazardous contaminants before shipping to Cytiva. To avoid delays in the processing of your equipment, complete this checklist and include it with your return.
-
Page 68: Index
48 miniVE , 17 electrophoresis run, 48 instrument modules, electrophoresis sample, 48 descriptions, 17 electrotransfer, 51 miniVE Blot Module , 18 incomplete electrotransfer, instrument modules, descriptions, 18 Unpacking, 19 Notes and tips, 6 Unpacking procedure, 19 On site service, 66... - Page 69 Page intentionally left blank...
- Page 70 © 2020 Cytiva All goods and services are sold subject to the terms and conditions of sale of the supplying company operating within the Cytiva business. A copy of those terms and conditions is available on request. Contact your local Cytiva representative for the most current information.
Need help?
Do you have a question about the miniVE and is the answer not in the manual?
Questions and answers