Table of Contents
Advertisement
ALDI guarantees that our exclusive brand products are developed to our
stringent quality specifi cati ons. If you are not enti rely sati sfi ed with this
product, please return it to the nearest ALDI store within 60 days from the
date of purchase, for a full refund or replacement, or take advantage of our
aft er sales support by calling the supplier's Customer Service Hotline.
Made in China
WORKZONE TITANIUM® is a registered trademark of ALDI Stores
DISTRIBUTED BY:
ALDI STORES
1 SARGENTS ROAD
MINCHINBURY NSW 2770
www.aldi.com.au
5
AFTER SALES SUPPORT
53666
1300 855 831
support@scheppach.com.au
MODEL:
YEARS
HM80MP
06/2019
WARRANTY
1700W
SLIDING MITRE SAW
Original operating manual
Vers.No. 190107
Contents
Details
04
06
07
09
10
11
12
12
13
19
20
25
26
26
26
27
28
28
29
30
Advertisement
Table of Contents

Related Manuals for ALDI WORKZONE TITANIUM HM80MP


Summary of Contents for ALDI WORKZONE TITANIUM HM80MP
-
Page 1: Table Of Contents
If you are not enti rely sati sfi ed with this Scope of delivery product, please return it to the nearest ALDI store within 60 days from the SLIDING MITRE SAW date of purchase, for a full refund or replacement, or take advantage of our Intended use aft er sales support by calling the supplier’s Customer Service Hotline. -
Page 2: Contents Of Box
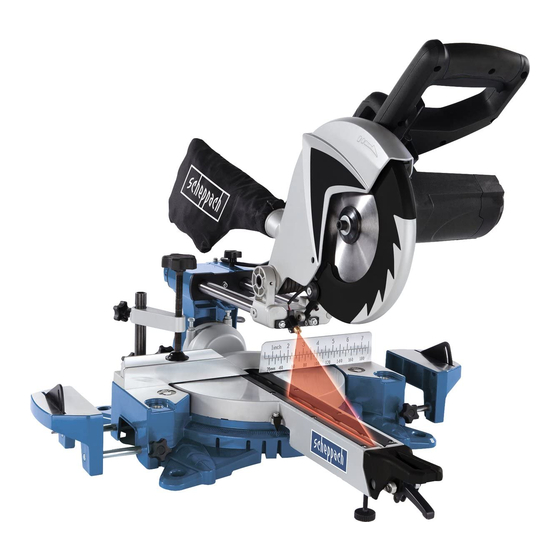
Overview Utilisation Pack contents/parts HM80MP Fig. 1 Fig. 6a Fig. 6b Fig. 6c Contents of Box 1 x Sliding Mitre saw Clamping device Fig. 6 Fig. 7 Workpiece support Dustbag Allen key LR44 Battery (pre-installed) Instruction manual Warranty card Fig. 8 Fig. -
Page 3: Handling Pictures
HM80MP Fig. 12 Fig. 13 Fig. 14 Fig. 15 Fig. 16 Fig. 17 Fig. 18 Fig. 19 AFTER SALES SUPPORT support@scheppach.com.au 1300 855 831 MODEL: HM80MP PRODUCT CODE: 53666 06/2019... - Page 4 <Chapter> HM80MP Text These operating instructions provide places concerning m Attention! your safety which are marked with this indication. Failure to follow these instructions may cause light to m Caution! medium risk of injury Failure to follow these instructions may cause danger to m Warning! life or danger of serious injuries! AFTER SALES SUPPORT...
-
Page 5: Explanation Of The Symbols On The Equipment
HM80MP Explanation of symbols Explanation of Symbols Caution - Read the operating instructions to reduce the risk of injury! Wear ear-muffs. The impact of noise can cause damage to hear- ing. Wear a breathing mask. Dust which is injurious to health can be generated when working on wood and other materials. -
Page 6: Introduction
Introduction HM80MP I. Introduction Congratulations on choosing to buy a WORKZONE TITANIUM product. ® All products brought to you by WORKZONE TITANIUM are manufactured to the ® highest standards of performance and safety, and as part of our philosophy of cus- tomer service and satisfaction, are backed by our comprehensive 5 Year Warranty. -
Page 7: Layout
HM80MP Layout II. Layout (Fig. 1-19) Handle ON/OFF switch Release lever Saw spindle lock Machine head Movable blade guard Saw blade Clamping device Workpiece support 10. Locking screw for workpiece support 11. Table insert 12. Indexed position lever 13. Locking lever 14. -
Page 8: Scope Of Delivery
Layout/Scope of delivery/Intended use HM80MP a) 90° angle gauge (not supplied) b) 45° angle gauge (not supplied) c) Allen key, 6 mm d) Counter nut for adjustment screw III. Scope of delivery 1700W Sliding Mitre Saw 1 x Clamping device (8) 2 x Workpiece support (9) 1 x Dust bag (21) 1 x Allen key (c) -
Page 9: Safety Regulations
HM80MP Intended use/Safety regulations imperative to observe the accident prevention regulations in force in your area. The same applies for the general rules of health and safety at work. The manufacturer will not be liable for any changes made to the equipment nor for any damage resulting from such changes. - Page 10 Safety regulations HM80MP Do not overload your electric tool They work better and more safely in the specified output range. – Use the correct electric tool Do not use low-output electric tools for heavy work. – Do not use the electric tool for purposes for which it is not intended. For ex- –...
- Page 11 HM80MP Safety regulations Check the connection cable of the electric tool regularly and have it replaced – by a recognised specialist when damaged. Check extension cables regularly and replace them when damaged. – Keep the handle dry, clean and free of oil and grease. –...
- Page 12 Safety regulations HM80MP Have your electric tool repaired by a qualified electrician This electric tool conforms to the applicable safety regulations. Repairs may – only be performed by an electrician using original spare parts. Otherwise accidents can occur. It is recommended that the tool always be supplied via a residual current device having a rated residual current of 30 mA or less.
- Page 13 HM80MP Safety regulations When transporting the electric tool, only use the transport devices. Never use – the protective devices for handling or transport. Make sure that the lower part of the saw blade is covered during transport, e.g. – by the protective device. Be sure to only use spacers and spindle rings specified by the manufacturer –...
- Page 14 Safety regulations HM80MP Attention: Laser radiation Do not stare into the beam Class 2 laser Protect yourself and you environment from accidents using suitable precau- tionary measures! • Do not look directly into the laser beam with unprotected eyes. • Never look into the path of the beam. •...
-
Page 15: Before Starting The Equipment
HM80MP Safety regulations/Before starting the equipment Keep unused batteries in the original packaging and keep them away from metal objects. Do not mix unpacked batteries or toss them together! This can lead to a short-circuit of the battery and thus damage, burns or even the risk of fire. Remove batteries from the equipment when it will not be used for an extended period of time, unless it is for emergencies! NEVER handle batteries that have leaked without appropriate protection. -
Page 16: Assembling And Operation
Before starting the equipment/Assembling and operation HM80MP • When working with wood that has been processed before, watch out for foreign bodies such as nails or screws, etc. • Before you press the ON/OFF switch check that the saw blade is fitted correctly. Moving parts must run smoothly. - Page 17 HM80MP Assembling and operation 7.4 Changing the speed (Fig. 2) The saw has 2 speed ranges: • To operate the saw at a speed of 3800 rpm (non-ferrous metals), set the switch (42) to position I. • To operate the saw at a speed of 5000 rpm (wood), set the switch (42) to position II. 7.5 Cross cut 90°...
- Page 18 Assembling and operation HM80MP 7.6 Cross cut 90° and turntable 0° - 45° (Fig. 1,6,7) The crosscut saw can be used to make crosscuts of 0° -45° to the left and 0° -45° to the right in relation to the fence. Caution! For bevel cuts (inclined saw head), the moveable fence (28) must be fixed in the outer position.
- Page 19 HM80MP Assembling and operation 7.8 Mitre cut 0°- 45° and turntable 0°- 45° (Fig. 1,2,6,9) The crosscut saw can be used to make mitre cuts to the left of 0°- 45° in relation to the work face and, at the same time, 0° - 45° to the left or 0° - 45° to the right in relation to the fence (double mitre cut).
- Page 20 Assembling and operation HM80MP 7.11 Precision adjustment for mitre cut 45° (Fig. 1,3,5,19) • No angle gauge included. • Lower the machine head (5) and secure using the fastening bolt (24). • Fix the turntable (16) in the 0° position. •...
-
Page 21: Technical Data
HM80MP Technical data VIII. Technical data AC motor 230 - 240 V~ 50Hz Power 1700 Watt Operating mode S6 20% 5 Min* Idle speed n 3800 / 5000 min Carbide saw blade ø 216 x ø 30 x 2,8 mm Number of teeth Mitre cut -47°... -
Page 22: Transport
Technical data/Transport/Maintenance/Storage HM80MP Wear hearing protection. The effects of noise can cause a loss of hearing. Total vibration values (vector sum - three directions) determined in accordance with EN 61029. IX. Transport (Fig. 1,2) • Tighten the screw (26) in order to lock the turntable (16) •... -
Page 23: Electrical Connection
HM80MP Electrical connection XII. Electrical connection The electrical motor installed is connected and ready for operation. The con- nection complies with the applicable Australian standards. The customer‘s mains connection as well as the extension cable used must also comply with these regulations. Important information In the event of an overloading the motor will switch itself off. -
Page 24: Disposal And Recycling
Disposal and recycling/Troubleshooting HM80MP XIII. Disposal and recycling The equipment is supplied in packaging to prevent it from being damaged in transit. The raw materials in this packaging can be reused or recycled. The equipment and its accessories are made of various types of material, such as metal and plastic. Defective components must be disposed of as special waste. -
Page 25: Warranty Details
1700W SLIDING MITRE SAW Warranty Details REGISTER YOUR PURCHASE AT www.aldi.com.au/en/about-aldi/product-registration/ TO KEEP UP-TO-DATE WITH IMPORTANT PRODUCT INFORM The product is guaranteed to be free from defects in workmanship and parts for a period of 60 months from the date of purchase. Defects that occur within this warranty period, under normal use and care, will be repaired, replaced or refunded at our discretion. -
Page 26: Repair And Refurbished Goods Or Parts Notice
Please be assured though, refurbished parts or replacements are only used where they meet ALDI’s stringent quality specifications. If at any time you feel your repair is being handled unsatisfactorily, you may escalate your complaint. Please telephone us on 1300 855 831 or write to us at: RossMac Pty.
Need help?
Do you have a question about the WORKZONE TITANIUM HM80MP and is the answer not in the manual?
Questions and answers
How to change saw blade
To change the saw blade on an ALDI WORKZONE TITANIUM HM80MP, follow these steps:
1. Unplug the saw – Remove the power plug to ensure safety.
2. Wear safety gloves – This helps prevent injury.
3. Remove the spring (41) – Push together the two ends to detach it from the pin.
4. Release the guide bar (40) – Detach it from the pin.
5. Press the saw spindle lock (4) – Hold it firmly.
6. Turn the flange screw (32) clockwise – Slowly rotate it while holding the spindle lock until the screw is loosened.
7. Replace the saw blade (7) – Ensure it spins freely in both perpendicular and 45° angle settings.
8. Reassemble the parts – Secure all removed components properly.
9. Check alignment – Ensure the blade is correctly positioned before use.
Always verify that all safety devices are in good working condition before operating the saw.
This answer is automatically generated
Having replaced the saw blade I need to reassemble the safety blade cover and associated parts. The exploded diagram on the manual is unreadable. Please tell me how to reassemble with a clear diageam.