
Related Manuals for Work Sharp WSBCHPAJ-PRO


Summary of Contents for Work Sharp WSBCHPAJ-PRO
- Page 1 U S E R ’ S G U I D E F O R T H E PROFESSIONAL PRECISION ADJUST KNIFE SHARPENER W S B C H P A J - P R O...
-
Page 2: Table Of Contents
TABLE OF CONTENTS ORIGINAL INSTRUCTIONS SETTING UP YOUR PRO PRECISION ADJUST SHARPENER ....3 GETTING TO KNOW YOUR PRO PRECISION ADJUST SHARPENER ..4 V-BLOCK CLAMP™... -
Page 3: Setting Up Your Pro Precision Adjust Sharpener
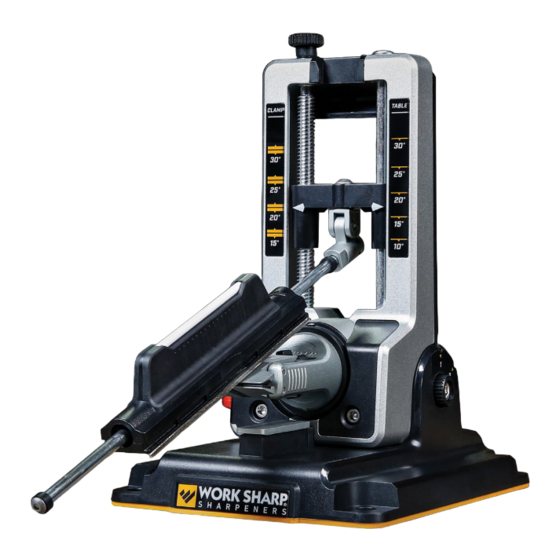
SETTING UP YOUR PROFESSIONAL PRECISION ADJUST SHARPENER Sharpening Chassis Sharpening Base Chassis Mounting Screws V-Block Clamp™ Abrasive Handle and Sharpening Rod with O-Rings Abrasive Digital Angle Indicator Small Knife Table Clamp Support SETTING UP YOUR PROFESSIONAL PRECISION ADJUST SHARPENER | 3... -
Page 4: Getting To Know Your Pro Precision Adjust Sharpener
GETTING TO KNOW YOUR PROFESSIONAL PRECISION ADJUST SHARPENER Angle Adjust Knob Chassis Tilt Lock Lever (on back) Angle Adjustment Carriage Sharpening Rod Clevis Sharpening Chassis Sharpening Base Chassis Mounting Screws V-Block Clamp™ Clamp Release Lever Sharpening Rod With Adjustable O-Rings Abrasive Handle Abrasive Plate Abrasive Handle Stowage Position... -
Page 5: V-Block Clamp™ Installation & Removal
V-BLOCK CLAMP™ INSTALLATION & REMOVAL Line up the Alignment Mark on the V-Block Clamp™ with the line on the Sharpening Chassis. Push the V-Block Clamp™ firmly into the Sharpening Chassis until it snaps/locks into place. To remove the V-Block Clamp™, press down on the Clamp Release Lever and pull the V-Block Clamp™ out of the Sharpening Chassis. -
Page 6: Rotating Your Knife
ROTATING YOUR KNIFE POCKET AND EDC KNIVES Most pocket knives and EDC (everyday carry) knives can be rotated by simply rotating the V-Block Clamp™ in the Sharpening Chassis. Rotate the knife counterclockwise 180° by pressing the Clamp Release Lever. Use knife handle to flip over knife. TIP: Ensure indicator marks are facing up and knife handle to right. -
Page 7: Choosing Your Grit
CHOOSING YOUR GRIT Determine the condition of your knife and progress through each grit using the sharpening directions located on page 9. EXTREMELY DULL EDGE REPAIR GRIT LEVEL ANGLE CHANGE 220 GRIT REPAIR 320 GRIT SHAPE SHARPENING 400 GRIT SHARPEN 600 GRIT SHARPEN 800 GRIT... -
Page 8: Abrasive Handle Installation And Storage Position
ABRASIVE HANDLE INSTALLATION AND STORAGE POSITION Insert the Sharpening Rod into the Sharpening Rod Clevis until it clicks into place. Install Abrasive Plate onto the handle. Ensure the plate is fully seated over the pins on the handle. Ensure the Sharpening Rod slides through both internal bearings and slides freely with full range of motion. -
Page 9: Clamp Support
CLAMP SUPPORT Use the Clamp Support when sharpening larger knives for additional stability and rigidity. Install onto the Mounting Rail of the Sharpening Base until fully seated. The V-Block Clamp™ will then rest on the Clamp Support. Sharpening Chassis must be tilted back to rotate the knife when using the Clamp Support. SHARPENING YOUR KNIFE WARNING: Sharpening can be a dangerous task. -
Page 10: Honing
Sharpen the same number of strokes on this side of the blade to establish an even bevel. TIP: Rubber O-Rings can be moved to adjust the amount of Abrasive Handle slide you desire when sharpening different knife types (EDC’s versus Kitchen knives). -
Page 11: Serration Sharpening
SERRATION SHARPENING Hold the knife in your hand, with the serrations face up. Remove the Abrasive Handle and Sharpening Rod from the Sharpening Chassis. Place the round Ceramic Rod into one of the serrations so it matches the angle. Using light pressure, swipe the ceramic rod back-and-forth inside the serration for 8-10 strokes. Repeat for each serration. - Page 12 INSTALLING YOUR SMALL KNIFE SHARPENING TABLE Remove the V-Block Clamp™ . Position the Mounting Slot of the Small Knife Sharpening Table over the Mounting Rail on the Sharpening Base. Slide the Table onto the Sharpening Chassis until it stops and is securely in position.
- Page 13 POSITIONING A SMALL KNIFE Place the blade with the cutting edge forward on the front edge of the table so the cutting edge is slightly past the edge of the Table The plunge line of the knife should be touching the side of the table. Magnets will help secure the knife to the table.
-
Page 14: Tips And Techniques
Abrasive can be replaced individually, visit WorkSharpTools.com to learn more. 3 YEAR WARRANTY This sharpener is covered by Work Sharp’s 3-year warranty. We stand behind and support our products – contact us if you need assistance, parts, or service. Warranty for consumer not industrial or commercial use, excludes abrasives. -
Page 15: Sharpening Notes
SHARPENING NOTES Knife / Tool Notes SHARPENING NOTES | 15... - Page 16 WORK SHARP 210 E Hersey St. Ashland OR 97520 Phone: 1 (800) 597-6170 Fax: 1 (541) 552-1377 Email: info@worksharptools.com Visit: Worksharptools.com WORK SHARP® is a registered trademark of DAREX, LLC PP0005063 Rev 1 12/22...
- Page 17 DO NOT PRINT KEY Booklet dimensions SPOT COLOR: NOTES: WORK SHARP 241mm x 150mm 210 E. HERSEY ST. CUT: ASHLAND, OR 97520 CREASE/FOLD: PHONE: (+1) 541-552-1301 PANTONE 7409C BLEED LINE: FAX: 541-552-1377 TITLE: PRO PA User Guide 157 GSM Coated Art paper cover...
Need help?
Do you have a question about the WSBCHPAJ-PRO and is the answer not in the manual?
Questions and answers