Advertisement
Quick Links
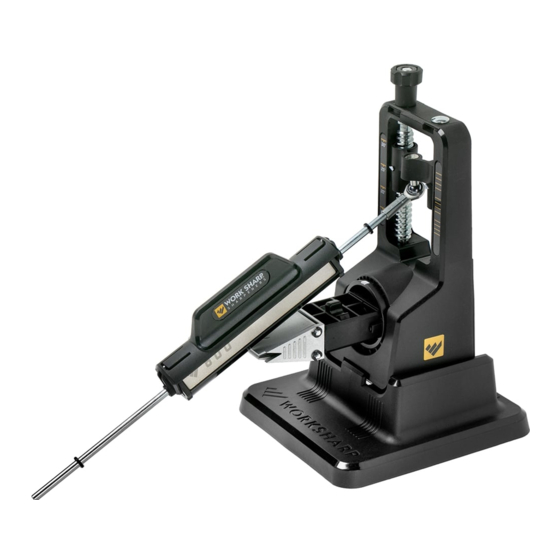
PRECISION ADJUST
SET UP - KNOW YOUR PARTS
Tri-Brasive™ and the Sharpening Rod
1
Sharpening Chassis snaps into the Sharpening Base
2
Insert Sharpening Rod Pin into Angle Selection Mechanism until magnet engages
3
Blade Clamp: Rotate knob to loosen jaws. Push Blade Clamp firmly into the
4
Sharpening Chassis.
5
Push the Spring-Loaded Button on the back of the Sharpening Chassis to rotate /
index clamp 180°
1
180�
INSTRUCTIONS
KNIFE SHARPENER
4
SNAP!
3
CLICK!
PP0004508 Rev. 1
2
5
Advertisement

Related Manuals for Work Sharp PRECISION ADJUST


Summary of Contents for Work Sharp PRECISION ADJUST
- Page 1 INSTRUCTIONS PRECISION ADJUST KNIFE SHARPENER SET UP - KNOW YOUR PARTS Tri-Brasive™ and the Sharpening Rod Sharpening Chassis snaps into the Sharpening Base Insert Sharpening Rod Pin into Angle Selection Mechanism until magnet engages Blade Clamp: Rotate knob to loosen jaws. Push Blade Clamp firmly into the Sharpening Chassis.
- Page 2 GETTING READY TO SHARPEN 1. CHOOSE YOUR ANGLE GENERAL TURN THE ADJUSTMENT KNOB TO RAISE OR LOWER THE SHARPENING ANGLE Low Edge Angles (15° to 22.5°): Highest Sharpness, Lower Durability High Edge Angles (23° to 30°): Functional Sharpness, Higher Durability OUTDOOR KNIVES Hunting Knife (light use / detail cutting): 20°...
- Page 3 SHARPENING STEP 1: SHAPING Start the sharpening process using the coarse 320 grit diamond. Index the Tri-Brasive™ so the 320 grit diamond is placed onto the cutting edge. Using light pressure and long strokes, start at the heel of the blade and swipe the abrasive back and forth while moving along the length of the cutting edge toward the tip.
-
Page 4: Tips And Techniques
STEP 3: HONING Rotate the Tri-Brasive™ so the Fine Ceramic is now face down onto the cutting edge. Using the same technique in STEP 2 above, sharpen blade for 8-10 strokes. Rotate the Blade Clamp again to sharpen the other side of the blade and repeat 8-10 strokes. - Page 5 Use light pressure when sharpening (weight of the blade). Let the abrasive do the work and take your time. You’ll get a better edge and you will have more fun doing it! LIGHT PRESSURE Light Pressure will yield the sharpest and most consistent edges. First Time Sharpening: Use all three Tri-Brasive™...
-
Page 6: Year Warranty
WARRANTY 3 YEAR WARRANTY This sharpener is covered by Work Sharp’s 3-year warranty. We stand behind and support our products – contact us if you need assistance, parts, or service. Warranty for consumer not industrial or commercial use, excludes abrasives.
Need help?
Do you have a question about the PRECISION ADJUST and is the answer not in the manual?
Questions and answers