Advertisement
- 1 DESCRIPTION
- 2 SAFETY PRECAUTIONS
- 3 BEFORE USAGE
- 4 "AUTOMATIC SHUT-OFF" FUNCTION
- 5 CHOICE OF WATER
- 6 FILLING THE WATER TANK (pic. 1, 2)
- 7 IRONING TEMPERATURE
- 8 SETTING THE IRONING TEMPERATURE
- 9 WATER SPRAYER
- 10 STEAM IRONING
- 11 ADDITIONAL STEAM RELEASE
- 12 VERTICAL STEAMING
- 13 IRONING
- 14 CLEANING SYSTEM
- 15 CARE AND CLEANING
- 16 STORAGE
- 17 TECHNICAL CHARACTERISTICS
- 18 Guarantee
- 19 Documents / Resources
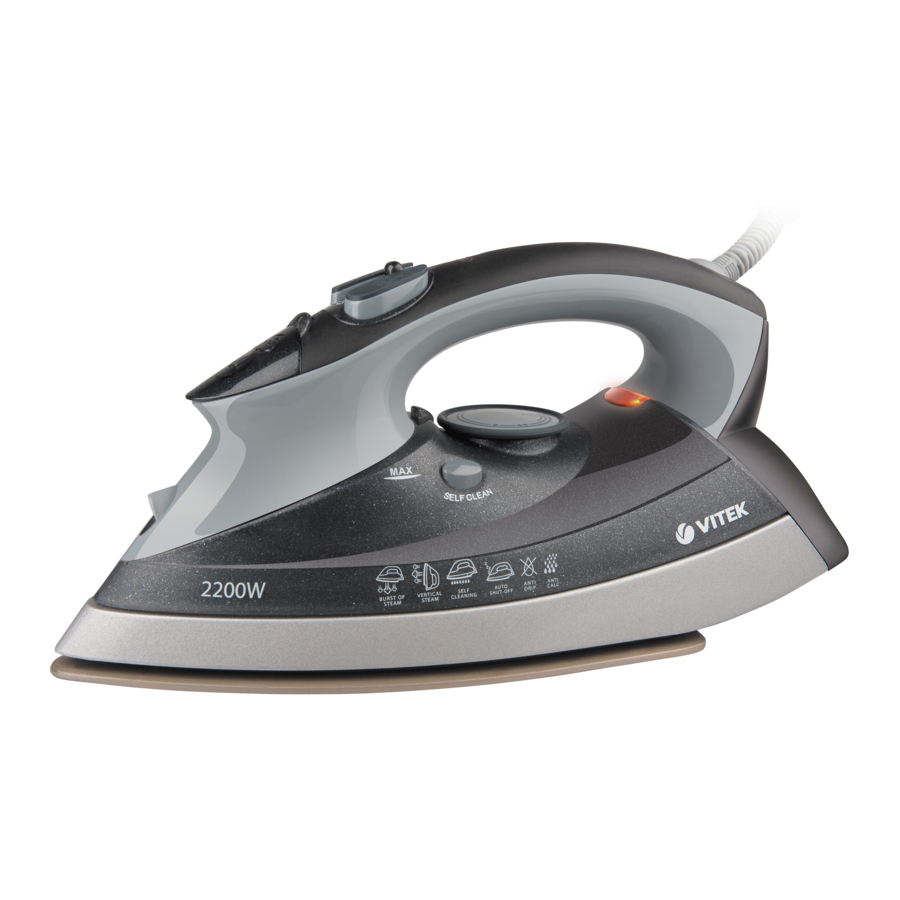
DESCRIPTION

- Water spray nozzle
- Water tank lid
- Additional steam release button
- Spray button
- Steam release On/OFF
- Power cord protection
- Base
- Light operating indicator
- Temperature regulator
- Cleaning button
- Iron sole
SAFETY PRECAUTIONS
Read these instructions carefully before using the device and also pay attention to the illustrations.
- Before connecting the iron to electrical power, maker sure that the voltage of your electrical system matches the operating voltage of the iron.
- Only use the iron for the purposes outlined in these instructions.
- Only use the iron on an ironing board.
- Always disconnect the iron from electrical power when filling the tank with water.
- Be especially careful when using the device around children and disabled persons.
- Do not leave the iron unattended while in use.
- Always disconnect the iron from electrical power when not in use.
- In order to prevent electrical shock, do not submerse the iron in water or any other liquid.
- Avoid contacting any open areas of skin with the hot surfaces of the iron or the released steam in order to prevent burns.
- Make sure that the power cord does not hang over the edge of the ironing board and that it does not come into contact with any hot surfaces.
- Always grip the power plug in order to disconnect the iron from electrical power; never pull on the power cord.
- Pour all the water out of the iron and allow to cool completely before storing.
- In order to avoid overloading the electrical circuit, do not simultaneously operate several devices with high power ratings.
- Do not use the iron if the power plug, power cord, or any other part is damaged or malfunctioning.
- In order to prevent electrical shock, do not attempt to take apart the iron yourself. Contact an authorized service center for repairs if the iron is malfunctioning.
- The iron must be used and rested on a stable surface.
- When placing the iron on its stand, ensure that the surface on which the stand is placed is stable.
- The iron is not to be used if it has been dropped, if there are visible signs of damage or if it is leaking.
- Keep electrical appliances out of reach from Children or infirm persons. Do not let them use the appliances without supervision.
- The user must not leave the iron unattended while it is connected to the supply.
- If the supply cord is damaged, it must be replaced by the manufacturer, its service agent or a similarly qualified person in order to avoid a hazard.
- The plug of the supply cord must be removed from the socket-outlet before the water reservoir is filled with water
- The filling aperture must not be opened during use. instructions for the safe refilling of the water reservoir shall be given.
- The iron must only be used with the stand provided.
- This appliance is not intended for use by persons (including children) with reduced physical, sensory or mental capabilities, or lack of experience and knowledge, unless they have been given supervision or instruction concerning use of the appliance by a person responsible for their safety
- Children should be supervised to ensure that they do not play with the appliance
BEFORE USAGE
- Take out the iron from the package and remove the protective cartoon covering from the iron sole.
- Make sure that the electrical supply voltage corresponds to the iron's operating voltage.
Note:
The iron's heating element is broken in during the first use; it is normal for a small amount of smoke to be released.
"AUTOMATIC SHUT-OFF" FUNCTION
if the iron is motionless during 30 seconds in horizontal position or about 8 minutes in vertical position, it will switch off automatically. The indicator in the temperature control (7) will be flashing.
To switch on the unit, just start ironing, the iron will switch on and the indicator will stop flashing.
CHOICE OF WATER
To fill the water tank use regular tap water. If the water is hard then it is recommended to mix it with distilled water at a ratio of 1:1, if the water is very hard, mix it with distilled water at a ratio of 1:2 or use only distilled water.
Note:
Do not fill the water tank with scented liquids, vinegar, starch solutions, descaling reagents, chemical substances etc.
FILLING THE WATER TANK (pic. 1, 2)

Make sure that the iron is disconnected from electrical power before filling it with water.
- Set the steam release regulator (5) to the position of steam vapor OFF.
- Open the water tank lid (2).
- Fill it with water.
Note:
- Do not fill it with water above MAX. indication.
- If you need to refill the water tank during ironing, turn off the iron and unplug the power cord from the outlet.
- After you finish ironing, turn the iron upside down and drain the remaining water (pic.8).


IRONING TEMPERATURE
Before operating test the heated iron on the old cloth to be sure that the iron sole and the water tank are clean.
- Always check the recommended iron temperature indicated on the tag before ironing.
- If the tag does not list the recommended ironing temperature, but you know the type of fabric, then use the following table to determine the proper temperature.
Signs Type of fabric/temperature ![]()
Synthetics, nylon, acryl, polyester (low temperature) ![]()
Silk/wool (medium temperature) ![]()
Cotton/linen (high temperature) - This table is only for fibrous materials. Fabrics of other types (crimped, raised etc.) are best ironed at low temperature.
- First sort items by ironing temperature: wool with wool, cotton with cotton etc.
- The iron heats up faster than is cools down. For this reason it is recommended to begin ironing at low temperature (for instance synthetic fabrics). After that, move to higher temperature ironing. Cotton and linens should be ironed last.
- If an item is made from a mix of fabrics, then the iron should be set for the fabric with the lowest ironing (for instance if an item is made from 60% polyester and 40% cotton, it should be ironed at the temperature used for ironing polyester "
![]() ").
"). - If you cannot define the fabric the item is made from, find a place on it that is hidden while wearing and, on practice select the ironing temperature (always start at the lowest and gradually raise it until you get the desired result.)
- Corduroy and other fabrics that start glossy quickly should be ironed strictly in one direction (along the lines) with slight pressure.
- To avoid appearance of glossy spots on the synthetic and silk fabrics, iron them back-side.


SETTING THE IRONING TEMPERATURE
- Place the iron on its base (7).
- insert the power plug into the outlet.
- Set the temperature regulator (9) to the required ironing temperature: "
![]() ", "
", "![]() " or "
" or "![]() " (depending on the type of fabric).
" (depending on the type of fabric).
The desired temperature will be reached when the light indicator (8) goes out. The indicator (8) will light up again if the temperature is lower than the required.
Note: When placing the iron on its stand, ensure that the surface on which the stand is placed is stable.
WATER SPRAYER
- You can dampen the fabric by pressing the spray button (4) several times (pic.3).

- Make sure that there is enough water in the water tank.

STEAM IRONING
- Steam ironing is only possible at high temperatures (temperature regulator position (9): "
![]() " or "
" or "![]() ").
"). - Insert the power plug into the outlet.
- Place the iron on its base (7).
- Set the temperature regulator (9) to the required ironing temperature: "
![]() " or "
" or "![]() ".
". - Make sure that there is enough water in the water tank.
- Wait until the light indicator (8) turns off and then light up again. Set the steam release regulator (5) to the required position (pic.4), after that the steam will begin to flow from the openings in the iron sole (11).


Antileaking valve
The system prevents water from leaking out of the iron sole: the iron automatically stops steaming at very low temperatures. When the valve opens you will hear a click.
ADDITIONAL STEAM RELEASE
Additional steam release function is useful when ironing folds and can only be used at high ironing temperatures (when the iron temperature regulator (9) is set to " ").
").
- Set the iron temperature regulator (9) to "
![]() " position.
" position. - When the additional steam release button (3) is pressed, steam will be vigorously released from the openings in the iron sole (pic.5).


Note:
- Sometimes it is necessary to press the additional steam release button (3) several times before the steam will be released from the openings in the iron sole.
- After the indicator (8) goes out, do not press the additional steam release button (3) more than three times.
VERTICAL STEAMING
- Insert the power plug into an electrical outlet.
- Place the iron on its base (7).
- Set the temperature regulator (9) to the "
![]() " position.
" position. - Make sure that there is enough water in the water tank.
- Wait until the light indicator (8) turns off and then light up again.
- Hold the iron vertically and press additional steam release button (3), steam will be released from the openings in the iron sole (11) (pic. 6).


- Vertical steaming is not recommended for synthetic fabrics.
- To avoid melting the fabric, do not touch the iron sole to the item while steaming.
- Never steam iron clothing that is being worn as the steam temperature is very high and it can cause burns. Use a coat-hanger or a stand.
IRONING
- Insert the power plug into an electrical outlet.
- Place the iron on its base (7).
- Set the steam release regulator (5) to the steam release OFF position.
- Set the temperature regulator (9) to the required ironing temperature: "
![]() ", "
", "![]() " or "
" or "![]() ".
". - Wait until the light indicator (8) turns off and then lights up again. The desired ironing sole temperature has been reached and you can begin the ironing process.
CLEANING SYSTEM
To increase the service life of your iron we recommend cleaning it regularly (once or twice a month depending on water hardness).
- Set the steam release regulator (5) to the steam release OFF position.
- Fill the water tank to MAX.
- Place the iron on its base (7).
- Insert the power plug into an electrical outlet.
- Set the temperature regulator (9) to the "
![]() " position.
" position. - Wait till the iron is heated and the light indicator (8) goes out.
- Unplug the power plug from the outlet and hold the iron horizontally above the sink.
- Press the cleaning button (10) (pic.7).

- Boiling water and steam together with scaling will be forced out of the openings in the iron sole. You can slightly rock the iron forward and back during cleaning.
- Release the cleaning button (10) after a minute or when the tank runs out of water. Place the iron on its base.
- Insert the power plug into an electrical outlet and allow the iron to heat up again.
- Iron a piece of unwanted fabric in order to allow the remaining water to steam away.
- Unplug the power plug from the outlet and wait until the iron sole is cooled off.
- Before you take the iron for storing, make sure that the iron sole is completely dry.

CARE AND CLEANING
- Before cleaning the iron, make sure that it is turned off and has cooled completely.
- Wipe the iron's outer surface with a damp cloth and then wipe dry.
- Sediment on the iron sole can be removed with a cloth soaked in vinegar-water solution.
- After removing sediment, polish the sole with a dry cloth.
- Do not use abrasive substances to clean the sole and body of the iron.
- Avoid touching the iron sole with sharp metal objects.
STORAGE
- Turn the temperature regulator (9) anticlockwise till Min position, set the steam release regulator (5) to the steam release OFF position.
- Remove the power plug from the outlet.
- Drain any remaining water from the water tank (pic.8).
- Set the iron vertically and allow it to cool completely.
- Store the iron vertically.
TECHNICAL CHARACTERISTICS
Power requirements: 220-240 V ~ 50/60 Hz
Power consumption: 2200 W (max)
The manufacturer shall reserve the right to change the specification of the appliances without preliminary notice.
The life time of the appliance shall not be less than 3 years
Guarantee
Details regarding guarantee conditions can be obtained from the dealer from whom the appliance was purchased. The bill of sale or receipt must be produced when making any claim under the terms of this guarantee.
 This product conforms to the EMC-Requirements as laid down by the Council Directive 89/336/EEC and to the Low Voltage Regulation (73/23 EEC)
A production date of the item is indicated in the serial number on the technical data plate. A serial number is an eleven-unit number, with the first four figures indicating the production date. For example, serial number 0606ххххххх means that the item was manufactured in June (the sixth month) 2006.

Documents / ResourcesDownload manual
Here you can download full pdf version of manual, it may contain additional safety instructions, warranty information, FCC rules, etc.
Advertisement


Need help?
Do you have a question about the VT-1222 GY and is the answer not in the manual?
Questions and answers