Table of Contents
Advertisement
Quick Links
Advertisement
Table of Contents

Related Manuals for Xterra SB4500


Summary of Contents for Xterra SB4500
- Page 1 SB4500 EXERCISE BIKE OWNER’S MANUAL...
-
Page 3: Table Of Contents
Important Safety Instructions ..............2 Important Electrical Instructions .............. 4 Important Operation Instructions ............. 5 SB4500 Product Overview ..............6 SB4500 Assembly Pack Checklist ............7 SB4500 Assembly Instructions ............... 8 Getting on / off your Exercise Bike ............14 Body Positioning ................... 15 Seat Adjustment ................... - Page 4 Stretching Guide ................... 34 Corporate Headquarters ............... 36 Warranty Information ................37 ATTENTION This exercise bike is intended for residential use only and is warranted for this application. Any other application voids this warranty in its entirety. Ver.A...
- Page 5 NOTE: Article number: SB4500 Use: HOME USE Max. user’s weight.:120 kg Product net weight: 39.4 kg. Product size: 148.5 x 65 x 116.5 cm Safety Standards: ISO 20957 – Class HB RECYCLING INFORMATION Used electrical and electronic equipment (WEEE) should not be mixed with general household waste.
-
Page 6: Important Safety Instructions
Important Safety Instructions WARNING - When using an electrical appliance, basic precautions should always be followed, including the following: Read all instructions before using this appliance. DANGER - To reduce the risk of electric shock: Always unplug this appliance from the electrical outlet immediately after using and before cleaning. - Page 7 Fitness Equipment Safety Instructions • To disconnect, turn all controls to the off position, then remove the plug from the outlet. • Do not operate equipment on deeply padded, plush or shag carpet. Damage to both carpet and equipment may result. •...
-
Page 8: Important Electrical Instructions
Important Electrical Instructions WARNING! • NEVER remove any cover without first disconnecting AC power supply. • If A.C. voltage varies by ten percent (10%) or more, the performance of your exercise bike may be affected. Such conditions are not covered under your warranty. If you suspect the voltage is low, contact your local power company or a licensed electrician for proper testing. -
Page 9: Important Operation Instructions
Important Operation Instructions • NEVER operate this exercise bike without reading and completely understanding the results of any operational change you request from the computer. • All users should have medical clearance before starting any rigorous exercise program. This is especially important for persons with a history of heart disease or other high risk factors. -
Page 10: Sb4500 Product Overview
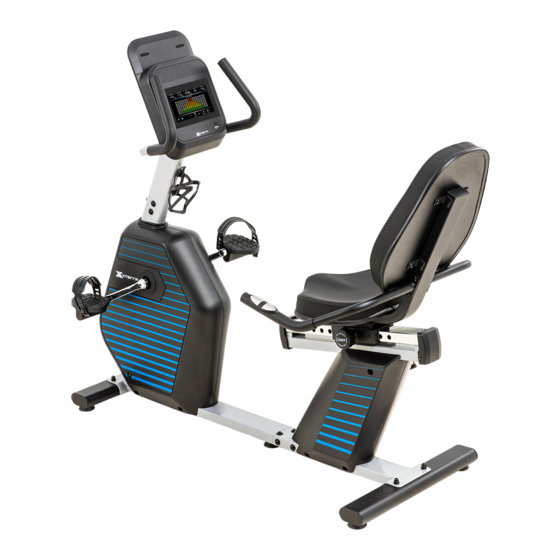
SB4500 Product Overview Mast Handle Bar Console Seat Seat Handle Bar Pedals Length: 148.5 cm(58.5") Width: 65 cm(25.6") Height: 116.5 cm(45.9") Weight: 39.4 kg... -
Page 11: Sb4500 Assembly Pack Checklist
SB4500 Assembly Pack Checklist 57#、Carriage Bolt: 54#、Cup Washer: 39#、Phillips Head Screw: M8*50MM(4pcs) M8* (1pc) M5*12MM(6pcs) 58#、Flat Washer: φ8*φ16*1.5t(4pcs) 52#、Flat Head Socket Screw: 36#、Phillips Head Screw: M8*40MM(4pcs) M8*15MM(27pcs) 59#、Cap Nut: M8(4pcs) 55#、Flat Washer: 61#、Philips Head 60#、5MM L Allen Wrench Screwdriver +13、14、15 φ8*φ21*2.0t (10pcs) -
Page 12: Sb4500 Assembly Instructions
SB4500 Assembly Instructions #57 M8 x 50mml Carriage Bolt (2 pcs), #58 φ8 x 16 x 1.5t Flat Washer (2 pcs), #59 M8 Cap Nut (2 pcs) Install the Front Stabilizer Tube (No. 11) onto the Main Frame and secure using 2 Carriage Bolts (No. - Page 13 #55. φ8 x 21 x 2t Flat Washer (6 pcs) #36 M8 x 15mm Philips Head Screw (6 pcs) Connect the two Handpulse Wires (No. 79 & 80) together. Be careful not to pinch the wires and feed them back into the connected frame.
- Page 14 #39 M5 x Philips Head Screws (4 pcs) Connect the Computer Cable (No. 74) with the Handpulse Wire (No. 78). Feed the excess wire into the tube. Be careful not to pinch the wires Secure the Console (No. 70) to the Mast using 4 Philips Head Screws (No.
- Page 15 #52 M8 x 40 Button Head Socket Screws (4 pcs) Secure the Seat Back Bracket (No. 9) to the Sliding Seat Plate using 4 Button Head Socket Screws (No. 52). Connect the two Handpulse Wires (No. 83 & 80). #36 M8 x 15 Philips Head Screws (4 pcs) 1.
- Page 16 #36 M8 x 15 Philips Head Screws (4 pcs) 81 83 Connect the Handpulse Wires (No. 81 & 83) Secure the Seat Handle Bar – L (No. 6) and the Seat Handle Bar – R (No.7) using 4 Phillips Head Screws (No. 36). #36 M8 x 15 、先将...
- Page 17 1. Secure the Pedal - L (No. 64) and Pedal - R (No. 65) using the The Left Pedal (No. Philips Head Screwdriver & Wrench (No. 61). 64) should be tightened counter-clockwise and the Right Pedal (No. 65) clockwise. 2. Secure all screws and adjust the 5 levelers to sit evenly on your floor.
-
Page 18: Getting On / Off Your Exercise Bike
Getting on / off your Exercise Bike IMPORTANT The Recumbent Bike comes with a Stationary Handlebar & Seat Handlebar. Always hold the Stationary Handlebar or Seat Handlebar when getting on and off the Recumbent Bike. First time users should familiarize themselves with using the Recumbent Bike by using the Stationary Handlebar first and then progressing to the Seat Handlebar. -
Page 19: Body Positioning
Body Positioning Sit straight on the saddle, grab the handle with both hands, position the feet on pedal through the pedal strap. Seat Adjustment Instruction Firstly, loosen the knob/pull pin anti-clockwise two or three times and then pull out a bit. In the meantime, adjust the seat to the proper position and release the knob. -
Page 20: Operation Of Your Console
Operation of Your Console Tablet Tray Touchscreen Display USB Port... - Page 21 Increase/ Default Function Value Decrease Description Value Step When the window displays 0:00, the time will be accumulated upward. 0:00 ~ Time 00:00 ± 1:00 When the window shows 5:00~99:00, 99:00 the time will count down until 0 and the exercise will end.
- Page 22 Console Interface Standby Mode Mode Selection Target Mode Interface Program Mode Selection Exercise Interface...
- Page 23 Console Interface Setting Interface Motion Interface (Program Mode) Data Review...
- Page 24 Console Buttons MODE: Press this key to access the mode selection interface PROGRAM: Press to access the program selection interface START: Press to start workout PAUSE: Press to pause workout STOP: Press to end the workout and access the exercise data interface SET: Press to set parameters : Return to the previous interface;...
- Page 25 Quick start mode After powering on, the user can press START to begin working out in Quick Start mode. During exercise, you can press the +/- keys to adjust resistance (range 1 -24). Program mode From the home screen, press the PROGRAM key to view available programs. Touch the desired program to select.
-
Page 26: Programs
Programs Weight Loss Program Uses a gradual build from low to medium back to low resistance training, intended to burn calories for the purpose of weight loss. Climb Simulates going up and down a hill. The workload will steadily increase and then decrease during the program. - Page 27 Beach Sport Simulates beach exercises to improve joint flexibility and enhance cardiopulmonary activity. Fat Burn This program follows a quick progression up to the maximum resistance level (default or user input level) that is sustained for 2/3 of the workout. This program will challenge your ability to sustain your energy output for an extended period of time.
-
Page 28: Bluetooth Capabilities
Pairing will differ based on the make and model of your specific heart rate monitor. Follow the instructions included with your Bluetooth heart rate monitor to ensure proper pairing and begin use. Once a heart rate monitor is paired, the SB4500 will display the data in the “Pulse” section of the screen. -
Page 29: Hand Pulse Grips
Hand Pulse Grips Your SB4500 Fitness Bike has built-in hand pulse grips located on the handles next to either side of the seat. To monitor your heart rate, simply grasp both hand pulse grips ensuring steady contact is made between your hands and the metal contact pads for at least 10 seconds. - Page 30 Heart Rate The old motto, “no pain, no gain”, is a myth that has been overpowered by the benefits of exercising comfortably. A great deal of this success has been promoted by the use of heart rate monitors. With the proper use of a heart rate monitor, many people find that their usual choice of exercise intensity was either too high or too low and exercise is much more enjoyable by maintaining their heart rate in the desired benefit range.
- Page 31 Rate of Perceived Exertion Heart rate is important but listening to your body also has a lot of advantages. There are more variables involved in how hard you should workout than just heart rate. Your stress level, physical health, emotional health, temperature, humidity, the time of day, the last time you ate and what you ate all contribute to the intensity at which you should workout.
-
Page 32: General Maintenance
Normally the transmitter will be oriented so the XTERRA Fitness logo is right side up. The receiver that picks up your heart rate is very sensitive. If there is an outside noise source, turning the whole machine 90 degrees may de-tune the interference. -
Page 33: Exploded View Diagram
EXPLODED VIEW DIAGRAM... -
Page 34: Parts List
PARTS LIST Item Description Usage Front Main Frame Rear Main Frame Console Mast Mast Handle Bar - L Mast Handle Bar - R Seat Handle Bar - L Seat Handle Bar - R Aluminum Track Seat Back Bracket Drive Pully Front Stabilizer Rear Stabilizer Idler Wheel Assembly... - Page 35 Nut 3/8"*7t Nut M10*9mm Nut M10*1.25 Circlip Ø 15.4*1t Button Head Socket Screw M8*40mml Cup Washer Ø 8*Ø 21*2t Flat Washer Ø 8*21*2t Carriage Bolt M8*50mml Flat Washer Ø 8*16*1.5t Cap Nut M8 L Allen Wrench 6mm Philips Head Screwdriver & Wrench 13 14 15 Flywheel Drive Belt Pedal - L...
-
Page 36: Beginner's Guide To Exercise
Beginner's Guide To Exercise The following guidelines will help you to plan Before You Start your workout program and exercise safely. If you ’ re beginning an exercise program for Remember that proper nutrition and adequate rest are essential for successful the first time or starting a new exercise results. - Page 37 Target Heart Rate How To Begin • To train effectively you shmuId aim to work in Start with two or three 15-minute the heart rate zone appropriate to your age sessions per week with a rest day as stipulated below. Please note this is a between workouts.
- Page 38 Stretching Guide Tips For Stretching Warm-Up And Cool-Down Begin with small mobility exercises of all A successful cardio-vascular exercise the joints e.g. simply rotate your ankles, program consists of a full-body warm-up, bend your knees and roII your hips. aerobic exercise, and a cool-down.
- Page 39 Stretching Stretching while your muscles are warm after a proper warm-up and again after your strength or aerobic training session is very important. Muscles stretch more easily at these times because of their elevated temperature, which greatly reduces the risk of injury. Stretching develops flexibility and reduces muscles soreness.
- Page 40 Corporate Headquarters 12F No.111, SongJaing Road, Taipei City, Taiwan, 104 Telephone: +886 2 2515 2288 Fax: +886 2 2515 9963 Email: info@dyaco.com International Offices Dyaco Canada Dyaco North America Spirit Fitness USA Address Address Address 6050 Don Murie Street 18303 Bothell Everett Hwy 3000 Nestle Road Niagara Falls Suite 210...
- Page 41 Does not include any island off Mainland UK Products that are not registered, XTERRA Fitness reserves the right to request a proof of purchase Incidental damages such as property damage i.e. Flooding or Electrical Fault FAILURE TO FOLLOW GENERAL MAINTENANCE PROCEDURES IN ACCORDANCE WITH YOUR...
Need help?
Do you have a question about the SB4500 and is the answer not in the manual?
Questions and answers