
Subscribe to Our Youtube Channel
Related Manuals for Xterra R15


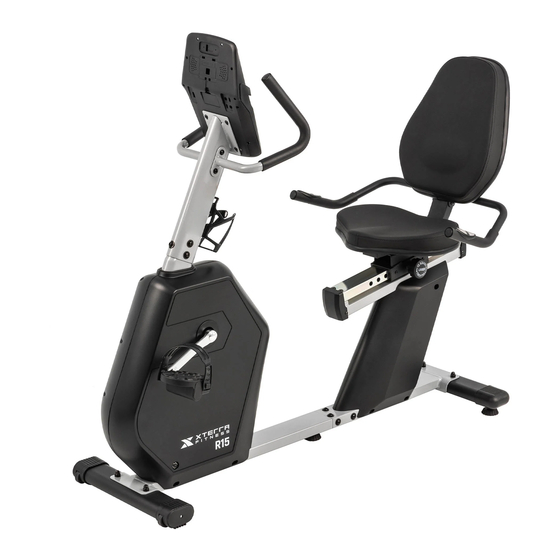
Summary of Contents for Xterra R15
- Page 1 EXERCISE BIKE OWNER’S MANUAL PLEASE CAREFULLY READ THIS ENTIRE MANUAL BEFORE OPERATING YOUR NEW EXERCISE BIKE...
-
Page 2: Table Of Contents
Table Of Contents Important Safety Instructions ..............2 Important Electrical Instructions .............. 3 Important Operation Instructions ............. 3 R15 Assembly Instructions ..............5 Operation of Your Console ..............11 Program Introduction & Operation............14 LCD Workout Graphics ................. 18 Hand Pulse Grips .................. 21 Exploded View Diagram ................ -
Page 3: Important Safety Instructions
Important Safety Instructions When using an electrical appliance, basic precautions should always be followed, including the following: Read all instructions before using this appliance. DANGER - To reduce the risk of electric shock: 1. Always unplug this appliance from the electrical outlet immediately after using and before cleaning. WARNING - To reduce the risk of burns, fire electric shock, or injury to persons: An appliance should never be left unattended when plugged in. -
Page 4: Important Electrical Instructions
Important Electrical Instructions WARNING! • NEVER remove any cover without first disconnecting AC power supply. • If A.C. voltage varies by ten percent (10%) or more, the performance of your exercise bike may be affected. Such conditions are not covered under your warranty. If you suspect the voltage is low, contact your local power company or a licensed electrician for proper testing. - Page 5 R15 Assembly Pack Checklist 57#、Carriage Bolt 54#、Cup Washer 39#、Phillips Head Screw φ8*21*2t (1pc) M8*50MM(4pcs) M5*12MM(6pcs) 58#、Flat Washer φ8*φ16*1.5t(4pcs) 52#、Flat Head Socket Screw 36#、Phillips Head Screw M8*40MM(4pcs) M8*15MM(27pcs) 59#、Cap Nut M8(4pcs) 55#、Flat Washer 61#、Philips Head 60#、5MM L Allen Wrench φ8*φ21*2t (10pcs) (1pc) Screwdriver +13、14、15...
-
Page 6: R15 Assembly Instructions
R15 Assembly Instructions Front Stabilizer Hardware Step 1 #57 M8 x 50mml Carriage Bolt (2 pcs), #58 φ8 x 16 x 1.5t Flat Washer (2 pcs), #59 M8 Cap Nut (2 pcs) Install the Front Stabilizer Tube (No. 11) onto the Main Frame and secure using 2 Carriage Bolts (No. - Page 7 Connecting the Main Frame Hardware Step 3 #55. φ8 x 21 x 2t Flat Washer (6 pcs) #36. M8 x 15mm Philips Head Screw (6 pcs) Connect the two Handpulse Wires (No. 79 & 80) together. Be careful not to pinch the wires and feed them back into the connected frame.
- Page 8 Console Hardware Step 5 #39. M5 x Philips Head Screws (4 pcs) Connect the Computer Cable (No. 74) with the Handpulse Wire (No. 78). Feed the excess wire into the tube. Be careful not to pinch the wires. Secure the Console (No. 70) to the Mast using 4 Philips Head Screws (No.
- Page 9 Seat Back Bracket Hardware Step 7 #52. M8 x 40 Button Head Socket Screws (4 pcs) Secure the Seat Back Bracket (No. 9) to the Sliding Seat Plate using 4 Button Head Socket Screws (No. 52). Connect the two Handpulse Wires (No.
- Page 10 Seat Handlebars Hardware Step 9 #36. M8 x 15 Philips Head Screws (4 pcs) Connect the Handpulse Wires (No. 81 & 83) Secure the Seat Handle Bar – L (No. 6) and the Seat Handle Bar – R (No. 7) using 4 Phillips Head Screws (No.
- Page 11 Pedals 1. Secure the Pedal - L (No. 64) and Pedal - R (No. 65) using the The Left Pedal Philips Head Screwdriver & Wrench (No. 61). (No. 64) should be tightened counter-clockwise and the Right Pedal (No. 65) clockwise. 2.
-
Page 12: Operation Of Your Console
Operation Of Your Console R15 console The things you should know before exercise A. Program select and setting value 1. Use the UP or DOWN keys to select program mode and then press ENTER to confirm your exercise mode. 2. At the Manual mode, the computer will use the UP or DOWN keys to set up your exercise TIME, DISTANCE, CALORIES, PULSE. - Page 13 Functions And Features 1. TIME: Shows your elapsed workout time in minutes and seconds. Your computer will automatically count up from 0:00 to 99:59 in one second intervals. You can also program your computer to count down from a set value by using the UP and DOWN keys. If you continue exercising once the time has reached 0:00, the computer will begin beeping, and reset itself to the original time set, letting you know your workout is done.
- Page 14 Key function There are 6 button keys and the function description as follows: 1. START/STOP KEY: ➢ Quick Start function: Allows you to start the computer without selecting a program. Manual workout only. Time automatically begins to count up from zero ➢...
-
Page 15: Program Introduction & Operation
Program Introduction & Operation Manual Program: Manual P1 is a manual program. User can start exercise by pressing START/STOP key. The default resistance level is 5. Users may exercise in any desirous of resistance level (Adjusting by UP/DOWN keys during the workout) with a period of time or a number of calories or a certain distance. - Page 16 Operations: 1. Use UP/DOWN keys to select the USER program from P14 to P17. 2. Press the ENTER key to enter your workout program. 3. The column 1 will flash, and then use the UP/DOWN keys to create your personal exercise profile.
- Page 17 7. The CALORIES will flash and you can press UP or DOWN keys to set your exercise CALORIES. Press ENTER key to confirm your desired CALORIES. 8. Press the START/STOP key to begin exercise Body Fat Program: Body Fat Program 23 is a special program design to calculate users’ body fat ratio and to offer a specific loading profile for users.
- Page 18 Error Message E1 (ERROR 1): Normal state: During workout, when the monitor did not get the count signal from the gear motor more than 4 seconds and check under successive 3 times then the LCD will show E1. Power on state: The gear motor will return to zero automatically, when the signal of motor cannot be detected for more than 4 seconds then the gear motor’s driver will be cut off immediately and show the E1 on the LCD display.
-
Page 19: Lcd Workout Graphics
LCD Workout Graphics ➢ PRESET PROGRAM PROFILES PROGRAM 1 PROGRAM 2 PROGRAM 3 MANUAL STEPS HILL PROGRAM 4 PROGRAM 5 PROGRAM 6 ROLLING VALLEY FAT BURN PROGRAM 7 PROGRAM 8 PROGRAM 9 RAMP MOUNTAIN INTERVALS PROGRAM 10 PROGRAM 11 PROGRAM 12 RANDOM PLATEAU FARTLEK... - Page 20 PROGRAM 15 USER 2 PROGRAM 16 USER 3 PROGRAM 17 USER 4 ➢ HEART RATE PROGRAM PROFILES: PROGRAM 18 55% H.R.C. PROGRAM 19 65% H.R.C. PROGRAM 20 75% H.R.C.
- Page 21 PROGRAM 21 85% H.R.C. PROGRAM 22 TARGET H.R.C. ➢ BODY FAT TEST PROGRAMS: BODY FAT (STOP MODE) (START MODE) PROGRAM 23 One of the Following Six Profiles Will Display Automatically after Measuring Your BODY FAT: Workout Time: 40 minutes Workout Time: 40 minutes Workout time: 20 minutes Workout Time: 40 minutes Workout Time: 40 minutes...
-
Page 22: Hand Pulse Grips
Hand Pulse Grips Your R15 Exercise bike has built-in hand pulse grips located on the handles next to either side of the seat. To monitor your heart rate, simply grasp both hand pulse grips ensuring steady contact is made between your hands and the metal contact pads for at least 10 seconds. -
Page 23: Exploded View Diagram
EXPLODED VIEW DIAGRAM... -
Page 24: Parts List
PARTS LIST Item Usage Description Front Main Frame Front Main Frame Rear Main Frame Console Mast Mast Handle Bar - L Mast Handle Bar - R Seat Handle Bar - L Seat Handle Bar - R Aluminum Track Seat Back Bracket Drive Pully Front Stabilizer Rear Stabilizer... - Page 25 Hexagon Nut 3/8"*5t Hexagon Nut 3/8"*7t Nut M10*9mm Hexagon Nut M10*1.25 Circlip φ17*1t Flat Head Socket Screw M8*40mml Cup Washer φ8*21*2t Flat Washer φ8*21*2t Carriage Bolt M8*50mml Flat Washer φ8*16*1.5t Cap Nut M8 L Allen Wrench 5mm Philips Head Screwdriver & Wrench 13 14 15 Flywheel Drive Belt Pedal - L...
Need help?
Do you have a question about the R15 and is the answer not in the manual?
Questions and answers