Advertisement
Quick Links
QSG185: Z-Wave 800 Dev Kit
Thunderboard Quick Start Guide with
Unify
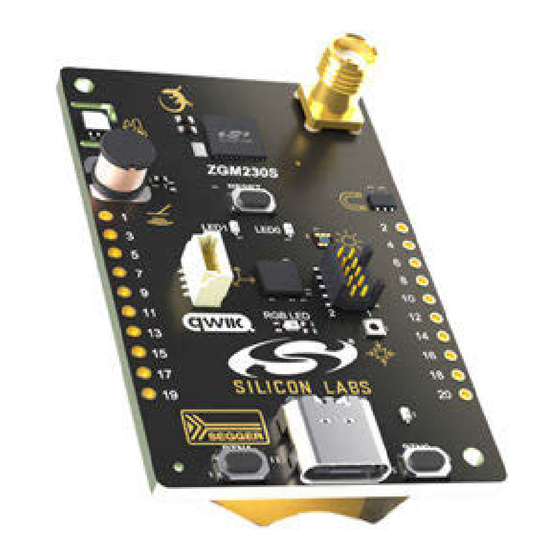
The Z-Wave 800 Thunderboard BRD2603A Radio Board is an excellent starting
point to get familiar with the ZGM230S Z-Wave 800 SiP Module. The board is a
small and cost-effective, feature-rich prototype and development platform based
on the ZGM230S SiP Module.
It has been designed to inspire customers to make energy-friendly, battery-oper-
ated and secure connected IoT devices using Z-Wave MESH and Z-Wave Long
Range protocols. Customers can develop wide range command, control, and
monitoring applications utilizing numerous sensors, buttons, and LEDs on this
board. A built-in SEGGER J-Link debugger ensures easy debugging using a
USB Type-C cable.
The Z-Wave 800 Dev Kit is supported in Simplicity Studio and it ships with Unify
SDK, a portable environment that works with any Z-Wave end device and pro-
vides a flying start, out-of-box experience for Z-Wave applications. This Quick
Start Guide describes the steps to get up and running quickly with the Dev Kit
with Unify environment. The portable runtime comes as an executable CLI, to-
gether with Unify, a docker-compose file, and a tool which can map a Silicon
Labs device with a docker environment on Windows, MacOS, or Linux.
silabs.com | Building a more connected world.
Copyright © 2023 by Silicon Laboratories
KEY FEATURES
• ZGM230S Z-Wave SiP Module with 512 kB Flash,
64 kB RAM
• +14 dBm TX power
• SMA antenna connector (863-925 MHz)
• Advanced Energy Monitor
• Virtual COM port
• SEGGER J-Link on-board debugger
• RGB LED, two single color LEDs, and two push
buttons
• CR2032 coin cell battery support
• 20-pin 2.54 mm breakout pads
• Mini Simplicity connector
ON-BOARD SENSORS
• Relative humidity and temperature sensor
• Passive Infrared sensor
• Hall effect sensor
• Ambient light sensor
• Pressure sensor
• LESENSE LC-sensor
• 6-axis Inertial sensor
SOFTWARE SUPPORT
• Simplicity Studio
• Unify SDK Z-Wave Protocol Controller
REQUIRED COMPONENTS
• Two Z-Wave Thunderboard Kits pre-programmed
and labelled with "Z-Wave - NCP Serial API
Controller"
• USB-C cable for controller (not included)
• Optional coin cell battery for end device (not
included)
• Docker version > 20.10.12 installed.
• Docker-compose version > 2.5.1
Rev. 0.7
Advertisement

Related Manuals for Silicon Laboratories Z-Wave 800 Series


Summary of Contents for Silicon Laboratories Z-Wave 800 Series
- Page 1 • USB-C cable for controller (not included) • Optional coin cell battery for end device (not included) • Docker version > 20.10.12 installed. • Docker-compose version > 2.5.1 silabs.com | Building a more connected world. Copyright © 2023 by Silicon Laboratories Rev. 0.7...
- Page 2 QSG185: Z-Wave 800 Dev Kit Thunderboard Quick Start Guide with Unify Setting Up Your Z-Wave 800 Dev Kit 1. Setting Up Your Z-Wave 800 Dev Kit Step 1: Unboxing 1. Unbox Z-Wave 800 Dev Kit. 2. Connect the USB Type-C connector to the PC using the USB-C cable. Step 2: Software Preparation 1.
- Page 3 QSG185: Z-Wave 800 Dev Kit Thunderboard Quick Start Guide with Unify Setting Up Your Z-Wave 800 Dev Kit Step 3: Flash Application The development kit devices are shipped with the NCP Serial API Controller firmware by default. To try the demo, at least one control- ler (SerialAPI) and one end device application is needed.
- Page 4 QSG185: Z-Wave 800 Dev Kit Thunderboard Quick Start Guide with Unify Setting Up Your Z-Wave 800 Dev Kit Step 3.1: Read Device Specific Key To perform a secure inclusion, it is necessary to provide the device specific key (DSK) of the end device. It can be read by running the following command: unify_portable_cli.exe read-dsk Select the end device from the list.
- Page 5 QSG185: Z-Wave 800 Dev Kit Thunderboard Quick Start Guide with Unify Setting Up Your Z-Wave 800 Dev Kit Step 3.2: List Connected Devices To get more information about the connected devices, run the following command: unify_portable_cli.exe list-devices The output contains the serialNumber and boardSerial of each device. The boardSerial is also printed on the back of the develop- ment kit, next to the SMA antenna.
- Page 6 QSG185: Z-Wave 800 Dev Kit Thunderboard Quick Start Guide with Unify Setting Up Your Z-Wave 800 Dev Kit Step 4: Start Unify Portable Environment 1. Connect only the Controller device (Dev Kit with the Z-Wave - NCP Serial API Controller firmware) to the PC. 2.
- Page 7 QSG185: Z-Wave 800 Dev Kit Thunderboard Quick Start Guide with Unify Setting Up Your Z-Wave 800 Dev Kit 6. Allow Docker access to the required files (mosquito-config location) if prompted in the Action Center. 7. Launch the GUI in your browser using the URL http://localhost:3080. 8.
- Page 8 QSG185: Z-Wave 800 Dev Kit Thunderboard Quick Start Guide with Unify Setting Up Your Z-Wave 800 Dev Kit Step 5: Include the End Device in the Z-Wave Network 1. Power on the end device by connecting it via a USB-C cable or by inserting a battery. 2.
- Page 9 QSG185: Z-Wave 800 Dev Kit Thunderboard Quick Start Guide with Unify Setting Up Your Z-Wave 800 Dev Kit Step 6: Try the Application • For a "Z-Wave - SoC Switch On/Off" end device, the capabilities are as shown below: • The capabilities of the connected node can be seen by clicking the icons: •...
- Page 10 QSG185: Z-Wave 800 Dev Kit Thunderboard Quick Start Guide with Unify Setting Up Your Z-Wave 800 Dev Kit • For the "Z-Wave - SoC Multilevel Sensor" end device, the capabilities are: • The capabilities of the connected node can be seen by clicking the icons: •...
- Page 11 QSG185: Z-Wave 800 Dev Kit Thunderboard Quick Start Guide with Unify Setting Up Your Z-Wave 800 Dev Kit Step 7: Exclusion of the Device 1. Press the States button on the right side of the controller’s row and select Remove node in the drop-down list. Next, press the button labelled BTN1 on the end device’s board.
-
Page 12: Advanced Options
QSG185: Z-Wave 800 Dev Kit Thunderboard Quick Start Guide with Unify Advanced Options 2. Advanced Options Descriptions for all the available commands and subcommands in the Unify Portable CLI can be accessed by using the -h option. unify_portable_cli.exe -h unify_portable_cli.exe flash-app -h unify_portable_cli.exe read-dsk -h unify_portable_cli.exe list-devices -h Some additional options are described in the following subsections. - Page 13 QSG185: Z-Wave 800 Dev Kit Thunderboard Quick Start Guide with Unify Advanced Options 2.2 Read DSK Value To perform a secure inclusion, it is necessary to provide the DSK of the end device. It can be read by running the following command: unify_portable_cli.exe -s <SERIAL_NO>...
-
Page 14: Troubleshooting
QSG185: Z-Wave 800 Dev Kit Thunderboard Quick Start Guide with Unify Troubleshooting 3. Troubleshooting 3.1 Docker Settings – Filesharing to Mosquitto Configuration After starting the Unify Portable Environment for the first time, Docker needs access to the mosquito-config folder. This must be gran- ted. - Page 15 QSG185: Z-Wave 800 Dev Kit Thunderboard Quick Start Guide with Unify Troubleshooting 3.3 Devices Not Detected by Unify If the Unify GUI is not able to detect the connected devices, try the following: 1. Press Disconnect in the web GUI. 2.
- Page 16 Note: This content may contain offensive terminology that is now obsolete. Silicon Labs is replacing these terms with inclusive language wherever possible. For more information, visit www.silabs.com/about-us/inclusive-lexicon-project Trademark Information Silicon Laboratories Inc. , Silicon Laboratories , Silicon Labs , SiLabs...
Need help?
Do you have a question about the Z-Wave 800 Series and is the answer not in the manual?
Questions and answers