Advertisement
Quick Links
Advertisement

Related Manuals for Ofs Kintra


Summary of Contents for Ofs Kintra
- Page 1 Kintra assembly instructions...
- Page 2 Kintra assembly instructions Table of contents Safety instructions One piece top, no shelf assembly One piece top, with shelf assembly Two piece top, no shelf assembly Two piece top, with shelf assembly 10-11 Assembly instructions ofs.com imagine a place® 800.521.5381...
-
Page 3: Important Safety Instructions
Kintra assembly instructions Important safety instructions When using an electrical furnishing, basic precautions should always be followed, including the following: This furnishing is made for commercial use only. Read all instructions before using this furnishing: DANGER To reduce the risk of electrical shock: 1. - Page 4 Kintra assembly instructions One piece top, no shelf SHIPPING Images below show how units will be shipped beam unit non-beam unit STEP 1 Place top, face side down, on a non marring surface. non-beam unit beam unit Assembly instructions ofs.com imagine a place®...
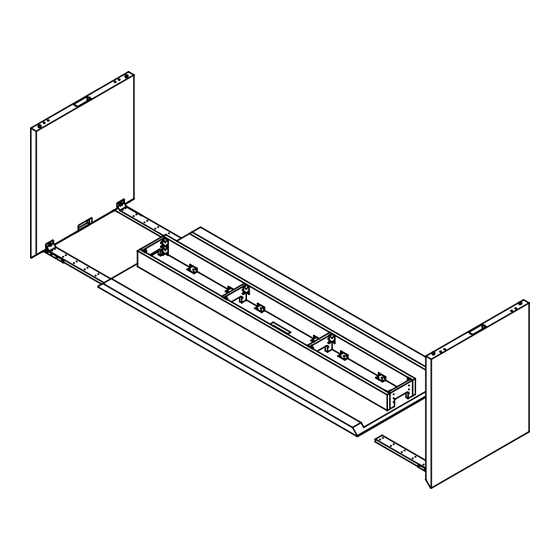
- Page 5 Kintra assembly instructions One piece top, no shelf continued STEP 2 Connect end panels to top by pressing mitered edge of end panel to the mitered edge of top. Ensure that mitered seam is tight and the end panel bottom edge is aligned along the bottom edge of the miter by using fi...
- Page 6 Kintra assembly instructions One piece top, with shelf SHIPPING Images below show how units will be shipped non-beam unit with shelf beam unit with shelf STEP 1 Place top, face side down, on a non marring surface. Remove shipping screws from the shelf bottom and along the back edge, set to the side.
- Page 7 Kintra assembly instructions One piece top, with shelf continued STEP 2 Connect end panels to top by pressing mitered edge of end panel to the mitered edge of top. Ensure that mitered seam is tight and the end panel bottom edge is aligned along the bottom edge of the miter by using fi...
- Page 8 Kintra assembly instructions Two piece top, no shelf SHIPPING Images below show how unit will be shipped STEP 1 Place two piece top, face side down, on a non marring surface. Install clamp plates from HK-6. While pulling both sections together making sure the seam is tight, center the 4x4 plates over the seam and use the screws provided to attach.
- Page 9 Kintra assembly instructions Two piece top, no shelf continued STEP 2 Set the beam assembly onto the top. Do not attach at this time. Connect end panels to top by pressing mitered edge of end panel to the mitered edge of top. Insure that mitered seam is tight and the end panel bottom edge is aligned along the bottom edge of the miter.
- Page 10 Kintra assembly instructions Two piece top, with shelf SHIPPING Images below show how unit will be shipped STEP 1 Place top, face side down, on a non marring surface. Install clamp plates from HK-6. While pulling both sections together making sure seam is tight, center the 4x4 plates over the seam use screws provided to attach.
- Page 11 Kintra assembly instructions Two piece top, with shelf continued STEP 2 Set the beam assembly onto the top. Do not attach at this time. Connect end panels to top by pressing mitered edge of end panel to the mitered edge of top.
Need help?
Do you have a question about the Kintra and is the answer not in the manual?
Questions and answers