Table of Contents
Advertisement
Quick Links
Advertisement
Table of Contents

Related Manuals for Tech Controllers EU-T-5z WiFi


Summary of Contents for Tech Controllers EU-T-5z WiFi
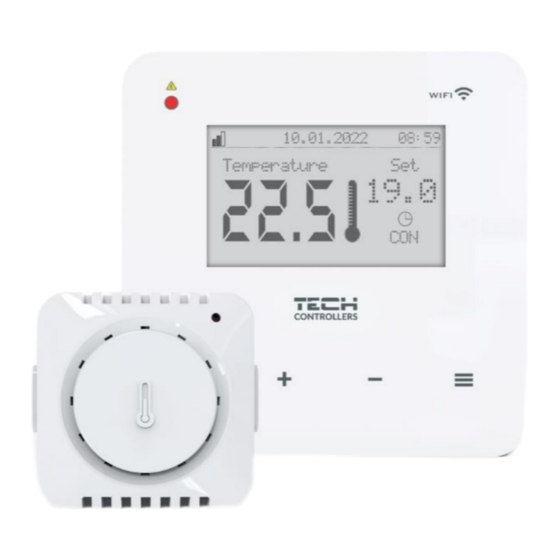
- Page 1 EU-T-5z WiFi...
-
Page 2: Table Of Contents
TABLE OF CONTENTS Safety .................................... 4 Device description ................................ 5 III. Operating principle ..............................5 Installing the Controller ............................6 First start-up ................................. 8 Setting up the Internet connection .......................... 8 EU-C-8ZR external sensor configuration ........................8 Configuration of temperature sensors, room controllers ..................9 Configuration of STT-868/STT-869/EU-G-X wireless thermostatic actuators ............ - Page 3 7.3. Time settings..............................18 7.4. Screen settings ............................... 18 7.5. Language selection ............................18 7.6. Service menu ..............................18 7.7. USB ................................19 7.8. Factory settings ............................. 19 Software version ..............................19 VIII. Checking the installation via the website ....................... 19 HOME tab ................................
-
Page 4: Safety
SAFETY Before operating the device, please read the following instructions carefully. Failure to observe the instructions may bring about personal injuries and damage the device. To avoid unnecessary errors and accidents, make sure that all persons operating the device have thoroughly familiarized themselves with the device operation and its safety functions. -
Page 5: Device Description
The signal from the zone is transmitted to the EU-T-5z WiFi controller via a sensor or room controller. It communicates with the controller via RF frequency. In the zone, STT-868/STT-869/EU-G-X wireless valve actuators can be used, which require a registration... -
Page 6: Installing The Controller
IV. INSTALLING THE CONTROLLER The controller should be only installed by a properly qualified person. WARNING Danger of injury or death due to electric shock on live connections. Before working on the controller, disconnect its power supply and secure it against accidental switching on. To connect the wires, remove the back cover of the controller. - Page 7 Heating device...
-
Page 8: First Start-Up
SETTING UP THE INTERNET CONNECTION The EU-T-5z WiFi has a built-in Internet module, which allows you to control the installation via the Internet. First of all, you need to connect to the Internet – using the <WiFi network selection> option in the controller menu to connect to the selected WiFi network. -
Page 9: Configuration Of Temperature Sensors, Room Controllers
CONFIGURATION OF TEMPERATURE SENSORS, ROOM CONTROLLERS In order for the EU-T-5z WiFi controller to operate the zone, it must receive information about its current temperature. The easiest way is to use a wireless temperature sensor, e.g. EU-C-8r or EU-C-mini. However, if we want to be able to change the temperature set point directly from the zone, we can use a wireless room controller, e.g. -
Page 10: Window Opening Sensor Setup
WINDOW OPENING SENSOR SETUP To register the window opening sensor, select the zone in the EU-T-5z WiFi menu, then the Window Sensors/Registration option, then briefly press the communication button on the window sensor. After releasing the button, observe the indicator LED: •... - Page 11 ➢ MAIN SCREEN DESCRIPTION - ZONE 1 SCREEN 1. WiFi signal range 2. Current date 3. Current time 4. Pre-set temperature in the given zone 5. Duration of the pre-set temperature (time overlay) 6. Additional device icon – If visible, this means that the device is switched on 7.
-
Page 12: Controller Functions
VII. CONTROLLER FUNCTIONS CONTROLLER MENU BLOCK DIAGRAM Registration Temperature settings Pre-set temperature Zone Operating mode Hysteresis Calibration Actuators Window sensors Normal mode Holiday mode Operating mode Economical mode Comfort mode Registration External sensor Signal Battery Calibration Zone Voltage-free contact Activation delay Additional contact Alarms Voltage-free contact... -
Page 13: Zone
2.1. REGISTRATION After switching on the room sensor and registering it in the zone, it will be used by the EU-T-5z WiFi controller. 2.2. After switching on the room sensor, it will be used by the EU-T-5z WiFi controller. However, you can disable this sensor by unchecking the ON option. - Page 14 To do this, hold the button on the actuator for approx. 2 seconds, then the information screen will appear on the EU-T-5z WiFi screen. Information – this option is only available when the actuator is registered. With this option, the user can view all actuators –...
-
Page 15: Window Sensors
You can connect an external temperature sensor to the controller, which allows you to view the current temperature on the main screen and in the https://emodul.eu app After installing the external sensor, register it in the EU-T-5z WiFi controller - The registration process is described in detail in the First start-up section. -
Page 16: Voltage-Free Contact
The user has the possibility to register an additional contact (EU-MW-1 module), which works analogously to the built-in contact. To register an additional contact: - press the registration button on the module - select the "Registration" option in the EU-T-5z WiFi controller. • Alarms – when an alarm occurs in the controller, the led flashes. •... -
Page 17: Fitter's Menu
FITTER'S MENU WiFi network selection Internet module Network configuration Registration Time lock Protections Lock time PIN code Automatic Time settings Clock settings Date settings Screen View Display contrast Screen settings Screen brightness Language selection Screen blanking Service menu Screen blanking time Factory settings 7.1. -
Page 18: Protections
MAC address. • REGISTRATION By running the Registration option, we generate the code required to register the EU-T-5z WiFi at https://emodul.eu - please refer to the First start-up section. 7.2. PROTECTIONS This function is used to change the settings of the parental lock. When the “Time Lock” function is activated, the screen will lock after the time set in the “Lock Time”... -
Page 19: Usb
New account registration panel at After logging in to your account in the Settings tab, activate the Register module option, and then enter the code generated by the controller (the code is generated by selecting the Registration option in the EU-T-5z WiFi controller menu). -
Page 20: Home Tab
You can assign any name to the module (under Module description): New module registration panel HOME TAB The Home tab displays the home page with tiles showing the current status of individual devices in the installation. By clicking on them, we can change the operating settings: HOME tab view NOTE The message "No communication"... - Page 21 Clicking in the area of the zone tile, we proceed to the editing of the pre-set temperature: Set point temperature edit screen The upper value indicates the current temperature of the zone, while the lower value indicates the pre-set temperature. As default option, the pre-set temperature in the zone will depend on the settings of the selected weekly schedule.
- Page 22 There are two types of weekly schedules in the EU-T-5z WiFi controller: 1. Local schedule This is a weekly schedule default assigned to the zone. When a room sensor is detected by the EU-T-5z WiFi controller, it is automatically assigned as valid in the zone. It can be edited at will.
-
Page 23: Zones Tab
Editing each schedule allows you to define two setting programs and select the days on which these programs will apply (e.g. Monday to Friday and weekend). The starting point of each program is the pre-set temperature. In each of the programs, the user can define up to three time intervals in which the temperature will be different from the pre-set temperature. -
Page 24: Settings Tab
SETTINGS TAB The Settings tab allows you to register a new module, change your email address and change your account password: Settings/Module Tab View Settings/Account Tab View... -
Page 25: Software Update
IX. SOFTWARE UPDATE NOTE The process of uploading new software to the controller may only be carried out by a qualified installer. After changing the software, it will not be possible to restore all previous settings, but only registered devices and schedules. - Page 26 radiator - Replace the valve on the radiator - Wrong valve on the radiator - Check the operation of the valve in the - Valve jam Head alarm ERROR #3 – piston offset too radiator - Wrong valve on the radiator small - Replace the valve on the radiator - Valve stroke (offset) too small...
- Page 27 - valve movement was too small, or a non- standard valve encountered Bolt extension too short. The bolt met - motor load measurement failure ERROR #3 - Calibration error 3 resistance too early during the calibration - motor load measurement inaccurate due process.
Need help?
Do you have a question about the EU-T-5z WiFi and is the answer not in the manual?
Questions and answers