
Related Manuals for TMG DUAL TRUSS PRO Series


Summary of Contents for TMG DUAL TRUSS PRO Series
- Page 1 ▶ W W W . T M G I N D U S T R I A L . C O M P 0 / 1 1 T o l l F r e e : 1 - 8 7 7 - 7 6 1 - 2 8 1 9...
-
Page 2: Main Specifications
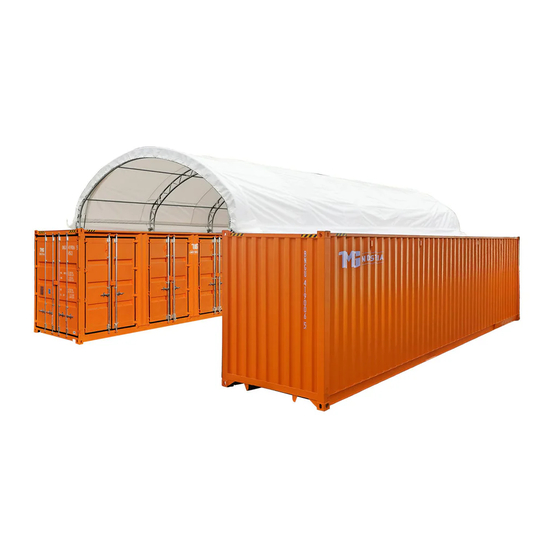
Main Specifications : Overall assembled size : W6 x L12 x H2 (m) / W19.7 x L39.4 x H6.5 (ft) Width : 6 m / 19.7ft Length : 12 m / 39.4ft Ridge peak height : 2 m / 6.5ft + container height ... -
Page 3: Installation Steps
Do not keep heat sources near the fabric cover. Keep the building surroundings clear at all times. Check the parts list below to make sure all parts are received prior to assembly. TMG-DT2041CV Part List Graphical Description... - Page 4 Base plate for front and W210xL340mm rear truss right corners Roof purlin L2440mm (horizontal tube) Ridge steel tension cables L2550mm (front and rear trusses) Cable connection plate L91mm Ratchets Tie down straps (for #10 and front and rear W38xL800mm arches) Self locking bolt and nuts M10x80mm Hex bolt and nuts...
- Page 5 Step 2 : Baseplate positioning. Part ▶ W W W . T M G I N D U S T R I A L . C O M P 4 / 1 1 T o l l F r e e : 1 - 8 7 7 - 7 6 1 - 2 8 1 9...
- Page 6 Step 3 : Installation of front and rear 2 group trusses. Part Part 12x2 Step 4 : Installation of middle 4 group truss. Part Part 12x4 ▶ W W W . T M G I N D U S T R I A L . C O M P 5 / 1 1 T o l l F r e e : 1 - 8 7 7 - 7 6 1 - 2 8 1 9...
- Page 7 Step 5 : Wrap (#14) around the sharp points of the joint to avoid friction between the fabric and the interface. Part ▶ W W W . T M G I N D U S T R I A L . C O M P 6 / 1 1 T o l l F r e e : 1 - 8 7 7 - 7 6 1 - 2 8 1 9...
- Page 8 Step 6 : Install the first two trusses. Part ▶ W W W . T M G I N D U S T R I A L . C O M P 7 / 1 1 T o l l F r e e : 1 - 8 7 7 - 7 6 1 - 2 8 1 9...
- Page 9 Step 7 : Install all other trusses. Part ▶ W W W . T M G I N D U S T R I A L . C O M P 8 / 1 1 T o l l F r e e : 1 - 8 7 7 - 7 6 1 - 2 8 1 9...
- Page 10 Step 7 : Install the top cover (#13) stretch and tighten top cover. Do not install the cover during windy weather! Unpack the top cover and place it along one of the long sides of the structure. Use 3 to 5 ropes (#13) to pull the cover over the top of the structure, from the inside 2 or 3 people standing inside on ladders to push upwards will help to move the cover without any damage.
- Page 11 Step 8 : Install ratchet straps. Stretch and adjust the cover from left and right, to make sure it is square and centered. Cut the groove pocket where it aligns with ratchet (#7), and use strap (#7A) to pull tension tube (#10B.#10C.#12) toward the ratchet and tie it firmly there.
-
Page 12: After The Installation
After the Installation Walk around and inspect the shelter periodically to make sure all components are still firmly secured and the whole shelter is well supported. Check all bolts and nuts as well as all connection points to make sure they are all in good position. Check the base plates, adjust the ropes and tie downs if required and clean the cover regularly.
Need help?
Do you have a question about the DUAL TRUSS PRO Series and is the answer not in the manual?
Questions and answers