Advertisement
Package Contents
- 1 CN9900 DisplayPort KVM over IP Switch / CN9950 4K DisplayPort KVM over IP Switch
- 1 DisplayPort Cable
- 1 USB Cable (USB-A to USB-B)
- 1 USB Cable (USB-A to Mini-USB)
- 1 Power Adapter
- 1 Mounting Kit
- 1 Footpad Set (4pcs)
- 1 User Instructions
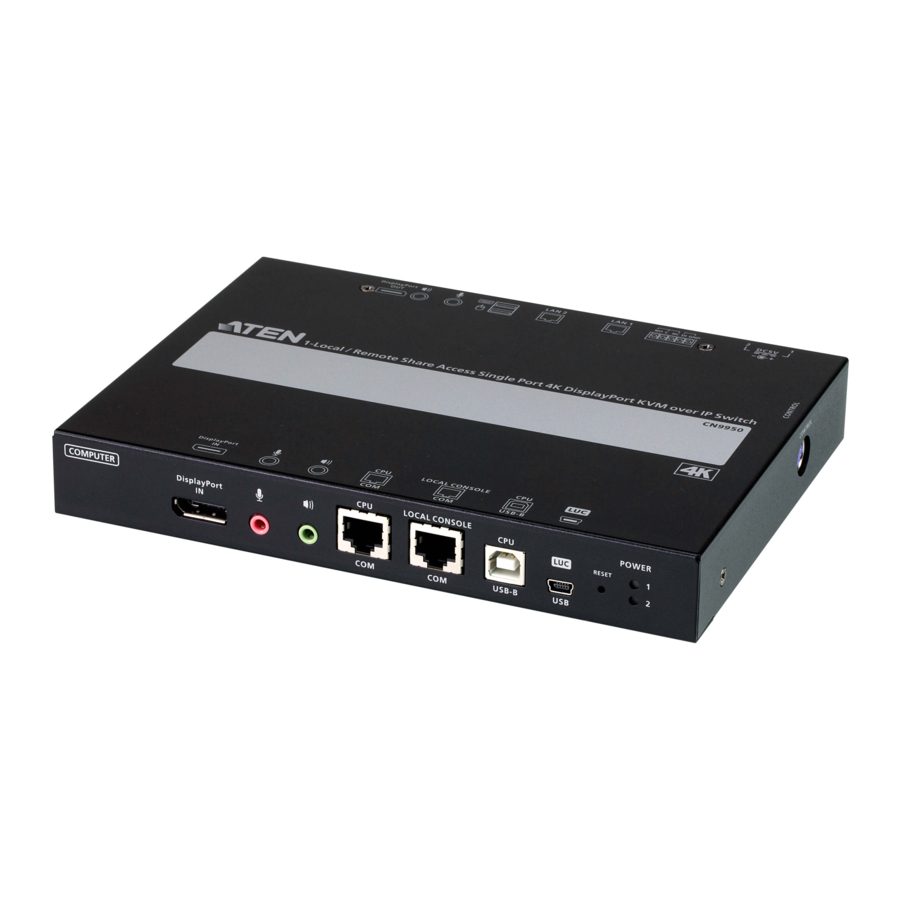
Hardware Review
Front View

- KVM DisplayPort Port
- KVM Audio Ports
- CPU COM Port
- Local Console COM Port
- KVM USB Type-B Port
- Laptop USB Console (LUC) Port
- Reset Button
- Power LED
Rear View

- Grounding Terminal
- Power Jacks
- Control Terminal
- LAN Ports
- Local Console Ports
Side View

- Control Port (Reserved)
Mounting
The unit can be placed on a fl at surface or mounted onto a rack or a wall. If you plan to have your unit mounted onto a rack or a wall, refer to the Mounting section of the user manual.
Hardware Installation

- Connect the unit's Grounding Terminal to a suitable grounded object.
Note: Do not omit this step. Proper grounding helps to prevent damage to the unit from power surges or static electricity.
- Plug your USB keyboard, mouse, and DisplayPort monitor into the Local Console Ports section located on the rear of the unit. (Optional) you can also connect speakers and microphone to the audio ports of the Local Console Ports Section.
- By using the DisplayPort and the USB (USB-A to USB-B) cables provided with the package, connect the unit's KVM DisplayPort Port and KVM USB Type-B Port to the server/PC for keyboard, video and mouse signal transmission.
- (Optional) By using your own audio (microphone & speaker) cables, connect the unit's KVM Audio Ports to the server/PC for audio signal transmission.
- (Optional) If you wish to access locally using Laptop USB Console (LUC) function, connect a USB port of the laptop to this LUC Port. Make sure you have set the mode in USB IO Setting to LUC. Refer to the user manual for more information.
- (Optional) If you are using serial devices (data terminal equipment) such as a touch panel, connect it to the Local Console COM Port with a network switch console cable.
- (Optional) If you are using serial devices (data communication equipment) such as a PC, connect it to the CPU COM Port with a serial RS-232 DB-9 to RJ-45 Cat5 Ethernet adapter network modem/switch/router cable.
- Plug a network cable into one of the unit's LAN Ports.
- (Optional) Plug a second network cable into the other LAN Port for dual LAN operation.
- (Optional) For basic switch operation (e.g. remote server reset function), connect the NC and C terminals to the server/PC.
- (Optional) For basic DI terminal notifi cation, connect the GND and DI to an alarm sensor (e.g. thermometer, humidity sensor).
- Plug the power adapter provided with this package into an AC power source and plug the power adapter cable into one of the unit's Power Jacks. The unit will turn on once it is powered.
- (Optional) Plug another power adapter into an AC power source and plug the power cable into the other Power Jack for dual power operation. Note: The second power connection acts as power back-up. A second power adapter can be purchased from your ATEN supplier.
Operation
- Open your browser and specify the IP address of the CN9900/CN9950 you want to access in the browser's URL location bar.
Note: You can get the IP address from the CN9900/CN9950 administrator, or see the "IP Address Determination" section of the user manual. (Default IP Address: 192.168.0.60) - If a Security Alert dialog box appears, accept the certifi cate – it can be trusted.
The Login page appears.
- Provide a valid Username and Password. Note: If you are logging in for the fi rst time, use the default Username: administrator; and the default Password: password.
- Then click Login to bring up the browser Main Page.
Local IP Setup
Use the local console to set the IP address. All procedures start from the OSD Main Screen.
- To pop up the Main Screen, tap [Scroll Lock] twice.
- When the login screen appears, enter a valid Username and Password to continue.
Note: If you are logging in for the fi rst time, use the default Username: administrator; and the default Password: password.
IP Installer
For computers running Windows, an IP address can be assigned with the IP Installer utility:
The utility can be obtained from the Download area of our website www.aten.com., after downloading the utility to your client computer, go to the directory that the IP Installer program resides in, and run IPInstaller.exe.
Support and Documentation Notice
All information, documentation, fi rmware, software utilities, and specifi cations contained in this package are subject to change without prior notifi cation by the manufacturer.
To reduce the environmental impact of our products, ATEN documentation and software can be found online at http://www.aten.com/download/
Technical Support
www.aten.com/support
Scan for more information
ATEN Website

User Manual

© Copyright 2020 ATEN® International Co., Ltd.
ATEN and the ATEN logo are trademarks of ATEN International Co., Ltd. All rights reserved.
All other trademarks are the property of their respective owners.


Documents / Resources
References
Download manual
Here you can download full pdf version of manual, it may contain additional safety instructions, warranty information, FCC rules, etc.
Advertisement


Need help?
Do you have a question about the CN9900 and is the answer not in the manual?
Questions and answers