ATEN Altusen KL1508Ai, KL1516Ai - Dual Rail LCD KVM Switch Quick Start
- User manual (245 pages) ,
- Specifications (5 pages) ,
- Quick start manual (2 pages)
Advertisement
Package Contents
1 KL1508Ai or KL1516Ai Dual Rail LCD KVM Switch with a Standard Mounting Kit
1 Power Cord
1 Firmware Upgrade Cable
2 L Brackets
1 User Instructions
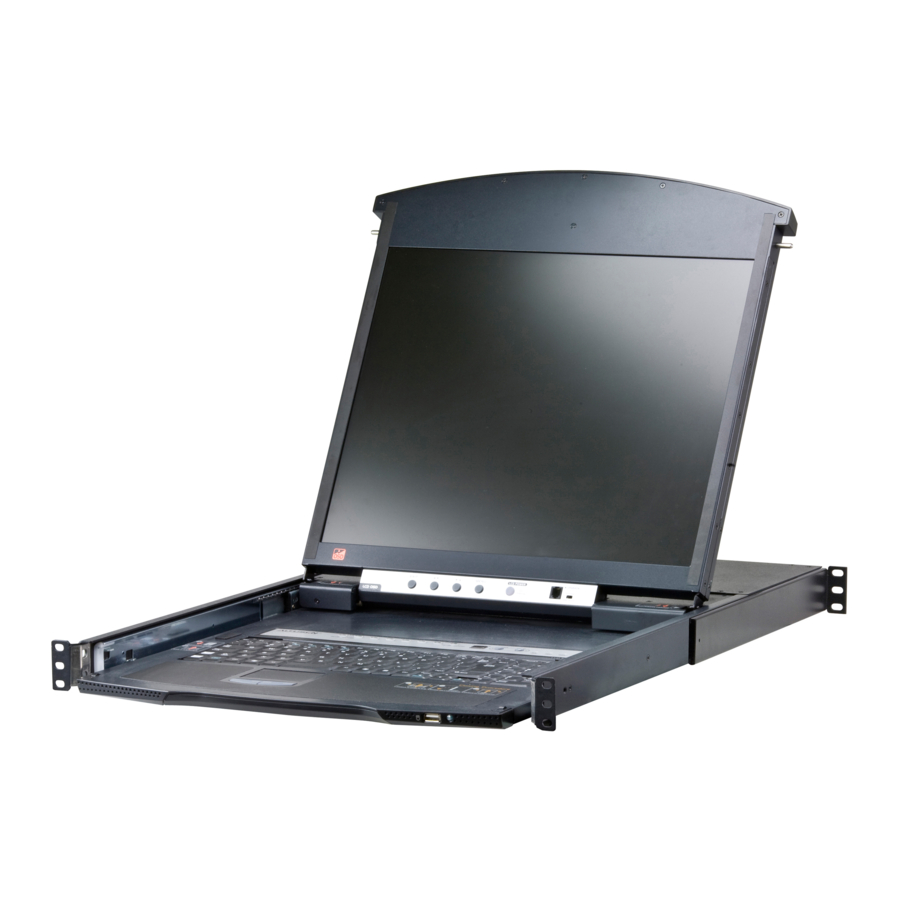
Hardware Review

Front View
- Upper Handle
- LCD Module
- Keyboard Module
- Lower Handle
- Power LED
- Keyboard Release Catch
- LCD Release Catch
- Rack Mounting Tabs
- LED Illumination Light
Keyboard Module
- Keyboard
- Touchpad
- External Mouse Port
- Station ID LED
- Station Selection Area
- Lock LEDs & Reset Switch
- Port Selection Buttons and LEDs
LCD Module
- LCD Display
- LCD Controls
- LCD On/Off Button
- Firmware Upgrade Section
Rear View
- Grounding Terminal
- Power Socket
- Power Switch
- LAN Port
- PON Port
- Daisy Chain Port
- Local Console Port Selection
- KVM Port Selection
Hardware Installation

Standard rack mounting
- While one person positions the switch in the rack and holds it in place, the second person loosely screws the front brackets to the rack.
- While the first person still holds the switch in place, the second person slides the L brackets into the switch's side mounting brackets, from the rear until the bracket flanges contact the rack, then screws the L brackets to the rack.
- After the L brackets have been secured, tighten the front bracket screws.
Note:- Allow at least 5.1 cm on each side for proper ventilation, and at least 12.7 cm at the back for the power cord and cable clearance.
- Download the user manual from our website for detailed instructions on Optional Rack Mounting (2 L Brackets provided in the Package Contents are used): www.aten.com
Single Station Installation
- Ground the KL1508Ai / KL1516Ai by connecting one end of the grounding wire to the grounding terminal, and the other end of the wire to a suitable grounded object.
Note: Do not omit this step. Proper grounding helps to prevent damage to the unit from surges or static electricity. - If you choose to install an external console, plug your keyboard, monitor, and mouse into the Console Ports located on the switch's rear panel. The ports are color coded and marked with an icon to identify themselves.
Note: This step is optional. - For each of the computers you are installing, use Cat 5e cable to connect any available KVM port to a KVM adapter cable that is appropriate for the computer you are installing.
Note: The maximum supported distance to the adapter cable is 50 m. - Connect the KVM Adapter cable to the computer. Plug the adapter cable connectors into their respective ports on the computers you are installing.
- Plug the LAN or WAN cable into the KL1508Ai / KL1516Ai's LAN port.
- Connect the power cord to the switch and to an AC power source
After the KL1508Ai / KL1516Ai is cabled up, you can turn on the power. After the switch is powered up, you can turn on the servers.
Operation
OSD
The On Screen Display (OSD) is a menu driven method to handle computer control and switching operations. All procedures start from the OSD Main Screen. To display the Main Screen, tap the OSD hotkey twice. The default hotkey is [Scroll Lock]. You can change the hotkey to the Ctrl key or the Alt key if you like.
When entering the OSD menu, the system will prompt you for a username and password. For the first time, enter the default username and password: administrator / password. The system will ask you to change the password immediately.
Hotkey Summary Table
| [Num Lock] + [-] or [Ctrl] + [F12] | [A] [Enter] | Invokes Auto Scan mode. When Auto Scan mode is in effect, [P] or left-click pauses auto-scanning. When auto-scanning is paused, pressing any key or another left-click resumes auto-scanning. |
| [B] | Toggles the Beeper On or Off. | |
| [Esc] or [Spacebar] | Exits hotkey mode. | |
| [Num Lock] + [-] or [Ctrl] + [F12] | [F1] | Sets Operating System to Windows. |
| [F2] | Sets Operating System to Mac. | |
| [F3] | Sets Operating System to Sun. | |
| [F5] | Performs a keyboard / mouse reset on the target computer. | |
| [H] | Toggles the Hotkey invocation keys. | |
| [Port ID] [Enter] | Switches access to the computer that corresponds to that Port ID. | |
| [R] [Enter] | Administrator only hotkey. It returns the switch's settings to their default values. | |
| [T] | Toggles the OSD Hotkey between [Ctrl] [Ctrl] and [Scroll | |
| [←] | Lock] [Scroll Lock]. Invokes Skip Mode and skips from the current port to the first accessible port previous to it. | |
| [→] | Invokes Skip Mode and skips from the current port to the next accessible port. | |
| [↑] | Invokes Skip Mode and skips from the current port to the last accessible port of the previous Station. | |
| [↓] | Invokes Skip Mode and skips from the current port to the first accessible port of the next Station. |
Support and Documentation Notice
All information, documentation, firmware, software utilities, and specifications contained in this package are subject to change without prior notification by the manufacturer. To reduce the environmental impact of our products, ATEN documentation and software can be found online at http://www.aten.com/download/
Technical Support
www.aten.com/support
Scan for more information

© Copyright 2019 ATEN ® International Co., Ltd.
ATEN and the ATEN logo are trademarks of ATEN International Co., Ltd. All rights reserved. All other trademarks are the property of their respective owners.
This product is RoHS compliant.
Part No. PAPE-1223-D21G Printing Date: 07/2019


Documents / Resources
References
Download manual
Here you can download full pdf version of manual, it may contain additional safety instructions, warranty information, FCC rules, etc.
Download ATEN Altusen KL1508Ai, KL1516Ai - Dual Rail LCD KVM Switch Quick Start
Advertisement


Need help?
Do you have a question about the Altusen KL1508Ai and is the answer not in the manual?
Questions and answers