ATEN CS1792, CS1794 - USB 2.0 HDMI KVMP Switch Quick Start Guide
- User manual (55 pages) ,
- Quick start manual (2 pages) ,
- Executive overview (11 pages)
Advertisement
Package Contents
1 CS1792 / CS1794 USB 2.0 HDMI KVMP Switch
2 Custom HDMI KVM Cable Sets (CS1792)
4 Custom HDMI KVM Cable Sets (CS1794)
1 Firmware Upgrade Cable
1 Power Adapter
1 USB-to-PS/2 Converter
1 User Instructions
Online Registration
International:
http://support.aten.com
North America:
http://www.aten-usa.com/product_registration
Technical Phone Support
International:
886-2-86926959
North America:
1-888-999-ATEN Ext: 4988
United Kingdom:
44-8-4481-58923
All information, documentation, and specifications contained in this media are subject to change without prior notification by the manufacturer. Please visit our website to find the most up to date version.
Requirments
Console
- A HDMI compatible monitor capable of the highest possible resolution
- A USB mouse
- A USB keyboard
Note: A PS/2 keyboard and mouse can be used with the converter included in the CS1792 / CS1794 package.
- Microphone and speakers (optional)
Computers
The following must be available on each computer:
- A HDMI port
Note: The quality of the display is affected by the quality of the display card. For best results, we recommend you purchase a high quality product.
- USB Type A port
- Audio ports (optional)
Cables
Two (CS1792) or four (CS1794) custom HDMI KVM cable sets are provided with this package.
Note: If the Console monitor has built-in speakers and supports audio through its HDMI interface, the speaker connectors on the Console ends of the custom HDMI KVM cable sets do not need to be used.
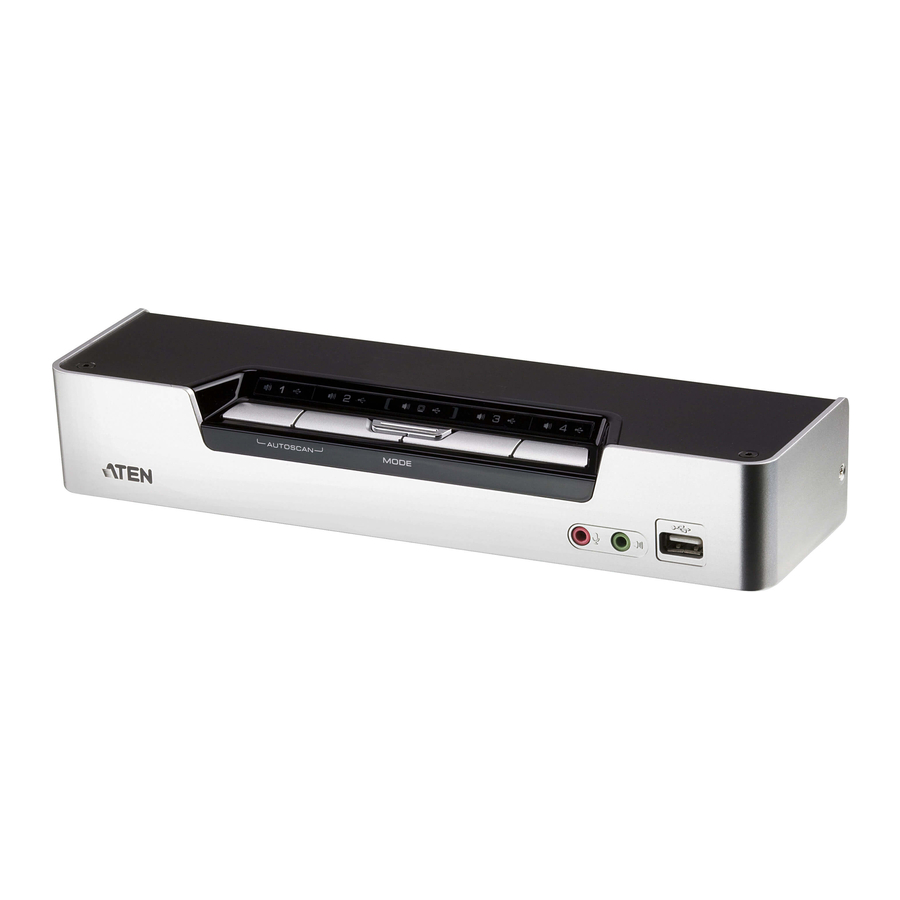
Hardware Review
Front View
LED Status Panel Detail

Front View
LED Status Panel Detail
- LED Status Panel
- Mode Selection Pushbutton
- Port Selection Pushbuttons
- Console Audio Ports
- USB 2.0 Peripheral Port
Rear View

- Firmware Upgrade Port
- USB Console Ports
- Console Analog Audio Port
- KVM Port Section
- Power Jack
- USB 2.0 Peripheral Port
- Console Monitor Port
Hardware Installation

Cable Connection
Note:
- a. If the Console monitor has built-in speakers and supports audio through its HDMI interface, separate speakers do not need to be used.
- If the computers in your installation fully support HDMI, the speaker connectors on the custom HDMI KVM cable sets do not need to be used.
To set up your CS1792 / CS1794 installation, refer to the installation diagram (the numbers in the diagrams correspond to the steps), and do the following:
- Plug your USB keyboard and USB mouse into the USB Console Ports located on the unit's rear panel.
- Plug your HDMI monitor into the Console HDMI port located on the unit's rear panel.
- If you are using separate speakers and microphone, plug them into the console analog audio ports on the unit's rear panel.
- Using the custom HDMI KVM cable set, plug the HDMI cable connectors and accompanying USB connectors into their corresponding sockets on the rear of the switch.
- At the other end of the cable, plus the HDMI and USB cables into their respective ports on the computers.
- Plug your USB peripherals into the type A sockets (one is located on the front; the second is located on the rear).
- Power on the monitor.
- Plug the power adapter that came with the CS1792 / CS1794 package into an AC power source, then plug the power adapter cable into the switch's power jack.
- Power on the computers.
Operation
Manual Switching
- To bring complete focus (audio, KVM, and USB) to a computer, either, a) press the port selection pushbutton that corresponds to that computer; or b) press the Mode pushbutton once (the Mode pushbutton's three icons light up) and then press the port selection pushbutton that corresponds to that computer. All three port icons light up.
- To bring only the KVM focus to a computer, press the Mode pushbutton twice (the Mode pushbutton's KVM icon lights up), and then press the port selection pushbutton that corresponds to that computer. The port's KVM icon (the port number) lights up.
- To bring only the audio focus to a computer, press the Mode pushbutton three times (the Mode pushbutton's audio icon lights up), and then press the port selection pushbutton that corresponds to that computer. The port's audio icon lights up.
- To bring only the USB focus to a computer, press the Mode pushbutton four times (the Mode pushbutton's USB icon lights up), and then press the port selection pushbutton that corresponds to that computer. The port's USB icon lights up.
- Press and hold port selection pushbuttons 1 and 2 simultaneously for 2 seconds to start Auto Scan Mode.
Keyboard Port Operation
All port switches begin with tapping the Scroll Lock key twice. The tables below describe the actions that each combination performs.
Note: If using the Scroll Lock key conflicts with other programs running on the computer, the Ctrl key can be used, instead.
Cycling Through the Ports
| Hotkey | Action |
| [Scroll Lock] [Scroll Lock] [Enter] | Brings the KVM, USB hub, and audio focus from the port that currently has the KVM focus to the next port on the installation (1 to2; 2 to 1 for the CS1792; and 1 to 2; 2 to 3; 3 to 4; 4 to 1 for the CS1794). |
| [Scroll Lock] [Scroll Lock] [K] [Enter] | Brings only the KVM focus from the port that currently has it to the next port on the installation. The USB and audio focus remain where they are. |
| [Scroll Lock] [Scroll Lock] [U] [Enter] | Brings only the USB hub focus from the port that currently has it to the next port on the installation. The KVM and audio focus remain where they are. |
| [Scroll Lock] [Scroll Lock] [S] [Enter] | Brings only the audio focus from the port that currently has it to the next port on the installation. The KVM and USB hub focus remain where they are. |
Cycling Through the Ports
| Hotkey | Action |
| [Scroll Lock] [Scroll Lock] [n] [Enter] | Brings the KVM, USB hub, and audio focus to the computer attached to the port corresponding to the specified Port ID. |
| [Scroll Lock] [Scroll Lock] [n] [K] [Enter] | Brings only the KVM focus to the computer attached to the specified port. The USB hub and audio focus remain where they are. |
| [Scroll Lock] [Scroll Lock] [n] [U] [Enter] | Brings only the USB hub focus to the computer attached to the specified port. The KVM and audio focus remain where they are. |
| [Scroll Lock] [Scroll Lock] [n] [S] [Enter] | Brings only the audio focus to the computer attached to the specified port. The KVM and USB hub focus remain where they are. |
| [Scroll Lock] [Scroll Lock] [n] [K] [U] [Enter] | Brings the KVM and USB hub focus to the computer attached to the specified port. The audio focus remains where it is. |
| [Scroll Lock] [Scroll Lock] [n] [K] [S] [Enter] | Brings the KVM and audio focus to the computer attached to the specified port. The USB hub focus remains where it is. |
| [Scroll Lock] [Scroll Lock] [n] [U] [S] [Enter] | Brings the USB hub and audio focus to the computer attached to the specified port. The KVM focus remains where it is. |
Note: The n stands for the computer's Port ID number (1 or 2 or 3 or 4).
Hotkey Setting Mode
Hotkey Setting Mode is used to set up your CS1792 / CS1794 switch configuration. All operations begin with invoking Hotkey Setting Mode (HSM).
Invoking HSM
To invoke HSM do the following:
- Press and hold down [Num Lock].
- Press and release [-].
- Release [Num Lock].
HSM Summary Table
| Key | Function |
| [H] | Toggles between the default and alternate HSM invocation keys. |
| [T] | Toggles between the default and alternate Port Switching keys. |
| [F2] | Enables Mac keyboard emulation. |
| [F10] | Disables keyboard emulation and activates pass through keyboard mode. |
| [F4] | Print the switch's current settings via a text editor or word processor. |
| [F5] | Performs a USB keyboard and mouse reset. |
| [B] | Toggles the beeper On and Off. |
| [X] [Enter] | Enables/Disables the Port Switching keys. |
| [R] [Enter] | Resets the hotkey settings to their default status. |
| [upgrade] [Enter] | Invokes Firmware Upgrade Mode. |
| [D] | Invokes the Video DynaSync function, which stores the console monitor's EDID to optimize display resolution. |
| [M] | Toggles between mouse emulation enable and disable. |
| [F1] | Sets the Keyboard and mouse to SPC mode so that it can work under special operating systems as a standard (104 key) keyboard and mouse. |
© Copyright 2012 ATEN ® International Co., Ltd. ATEN and the ATEN logo are trademarks of ATEN International Co., Ltd. All rights reserved. All other trademarks are the property of their respective owners.

Documents / Resources
References
Download manual
Here you can download full pdf version of manual, it may contain additional safety instructions, warranty information, FCC rules, etc.
Download ATEN CS1792, CS1794 - USB 2.0 HDMI KVMP Switch Quick Start Guide
Advertisement


Need help?
Do you have a question about the CS1792 and is the answer not in the manual?
Questions and answers