Advertisement
Introduction
You have chosen a high quality product. The instructions for use are part of the product. They contain important information concerning safety, use and disposal. Before using the product, please familiarise yourself with all of the safety information and instructions for use. Only use the unit as described and for the specified applications. If you pass the product on to anyone else, please ensure that you also pass on all the documentation with it.
Proper Use

This product is for indoor use only.
The product is not intended for commercial use.
Supply scope
1 x Digital thermometer with outside sensor and approx. 3 m cable
1 x 1.5 V ![]() , AA battery
, AA battery
1 x Operating manual
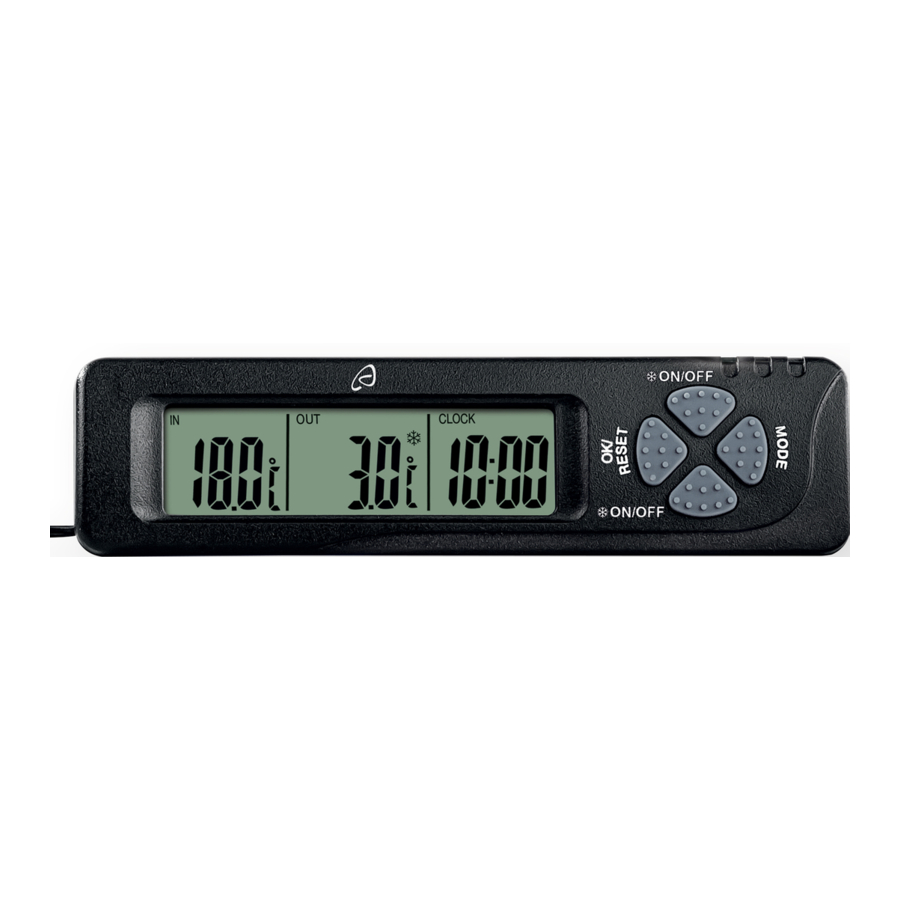
Description of parts

- Ice warning ON / OFF
- MODE (function) button
- RESET button
- Time display
- Outside temperature display
- Inside temperature display
- Outside sensor
Displays
IN = Inside temperature
OUT = Outside temperature
MAX = Stored maximum temperature
MIN = Stored minimum temperature
 = Ice warning
CLOCK = Time
AM = Morning (time in 12-hour mode)
PM = Afternoon (time in 12-hour mode)
Technical data
Operating voltage: 1.5 V 
Type of battery: 1.5 V , AA
Inside temperature measuring range: –10°C to +50°C
Outside temperature measuring range: –50°C to +70°C
Tolerance: (–50°C to 0°C) ± 2°C
(0°C to +30°C) ± 1°C
(+30°C to +70°C) ± 2°C
Ice warning signal range: –1°C to +3°C
Outside sensor cable length: approx. 3 m
Getting started
Inserting / changing the battery
- Open the battery compartment on the back of the instrument by pushing the battery compartment cover in the direction indicated by the arrow.
- Insert the supplied battery with the correct polarity or replace a spent battery with a new one in the same way.
- Close the battery compartment again.
Mounting
We recommend using strips of double-sided adhesive tape (not included in the delivery) to mount the instrument. This adhesive tape can be used to affix the thermometer to almost any smooth surface. Please follow the manufacturer's instructions for the adhesive tape.
- Clean the surface on which you wish to mount the instrument with a degreasing and non-abrasive or chemical cleaning agent.
- Attach the outside sensor
![]() to the window frame or behind the front bumper of your motor vehicle.
to the window frame or behind the front bumper of your motor vehicle.
 to the window frame or behind the front bumper of your motor vehicle.
Operation
Note: After approx. 1 minute in any mode, the instrument automatically switches back into normal display mode. The inside and outside temperature and the time are displayed.
Settings
Note: Whenever you insert a battery or if you press and hold down the MODE  and RESET
  buttons for 2 seconds, all the displays appear briefly and the instrument then switches into the "Settings" mode. All settings can be made in the order indicated below.
- Set the time
"![]() " flashes in the time display
" flashes in the time display ![]() .
. - Press the MODE button
![]() to switch between 12 and 24 hour mode.
to switch between 12 and 24 hour mode. - Confirm your choice by pressing the RESET button
![]() .
.
If 24 hr mode is chosen, "![]() " will appear in the time display
" will appear in the time display ![]() . If 12 hr mode is chosen, "
. If 12 hr mode is chosen, "![]() ", "Clock" and "AM" will appear in the time display
", "Clock" and "AM" will appear in the time display![]() .
. - Set the time by pressing the MODE button
![]() and / or holding the button down to move the numbers forwards. j Confirm your setting by pressing the RESET button
and / or holding the button down to move the numbers forwards. j Confirm your setting by pressing the RESET button ![]() .
.
- Press the MODE button
 " flashes in the time display
  .
.  " will appear in the time display
  ", "Clock" and "AM" will appear in the time display
- Select Celsius / Fahrenheit
The outside temperature display![]() and inside temperature display
and inside temperature display ![]() flash.
flash. - Press the MODE button
![]() to select Celsius (°C) or Fahrenheit (°F).
to select Celsius (°C) or Fahrenheit (°F). - Confirm your setting by pressing the RESET button
![]() .
.
- Press the MODE button
-
Set memory mode (Reset)
"![]() " flashes on the display
" flashes on the display ![]() .
.-
Press the MODE button
![]() to switch between daily "
to switch between daily "![]() " or manual reset "
" or manual reset "![]() ".
". -
Confirm your setting by pressing the RESET button
![]() .
.
-
 and inside temperature display
  flash.
  " flashes on the display
  " or manual reset "
 ".
".Daily reset: When this setting is made, the minimum and maximum temperatures of the past 24 hours are stored and deleted every day at midnight.
Manual reset: This setting enables you to manually delete the temperatures stored so far.
-
Activate / deactivate ice warning
The displays![]() and
and ![]() flash. They indicate the signal range +3.0°C to –1.0°C.
flash. They indicate the signal range +3.0°C to –1.0°C. -
Press the MODE button
![]() to activate the ice warning.
to activate the ice warning. ![]() appears in the display
appears in the display ![]() .
. -
Press the MODE button
![]() again to deactivate the ice warning. The symbol for the ice warning in the display
again to deactivate the ice warning. The symbol for the ice warning in the display ![]() disappears.
disappears. -
Confirm your setting by pressing the RESET button
![]() .
.
-
 appears in the display
 You can also activate and deactivate the ice warning in the normal display mode.
- Press one of the Ice Warning ON / OFF buttons
![]() . The ice warning is activated when the
. The ice warning is activated when the ![]() symbol appears in the display
symbol appears in the display ![]() .
.
Note: As soon as the outside temperature reaches the signal range, a 16-second warning signal is emitted at 5-minute intervals. In this temperature range, there is a risk of road surfaces becoming slippery, or they may already be slippery. Pay particular attention and drive according to the conditions. Press any button to switch the warning signal off.
 . The ice warning is activated when the
  symbol appears in the display
 Call up the temperature memory
- In normal display mode, press the MODE button
![]() to call up the stored maximum temperature (MAX).
to call up the stored maximum temperature (MAX). - Press the MODE button
![]() again to call up the stored minimum temperature (MIN).
again to call up the stored minimum temperature (MIN).
Delete the temperature memory
- In normal display mode, press the MODE button
![]() to call up the stored maximum temperature (MAX). Press the RESET button
to call up the stored maximum temperature (MAX). Press the RESET button ![]() to delete the stored temperatures.
to delete the stored temperatures. - Press the MODE button
![]() again to call up the stored minimum temperature (MIN). Press the RESET button
again to call up the stored minimum temperature (MIN). Press the RESET button ![]() to delete the stored temperatures.
to delete the stored temperatures.
Troubleshooting
| Error | Cause / Remedy |
Incorrect temperature | Measurement is impaired, e.g. by direct sunlight, air-conditioning or a fan heater – remove the instrument and the outside sensor from the area of interference. |
Display diminishes / incorrect temperature is displayed | Spent battery or dirty battery contacts – clean the contacts and insert battery; replace the battery if necessary. |
Display is black | Temperatures are outside the measuring range or instrument has been exposed to direct sunlight for a long time. |
Irregular display of figures | Remove the battery and put it back in the battery compartment. |
| Normal functioning of the product may be disturbed by electromagnetic inter ference | If so, simply reset the product to resume normal operation by following the instruction manual. |
Cleaning and Care
- Clean the exterior of the instrument only with a soft, dry cloth.
- Do not under any circumstances use liquids or cleaning agents, as they will damage the instrument.
- Clean the outside sensor with a slightly dampened cloth. The outside sensor is only protected against rain from above and splashes of water.
Safety
 Safety Instructions
- This appliance can be used by children aged from 8 years and above and persons with reduced physical, sensory or mental capabilities or lack of experience and knowledge if they have been given supervision or instruction concerning use of the appliance in a safe way and understand the hazards involved. Children shall not play with the appliance. Cleaning and user maintenance shall not be made by children without supervision.
![]()
Do not place the thermometer anywhere near an airbag, since this may result in injury if the airbag is activated. - Do not place the instrument directly in the driver's windscreen area. This can restrict visibility and distract the driver.
- Do not allow yourself to become distracted from concentrating on the traffic by the displays.
- Check all parts to ensure that they are intact. Mounting dam aged parts can result in injury.
- Check that all parts are assembled correctly. Improper assembly can result in injury.
- Do not expose the instrument to:

- extreme temperatures,
- strong vibrations,
- high mechanical loads,
- direct sunlight,
- moisture.
- This appliance has delicate electronic components. This means that if it is placed near an object that transmits radio signals, it could cause interference. This could be, for example, mobile telephones, walkie talkies, CB radios, remote controls and microwaves. If the display indicates a problem, move such objects away from it. Electrostatic charge can lead to the appliance failing. In cases of the appliance failing to work press the RESET button
![]() and MODE button
and MODE button ![]() together to reset the thermometer, or remove the batteries for a short while and then replace them.
together to reset the thermometer, or remove the batteries for a short while and then replace them.
 and MODE button
  together to reset the thermometer, or remove the batteries for a short while and then replace them.
Safety instructions for handling and use of batteries

OF EXPLOSION! Never recharge batteries.
- Keep batteries out of the reach of children; do not dispose of batteries in fire, short-circuit them or take them apart.
- Seek medical attention immediately if anyone swallows a battery.
- Make sure that you insert the battery with the correct polarity.
- Avoid extreme conditions and temperatures that may affect batteries, e.g. on radiators. Otherwise there is an increased risk of leakage.
- Avoid contact with the skin, eyes and mucous membranes if fluid has leaked from the battery. In the event of contact with battery acid, rinse the affected area with plenty of clean water and consult a doctor.
- Clean the battery and instrument contacts if necessary before inserting the battery.
- Remove the spent battery from the instrument immediately.
Otherwise there is an increased risk of leakage. - Remove the battery from the instrument if you are not intending to use the instrument for any length of time.

Documents / ResourcesDownload manual
Here you can download full pdf version of manual, it may contain additional safety instructions, warranty information, FCC rules, etc.
Advertisement


Need help?
Do you have a question about the Z31714 and is the answer not in the manual?
Questions and answers