Advertisement
Quick Links
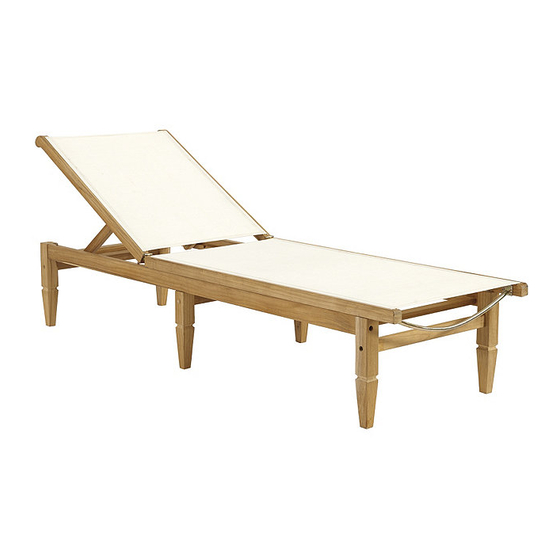
PRODUCT NAME: Madison Poolside Chaise
ITEM NUMBER: JC152
ASSEMBLED DIMENSIONS : 42 1/2"H x 24 3/4"W x 79"L
PRODUCTS ARE NOT INTENDED
FOR COMMERCIAL USE.
UPDATED: 12-7-2021
Prevent accidentally discarding small parts or
hardware. Retain all carton contents until assembly
and installation are complete.
Customer Service: 800-367-2810
Online: www.ballarddesigns.com
MADE IN VIETNAM
Page 1 of 5
Advertisement

Subscribe to Our Youtube Channel
Related Manuals for Ballard Designs JC152


Summary of Contents for Ballard Designs JC152
- Page 1 Customer Service: 800-367-2810 Online: www.ballarddesigns.com PRODUCT NAME: Madison Poolside Chaise ITEM NUMBER: JC152 ASSEMBLED DIMENSIONS : 42 1/2”H x 24 3/4”W x 79”L Prevent accidentally discarding small parts or hardware. Retain all carton contents until assembly and installation are complete.
-
Page 2: Required Tools
Assemble in location for intended use. Ltr. REQUIRED TOOLS: Hardware Included Allen Wrench (included) M7x 70mm Allen Screws -Two person assembly suggested. M6x40mm Allen Bolts Remove all parts, hardware and protective packaging from carton M6x25mm Allen Bolts and carefully arrange on a clean, level, padded surface. - Page 3 STEP 1: Attach a Left and Right Leg (G,I) to each end of Crossbar (H) using Allen Screws (A). Tighten using Allen Wrench (F). Repeat process for remaining Left and Right Legs and a remaining Crossbar. IMPORTANT: Be certain PEG HOLES are identically oriented on both assemblies. STEP 2: Attach Middle Left and Right Leg (J,K) to each end of remaining Crossbar (H) using Allen Screws (A).
- Page 4 STEP 5: Carefully insert each Back Support (N) into pockets along edge of Back Sling (M). Next, insert each Seat Support (P) into pockets along edge of Seat Sling (O). NOTE: Replacement Slings are available. Sold separately (Item Number JC157) Create Seat and Back Slings STEP 6: Insert Seat and Back Assemblies (from STEP 5) into channels in Chaise Frame (L).
- Page 5 STEP 7: Turn assembled Chaise upright and cover screw holes on sides and ends by inserting Screw Plugs (E) and lightly tapping into place. Cover Screw Holes STEP 8: Back angle adjustments made by lifting up on back then locking into desired position. Adjust Back Angle Cleaning and Care Occasionally wipe or hose down to remove dirt and debris.
Need help?
Do you have a question about the JC152 and is the answer not in the manual?
Questions and answers