Table of Contents
Advertisement
Advertisement
Table of Contents

Subscribe to Our Youtube Channel
Related Manuals for HOMCOM HOME GYM


Summary of Contents for HOMCOM HOME GYM
- Page 1 HOME GYM Assembly Instruction Assembly video please scan the QR code .
-
Page 2: Important Safety Information
Important Safety Information Please keep this manual in a safe place for reference. 1. It is important to read this entire manual before assembling and using the equipment.Safe and efficient use can only be achieved if the equipment is assembled, maintained and used properly. -
Page 3: Safety Instruction
Safety Instruction... -
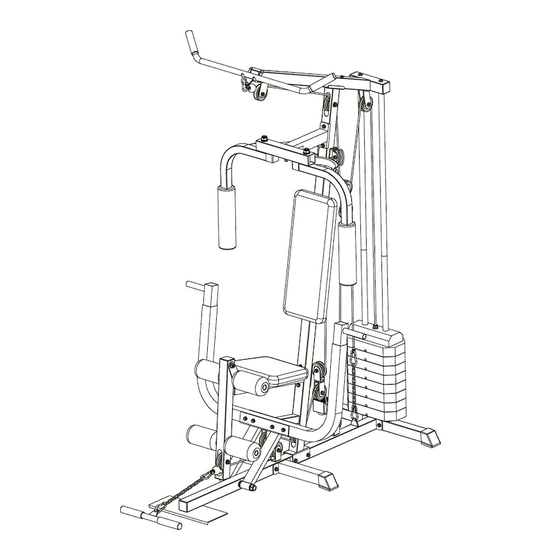
Page 4: Exploded Drawing
Exploded Drawing... - Page 5 NO. Description NO. Description Front Base Tube Round Plugφ1” Middle Base Tube L Cover Back Base Tube Handle Grip Guide Tube(down) Middle empty Plug Guide Tube(up) Rubber Ring Bilateral Tube Rubber Cushion Ridge Tube Pulley Connecting Part Pulley Bushing Butterfly Arm (right) Quick Pin Butterfly Arm (left) Snap Hook...
- Page 6 Step 1 – Assembly Instructions. Assembly of the base frame and weight stack 1) Insert the guide tubes (down)(4-2pcs) to the back base tube (3), secured with hex bolt (60- 2pcs) and washer (64-2pcs).Screw together middle base tube (2) and the back base tube (3), secured with hex bolt (56-2pcs), washer (64-4pcs) and nylon nut (66-2pcs).
- Page 7 Step 2 – Assembly Instructions. Assembly of the main frame 1) Screw together the main frame(down) (15) with middle base tube (2), secured with parts hex bolt (56-2pcs), washer (64-4pcs) and nylon nut (66-2pcs). 2) Insert the main frame(up) (16) into the main frame(down) (15), secured with parts hex bolt (60-3pcs) and washer (64-3pcs).
- Page 8 Step 3 – Assembly Instructions Assembly of the butterfly arm 1) Attach the connecting part (8) to main frame (up) (16), secured with parts hex bolt (56-2pcs), washer (64-4pcs) and nylon nut (66-2pcs). 2) Attach butterfly arm (right)(9)& butterfly arm (left)(10) to the connecting part (8),secured with brass color bushing (52-4pcs), washer (65-2pcs) and nylon nut (67-2pcs).
- Page 9 Step 4 – Assembly Instructions. Assembly of the U Push Frame 1) Attach the Connect Tube(17) to the front base tube(1), secured with brass color bushing (51- 6pcs), bolt(55-1pcs),washer (65-2pcs) and nylon nut (67-2pcs). 2) Fix the U push frame(left)(19)&(right) (31) to the Connect Tube(17), secured with parts hex bolt (56-4pcs), washer (64-8pcs) and nylon nut (66-4pcs).
- Page 10 Step 5 – Assembly Instructions. Assembly of the leg curl and backrest 1) Fix the seat beam (12) to the main frame (15), secured with parts hex bolt (56-2pcs), washer (64-4pcs) and nylon nut (66-2pcs). 2) Attach the leg beam (13) to the seat beam (12), secured with hex bolt (57),washer (64-2pcs) and nylon nut (66).
- Page 11 Step 6 – Assembly Instructions. Assembly of the pulley Let pulley (41-14pcs) be assembled on welded pulley brackets(18-2pcs), Reverse pulley bracket (23), and floating pulley bracket (22), secured with all hex bolt (59-11pcs), hex bolt (56-3pcs), hex bolt (60-2pcs),pulley bush (42-6pcs),washer (64-32pcs) and nylon nut (66-16pcs).
- Page 12 Assembly of the wire cables and pulleys Cable 48 assembly: Start at No.6 to put cable first then assembly pulley and follow ARROW to go around No.7, 8 ,9,10,11 and 5. And finally use snap hook (44) to connect cable 48 and chain (45) together to fix. Cable 49 assembly: Start at fixing cable 49 on right butterfly arm, and put cable first then assemble pulley on No.13 then follow ARROW to go around No.12 up to No.14 to fix cable 49 on left butterfly arm.
-
Page 13: Exercise Instructions
MULTI GYM Using your will provide you with several benefits. It will improve your physical fitness, tone your muscles and, in conjunction with a calorie-controlled diet, help you lose weight. 1.The Warm Up Phase This stage helps get the blood flowing around the body and the muscles working properly. It will also reduce the risk of cramp and muscle injury.
Need help?
Do you have a question about the HOME GYM and is the answer not in the manual?
Questions and answers
What is the crank for on a homcom gym. I have looked at the manual on the internet and do not see the point of it. Check home gyms out before I buy. Thank you.