HOMCOM A90-243 Manual
Hide thumbs
Also See for A90-243:
- Instruction manual (26 pages) ,
- User manual (24 pages) ,
- Manual (24 pages)

Related Manuals for HOMCOM A90-243


Summary of Contents for HOMCOM A90-243
- Page 1 INapa001V02_FR A90-243 RAMEUR MANUEL D'UTILISATION IMPORTANT - CONSERVEZ CES INFORMATIONS POUR VOTRE CONSULTATION ULTÉRIEURE: LISEZ ATTENTIVEMENT UESR’S MANUAL...
- Page 2 SOMMAIRE ATTENTION LISTE DES PIECES VUE DETAILLEE INSTRUCTIONS D'ASSEMBLAGE REMPLACEMENT DES PILES PLIAGE DE LA MACHINE DETAILS DU MONITEUR D'AFFICHAGE...
- Page 3 ATTENTION! La charge maximale supportée est de 264 livres (120KG) Si vous ne vous sentez pas bien pendant l'utilisation de l'appareil, veuillez arrêter immédiatement et consulter votre médecin avant la prochaine utilisation. Pour votre sécurité, vous devez garder une distance d'au moins 0,9 mètre par rapport à...
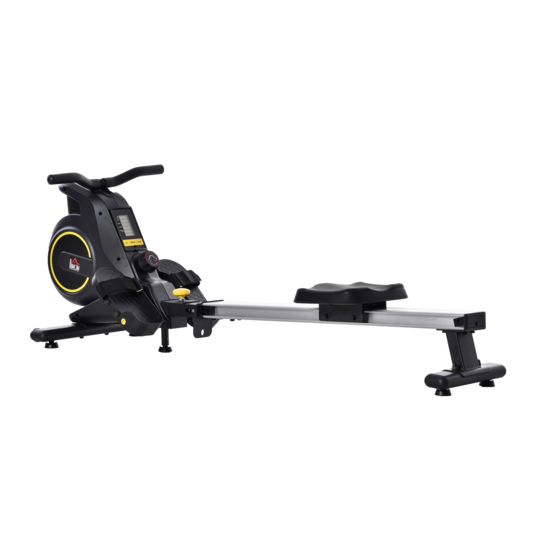
- Page 4 LISTE DES PIECES COMPOSANTS DU RAMEUR 4. Pièce de connexion au 1.Frame 2. Support de pied avant 3. Rail cadre 6.Jeu de verrous x 2 7. Siège 8. Support arrière 5. Protection avant du rail 12. M12 flat washerx 2 12.
- Page 5 DESSIN ÉCLATÉ...
- Page 6 INSTRUCTIONS D'ASSEMBLAGE Étape 1 : Assembler le support de pied avant Fixez la barre de stabilisation du pied avant (n° 2) au cadre (n° 1). Attention : les roues de la barre avant doivent être tournées vers l'extérieur. Vissez et serrez deux boulons de carros- serie M8 *55mm (No.24), deux rondelles plates M10 (No.
- Page 7 Step 3: Assemble the seat and rear of the rail For the step, please prepare a lock bolt set (No.6), the seat (No.7), rear support(No.8). connecting shect (No.9), rear rail cover (No.10), four M8*16mm bolts (No.20), four split washers (Nc.21), four flat washers (No.22), M5*16 bolt (No.23), and two Allen wrenches (No.32).
- Page 8 Step 5: Assembling the rail Connect the rail and the frame. Screw the M10*100mm hex bolt (No.26) and the M10 lock nut (No.27) to the hole near to the frame by using two open end wrenches (No.33). lnsert the detent pin (No.28) to the hole near to the rail.
- Page 9 BATTERY REPLACEMENT 1. Press the button and the remove 2. Remove the battery cover. the monitor carefully. 3. Replace with two AA batteries. 4. Place the cover back on and install the monitor carefully.
- Page 10 FOLDING THE MACHINE When folding and storing the rowing machine, first pull out the locking knob (No.29) and the quick latch (No. 28), then fold the aluminium rail upwards. Insert the locking knob at the junction of the fuselage and the aluminium rail. After folding, you can move the machine with the aid of the two wheels on the front foot bar.
- Page 11 DETAILS OF DISPLAY MONITOR Parameters TIME 00:00-99:00 COUNT 0~9999 DISTANCE 0.0~99.9 ML CALORIES 0-9999 KCAL STROKES 0-999 SPM Operation Turn on/off The monitor will automatically turn on when you start to exercise, and you can also turn on it manually by pressing those buttons. The monitor will automatically turn off after 2 minutes when you stop exercise.
- Page 12 -12-...
- Page 13 ROWING MACHINE IMPORTANT, RETAIN FOR FUTURE REFERENCE: READ CAREFULLY...
-
Page 14: Table Of Contents
CONTENTS Safety Notice Parts List Exploded View Assembly Instructions Battery replacemen Folding the machine Details of Display Monitor... - Page 15 CAUTION!
- Page 16 PACKING LIST 1.Frame 12. M12 flat washerx 2 13.M12 circlip 17.stop lever...
-
Page 17: Exploded View
EXPLODED VIEW... -
Page 18: Assembly Instructions
ASSEMBLY INSTRUCTIONS Step 1: Assemble the front foot pipe Attach the front foot stabliliser bar (Na.2) to the frame (No.1). Attention: the wheels of the front bar should be facing outward. Screw two M8*55mm carriage bolt(No.24). two M10 flat washers (No.18), two M8 acorn nut (No.25) using the big Allen wrench (No.32) to tighten. - Page 19 Step 3: Assemble the seat and rear of the rail For the step, please prepare a lock bolt set (No.6), the seat (No.7), rear support(No.8). connecting shect (No.9), rear rail cover (No.10), four M8*16mm bolts (No.20), four split washers (Nc.21), four flat washers (No.22), M5*16 bolt (No.23), and two Allen wrenches (No.32).
- Page 20 Step 5: Assembling the rail Connect the rail and the frame. Screw the M10*100mm hex bolt (No.26) and the M10 lock nut (No.27) to the hole near to the frame by using two open end wrenches (No.33). lnsert the detent pin (No.28) to the hole near to the rail.
-
Page 21: Battery Replacemen
BATTERY REPLACEMENT 1. Press the button and the remove 2. Remove the battery cover. the monitor carefully. 3. Replace with two AA batteries. 4. Place the cover back on and install the monitor carefully. -
Page 22: Folding The Machine
FOLDING THE MACHINE When folding and storing the rowing machine, first pull out the locking knob (No.29) and the quick latch (No. 28), then fold the aluminium rail upwards. Insert the locking knob at the junction of the fuselage and the aluminium rail. After folding, you can move the machine with the aid of the two wheels on the front foot bar. -
Page 23: Details Of Display Monitor
DETAILS OF DISPLAY MONITOR Parameters TIME 00:00-99:00 COUNT 0~9999 DISTANCE 0.0~99.9 ML CALORIES 0-9999 KCAL STROKES 0-999 SPM Operation Turn on/off The monitor will automatically turn on when you start to exercise, and you can also turn on it manually by pressing those buttons. The monitor will automatically turn off after 2 minutes when you stop exercise. - Page 24 -12-...
Need help?
Do you have a question about the A90-243 and is the answer not in the manual?
Questions and answers