
Subscribe to Our Youtube Channel
Related Manuals for HOMCOM A91-134


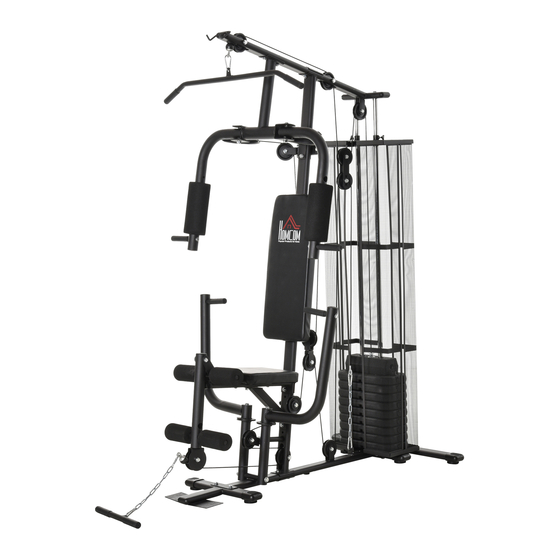
Summary of Contents for HOMCOM A91-134
- Page 1 INald002V02_UK A91-134 HOME GYM IMPORTANT, RETAIN FOR FUTURE REFERENCE: READ CAREFULLY ASSEMBLY INSTRUCTION...
- Page 2 PACKING DETALS:TOTAL 4 BOXES BOX-1/4 PARTS PARTS PARTS HARDWARE...
- Page 3 BOX-2/4 PARTS PARTS PARTS...
- Page 4 BOX-3/4 PARTS BOX-4/4 PARTS...
-
Page 5: Table Of Contents
TABLE OF CONTENTS SAFETY INFORMATION ........................1 PRODUCT COMPONENT DETAILS ...................... 3 PARTS LIST ............................4 PARTS LIST 1 ............................5 PARTS LIST 2 ............................6 INSTALLATION ............................7 CLEANING AND MAINTENANCE ......................18 DISPOSAL ............................18... -
Page 6: Safety Information
SAFETY INFORMATION IMPORTANT – Please read fully before assembly or use. This exercise equipment is built for optimum safety. However, certain precautions apply whenever you operate a piece of exercise equipment. Be sure to read the entire manual before you assemble, operate, or use this equipment, note the following safety precautions. - Page 7 Children or persons with limited physical or mental abilities, or those not familiar with this device, should not be allowed to use this weight bench! Please keep in mind that this manual and the safety can only draw your attention to eventual hazard.
-
Page 8: Product Component Details
PRODUCT COMPONENT DETAILS ~ 3 ~... - Page 9 PARTS LIST Parts Description Parts Description Main base tube 1 pc Rubber Cushion 2 pcs Back base tube 1 pc Weight 9 pcs Front base tube 1 pc Pulley shaft 1 pc Upper Support 1 pc Locking pin 10*150 1 pc Vertical Support 1 pc Pulley Seat...
-
Page 10: Parts List 1
PARTS LIST 1 ~ 5 ~... -
Page 11: Parts List 1
PARTS LIST 2 ~ 6 ~... -
Page 12: Installation
INSTALLATION Step 1 1. Attach main base tube(l) to back base tube(2),chrome bar(22)using Hex bolts M10x25(64- 2sets), washers and Hex bolts M8x20 (67- 2sets),wash- ers. 2. Attach main base tube(l) to front base tube(3)using Hex bolts M10x45(61-2sets), washers, nuts, and Hex bolts M8x20(67-2sets), wash- ers. - Page 13 Step 2 1.Attach weights(24, 29) to chrome bars(22) as shown. ~ 8 ~...
- Page 14 Step 3 1. Attach Vertical support(5)to Main base tube(I) using reinforced plate (48) and Hex bolts MI0 x50 (60-2sets) washers and nuts. 2. Attach Upper support(4)to Vertical support(5) using reinforced plate (48) and Hex bolts MI0 x50(60-2sets) and insert chrome bars(22) into holes of upper support(4) using Hex bolts M10 x25(64-2sts).
- Page 15 Step 4 1. Attach the chest press (10) to upper support 94) using Hex bolts M10 x 45 (61 – 2 sets), washers and nuts 2. Attach the pulley shaft (30), pro support (51) to vertical support (5) using Hex bolts M10 x 50 (51-2sets), washers and nuts ~ 1 0 ~...
- Page 16 Step 5 1. Attach the right arm(12) to chest press(10) using steel bushing (42) and Hex bolts M12x85 (56), washer and nut. 2. Insert the handle bar(16) into right arm(12) using Hex bolts M10x25(64),washer. ~ 1 1 ~...
- Page 17 Step 6 1. Attach the H- shaped support (13) to the main base tube (1) using the steel busing (42) and Hex bolts M12 x 190 (55), washer and nut 2. Insert the rowing support (9) into the holes of the vertical support (5) using Hex bolts M10 x 25 (64), washer ~ 1 2 ~...
- Page 18 Step 7: 1. Attach leg extension(7) to seat support(6) using Hex bolts M10 x75 (58-Isets) washers and nuts. 2. Insert the rowing arm (19) into the H-shaped support (7) using the big washer (41) and Hex bolts M10 x25 (64-2 sets) washers. ~ 13 ~...
- Page 19 Step 8: 1. Attach back cushion(50) to vertical support(5) using Hex bolts M8x45(65-2sets) washers . 2. Attach seat pad (46) to seat support (6) using Hex bolts M8x45 (65-2sets) washers ~ 1 4 ~...
- Page 20 ~ 15 ~...
- Page 21 ~ 16 ~...
- Page 22 ~ 17 ~...
-
Page 23: Cleaning And Maintenance
CLEANING AND MAINTENANCE 1. Regularly examine the equipment to detect any damage to wear which may have occurred. The safety level of the equipment can be maintained only if it is examined regularly for damage and wear and tear on ropes, pulleys, and connection points. 2.
Need help?
Do you have a question about the A91-134 and is the answer not in the manual?
Questions and answers
Number 57 bolts won't fit into the wheels