
Related Manuals for Oilon EasyAce


Summary of Contents for Oilon EasyAce
- Page 1 M8004 2308EN 21 March 2023 Operation manual Heat pumps with EasyAce control Read these instructions carefully before installation, use, or maintenance...
-
Page 3: Table Of Contents
Contents Introduction EasyAce heat pumps..................3 Instructions and diagrams................3 Basic concepts.................... 3 How to change the language..............4 Home view Home view – Overview................6 Heating......................7 The domestic hot water display and the boost function......9 Home or Away function and Schedules........... 10 Settings and status information Status view –... - Page 4 Connecting a mobile device to the data hub’s Wi-Fi network....39 6.4.1 Keeping a Wi-Fi connection without internet..........40 Connecting a heat pump to your home Wi-Fi network......41 Changing the connection method.............44 Changing the password for your connection..........45 Adding a new heat pump.................
-
Page 5: Introduction
EasyAce heat pumps feature wireless connectivity, allowing you to manage and monitor your heat pump both locally and remotely. In addition to the wireless touch screen provided with the heat pump, you can connect to the EasyAce system by downloading the simple-to use EasyAce app to your mobile device. -
Page 6: How To Change The Language
(as ‘flow’ water). In-line heater An electric heater cartridge built into or connected to a fluid line. In Oilon heat pumps, an in-line heater is often built into the condenser flow pipe to provide supplementary heating or to act as a backup heater. - Page 7 Screen texts in different languages English App settings → Application User interface Language and location → language language Finnish Sovellusasetukset → Kieli ja sijainti Sovelluksen kieli Käyttöliittymän kieli Swedish Appinställningar → Språk och position Applikationens språk Användargränssnittets språk Estonian Rakenduse seaded → Keel ja asukoht Rakenduse keel Kasutajaliidese keel M8004 2308EN 5 (49)
-
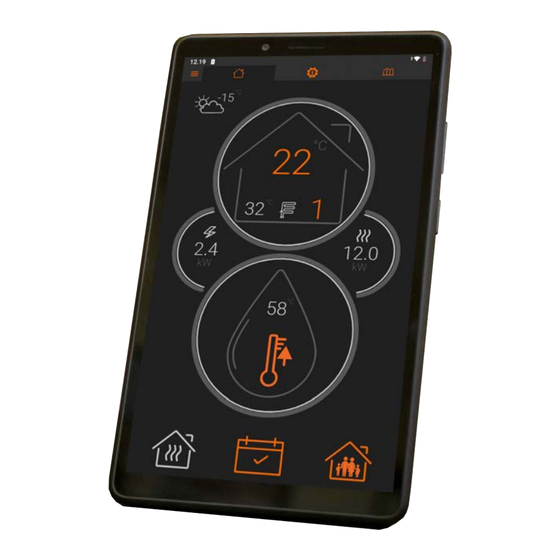
Page 8: Home View
In-line heater on Increase or decrease heating Error condition In case of an error, check the alarms by tapping the Error icon. If necessary, contact a repair service or Oilon customer services. 6 (49) M8004 2308EN... -
Page 9: Heating
2.2 Heating Heating circuits and their temperature To change the heating circuit displayed in the Home The Heating circuit window appears. Select view, tap the circuit’s number. another circuit, and tap OK. Circuit 1 is now displayed in the Home view. If the heating circuit has no room temperature measurement available, the display shows the icon for increasing and decreasing heating (see sub-... - Page 10 When active, the setting moves the circuit's heating curve by moving each of the curve’s points up or down by the selected value. This has the same effect as moving the curve sideways. If you change the curve manually, the increase or decrease in heating will be reset.
-
Page 11: The Domestic Hot Water Display And The Boost Function
2. Change the setting, and tap OK. In the figure, the 1. Tap the temperature value in the middle of the house icon. target temperature value has been set to +22 °C. ● The change will apply only to the selected ●... -
Page 12: Home Or Away Function And Schedules
2. Select for how long hot water production will be To check the remaining time, tap the boost function boosted, and tap OK. icon. ● Exit the setting window by tapping Cancel. To stop the boost function before this time has When the boost function is active, the domestic hot elapsed, set the time at 0 hours and tap OK. - Page 13 2. Select either At home or Away, and tap OK. 1. To change the setting, tap the house icon. Schedules Schedules can also be accessed from heating circuit or domestic hot water settings (see chapter Settings and status information). The Schedule function allows you to set up a weekly schedule for space heating, domestic hot water heating, or both.
- Page 14 Scheduling an event 1. Select the schedule for a heating circuit or 3. Select the operating mode, and tap OK. domestic hot water. ● In the figure, Boost has been selected. 2. Press and hold the desired time slot in the Domestic hot water heating will now be boosted schedule.
- Page 15 To discard the changes, tap the Cancel button in the 6. To save the settings and finish the process, tap Save. upper edge of the screen. ● Once the Cancel button is pressed, the ● Days with unsaved schedule items are highlighted in orange.
-
Page 16: Settings And Status Information
3 Settings and status information 3.1 Status view – Overview Heat pump status Space heating, flow and return Space heating, temperature target for flow temperature Domestic hot water tank, heating Domestic hot water temperature water tank, measured Brine circuit, temperature and flow and return target temperature temperature... -
Page 17: Heating
3. You can use the Device settings menu to access Alternatively, tap the middle tab. From the bottom of the page, select Device settings. any device settings you need. ● To directly access heating or domestic hot water settings and status information, tap the relevant heading. - Page 18 If room temperature optimization is enabled, the view will show the current room temperature as well as the room temperature target values for each operating mode. 1 Heating curve Current operating mode Circuit flow 6 Settings temperature and The impact of target temperature different operating Heating circuit...
- Page 19 Radiator heating, guideline values Floor heating, guideline values Room temperature +1 °C → Increase by 6 (+6) Room temperature +1 °C → Increase by 3 (+3) Room temperature −1 °C → Decrease by 6 (−6) Room temperature −1 °C → Decrease by 3 (−3) For example, if the flow temperature in the curve is +35 °C and the Reduced setting is –3 °C, the target flow temperature will be +32 °C.
-
Page 20: Typical Heating Curve Adjustments
Device settings → Heating Circuit 1 → Settings → Room temperature Flow temperature is primarily determined by the heating curve. Temperature optimization adjusts flow temperature based on room temperature measurements and a setpoint. An indoor temperature sensor is required, and the heat pump’s automation must be able to control the indoor temperature. To enable temperature optimization ●... -
Page 21: Domestic Hot Water
3.4 Domestic hot water Domestic hot water view Current operating mode 4 Settings Domestic hot water Target temperature tank’s heating for each domestic water flow and hot water tank return temperature operating mode (condenser out and condenser in) DHW storage tank temperature Target temperature for domestic hot... -
Page 22: Other Settings
Device settings → Hot water → Settings → Legionella inhibition Status view → Hot water → Settings → Legionella inhibition The interval between heating periods. This interval depends on the domestic hot water temperature setting. Time between starts ● Typical setting: 3–7 days ●... -
Page 23: Controller's Time
Device settings → Device info Displays details of the unit and the associated software. Device settings → Restore factory settings This function reverts all settings to factory defaults, except for password-protected settings. The password-protected settings accessible through the Service menu will not be reverted. 3.5.1 Controller’s time Device settings →... -
Page 24: Service Settings
4 Service settings 4.1 Signing in as a service level user The Service level password is 8520. To gain access to all settings, sign in as a service-level user. 2. From the menu, select App settings. 1. Open the main menu from the top left corner or by swiping right from the left edge of the screen. -
Page 25: Heating Settings
4.2 Heating settings Device settings → Service → Heating The Heating buffer sensor setting determines the heat source used by heating circuits: either the heat pump's condenser or a buffer tank. Select other circuit equipment from each circuit’s settings. Not connected The heat pump is connected directly to the building’s heating system without a buffer tank. -
Page 26: Additional Heating, Space Heating
4.3 Additional heating, space heating Device settings → Service → Heating → Additional heating An electric immersion heater (in-line heater) provides heating in the same way as the compressor and uses the same setpoint values. The heater switches on and off (and transitions between higher and lower power stages) with a delay. -
Page 27: Heating Circuits
Device settings → Service → Heating → Additional heating Backup use only The electric heater will be switched on if: 1. The outdoor temperature is below +5 °C (freezing protection). 2. An alarm prevents the compressor from starting (backup operation). In backup use, space heating has priority over domestic hot water heating. -
Page 28: Hot Water Settings
0–10 V When the heating circuit requires more heating, the level of the valve control signal is increased. ● 0 V: valve fully closed, 10 V: valve fully open. 3–point The outputs for opening and closing the valve correspond to the default connection indicated in the electric diagram. -
Page 29: Additional Heating, Hot Water
4.6 Additional heating, hot water Device settings → Service → Hot water → Additional heating The electric heater’s delay for heating domestic hot water. Once the delay has elapsed, the first electric heater power stage will switch on. ● Typical setting: 60–180 ●... -
Page 30: Pump Settings
Device settings → Service → Hot water → Additional heating After compressor The electric heater will switch on if: 1. DHW tank temperature is below +5 °C (freezing protection). 2. An alarm prevents the compressor from starting (backup operation). 3. The target temperature for the DHW tank is not reached, and the compressor reaches its operating limits and switches off. - Page 31 Device settings → Service → Pump → Brine pump Constant speed The brine pump runs at a constant speed determined by the Speed control setpoint. Always on The brine circuit pump will always run at a constant speed (determined by the Speed control setpoint) regardless of the Operation on standby setting.
-
Page 32: General Settings
The condenser pump settings for domestic hot water heating are identical, but they should not be changed. 4.8 General settings Device settings → Service → Initial setup See the product’s initial setup settings in the heat pump’s Installation and commissioning manual. Hide initial setup After initial setup has been completed, the initial setup menu will no longer be menu... - Page 33 Device settings → Service → Electricity An estimate of the electrical current drawn by the unit. System current ● The estimated power consumption of the unit’s peripherals is also included in the value. The automation system maintains a constant estimate of the electrical current drawn Maximum system by the unit and its peripherals.
-
Page 34: Trends
5 Trends 5.1 Trends view – Overview The Trends view shows the unit’s key operating values from the last 45 days. To switch to vertical view, tap the full screen button (pos. 2). Pos. Item Refresh the view Full screen view 3, 4 Zoom in and out Select the values to display... -
Page 35: Connecting The Heat Pump To A Mobile Device
The app is available for devices with a Google Android operating system. Download the EasyAce app from Google Play Store just like you would any other app. The IDs and passwords required for setting up the app are on the heat pump’s front panel. -
Page 36: Setting Up A Heat Pump Connection
Service, you won’t be able to use heat pump’s front panel. corner. the heat pump with your device. 4. Connect EasyAce to the heat 5. Select the connection type. 6. Give the password. pump’s Wi-Fi network. ● If you selected Cloud connection as the connection type, go directly to step 5. -
Page 37: Cloud Connection
Your mobile device connects directly to the data hub’s wireless Wi-Fi network. The connection can be used inside your home near the heat pump. From the app, select Local connection as the connection method. EasyAce - local connection ver. 2 Establishing a connection 1. Enter the Unit ID. - Page 38 Internet connection through a network cable EasyAce - internet, cable connection only ver. 1 1. Connect a network cable to the data hub’s WAN port. 2. Enter the Unit ID. 3. Select Cloud connection as the connection method. 4. If required, disable the data hub’s Wi-Fi from the Wi-Fi switch on the side of the device.
-
Page 39: Local Connection And Cloud Connection
Wireless internet connection EasyAce - wireless internet connection ver. 2 1. Enter the Unit ID. 2. Connect your mobile device to the data hub’s Wi-Fi network (instructions below). 3. Select Local connection as the connection method. 4. Connect the data hub to your home Wi-Fi network (instructions below). - Page 40 Internet connection through a network cable EasyAce - internet through a network cable ver. 2 1. Connect a network cable to the data hub’s WAN port. 2. Enter the Unit ID. 3. Connect your mobile device to the data hub’s Wi-Fi network (instructions below).
-
Page 41: Connecting A Mobile Device To The Data Hub's Wi-Fi Network
Wireless internet connection EasyAce - Local&Cloud wireless internet ver. 1 1. Enter the Unit ID. 2. Connect your mobile device to the data hub’s Wi-Fi network (instructions below). 3. Select Local connection as the connection method. 4. Connect the data hub to your home Wi-Fi network (instructions below). -
Page 42: Keeping A Wi-Fi Connection Without Internet
4. Press Connect. 3. Enter EasyAce network password. 5. The connection has been established. 6.4.1 Keeping a Wi-Fi connection without internet If the heat pump is not connected to the internet via a network cable, devices cannot connect to the internet through the heat pump. Some smartphones will notify you of the missing connection or automatically switch to using another connection. -
Page 43: Connecting A Heat Pump To Your Home Wi-Fi Network
2. Press the down arrow and from the menu, select Manage user interfaces. by swiping right from the left edge of the screen. 3. Open the menu from the top right corner. 4. From the menu, select EasyAce Hub. 5. Select EasyAce Hub. 6. Select Wi-Fi-Client. M8004 2308EN... - Page 44 Option 2: Settings 2. From the menu, select App settings. 1. Open the main menu from the top left corner or by swiping right from the left edge of the screen. 3. Tap Connection. 4. Tap EasyAce. 42 (49) M8004 2308EN...
- Page 45 5. Tap EasyAce Hub. 6. Tap Settings. 7. Select EasyAce Hub. 8. Tap Wi-Fi Client. 9. Select Connect as Wi-Fi Client. 10. Select the appropriate home network. In the figure below, the network is “Home network”. 11. Enter the network password, and tap OK.
-
Page 46: Changing The Connection Method
1. Open the main menu from the top left corner or by swiping right from the left edge of the screen. 3. Tap Connection. 4. Tap EasyAce. 5. Select Connection. 6. Select Change. 7. Select the connection method and proceed into the setup process. -
Page 47: Changing The Password For Your Connection
1. Open the main menu from the top left corner or by swiping right from the left edge of the screen. 3. Tap Connection. 4. Tap EasyAce. 5. Tap Connection password. 6. First, enter the current password and tap OK. -
Page 48: Adding A New Heat Pump
6.8 Adding a new heat pump 1. Open the main menu from the top left corner or 2. Press the down arrow and from the menu, select Manage user interfaces. by swiping right from the left edge of the screen. 3. -
Page 49: Troubleshooting
If the unit does not recover from fault mode (or there is a persistent or frequently repeated alarm in the system), please contact a repair service or Oilon customer services. If an alarm is active, access the Alarms view by The unit’s active alarms and alarm history can also... -
Page 50: Troubleshooting Connection Problems
● LAN cable is connected. ● WAN cable is connected. ● Only if a wired internet connection is used. EasyAce data hub ver. 2 Restarting the data hub Turn off the hub’s power and wait for approximately one minute: ● Shut down the entire heat pump from the heat pump’s main switch, or ●... - Page 51 Typical problems and solutions Problem Solution The home Wi-Fi network has changed, or the hub Reset the hub using the reset button and re- fails to connect to the network at times. establish the connection. M8004 2308EN 49 (49)
- Page 52 50 (49) M8004 2308EN...
- Page 54 Contact information of Oilon dealer: OILON GROUP P.O. Box 5 FI-15801 LAHTI FINLAND Tel: +358 3 85 761 Fax: +358 3 857 6239 Email: info@oilon.com Date of installation: www.oilon.com...
Need help?
Do you have a question about the EasyAce and is the answer not in the manual?
Questions and answers