TELTONIKA TST100 - Kick E-Scooter Tracker Quick Start Guide
- Quick manual (14 pages) ,
- How-to (5 pages)
Advertisement
SET UP YOUR DEVICE
- Remove the top cover.
![]()
- Insert Micro-SIM card as shown with PIN request disabled. Make sure that Micro-SIM card cut-off corner is pointing forward to slot.
![]()
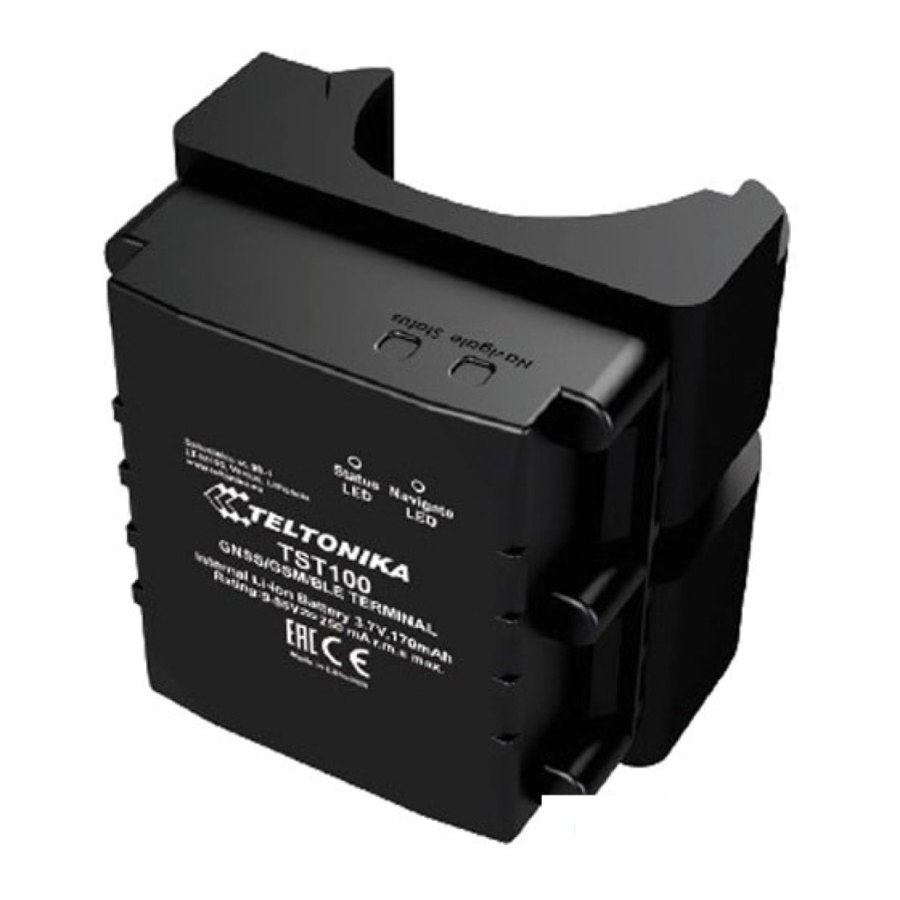
- Connect the battery.
![]()
- To power up TST100, connect the plug to the E-scooter.
![]()
- Configure the device by connecting micro-USB from TST100 to PC
![]()
- After configuration, disconnect TST100 from PC. Attach the lid and put the screws back in as shown.
![]()
- Device is ready to be used.
![]()


 Micro-SIM card insertion/removal must be performed when device is powered off – external voltage and battery are disconnected. Otherwise, Micro-SIM card might be damaged or device will not detect it.
*Given instructions are for sharing version of Segway kick e-scooters with exposed cable on the tube.
PINOUT

| PIN NAME | JL-F39-Z508JG CABLE CONNECTOR PIN NO. | TST100 PCB PIN NO. |
| VCC (+) (8-50)V DC | 1 | 1 |
| GND (-) | 5 | 2 |
| RX | 3 | 3 |
| TX | 4 | 4 |
| Power Control Wire (PCW) | 2 | 5 |
Note! Always double check GND and PCW PINS!
CONFIGURE YOUR DEVICE
PC PREPARATION (WINDOWS)
- Please download COM port drivers from Teltonika here:
https://wiki.teltonika-mobility.com/wikibase/images/d/d0/TeltonikaCOMDriver.zip - Extract and run TeltonikaCOMDriver.exe.
- Click Next in driver installation window.
- In the following window click Install button.
- Setup will continue installing the driver and eventually the confirmation window will appear.
Click Finish to complete the setup.
CONFIGURATOR (WINDOWS)
At first the device will have default factory settings set unless you order pre-configured device. These settings should be changed according to the user's needs. Main configuration can be performed via Teltonika Configurator software. Configurator operates on Microsoft Windows OS and uses prerequisite MS.NET Framework. Make sure you have the correct version installed: MS.NET Framework 4.6.2 or newer.
DEVICE CONNECTION TO CONFIGURATOR (WINDOWS)
- Power-up the device with DC voltage E-scooter or external (8 – 50 V) power supply using supplied power cable. LED's should start blinking, see LED behavior description.
- Connect device to computer using Micro-USB cable or Bluetooth (Device Bluetooth is enabled by default, default password 5555) connection.
- You are now ready to use the device on your computer.
CONFIGURE THE DEVICE
- Connect device to computer using Micro-USB cable and open Teltonika Configurator.
- Configuration process begins by pressing on connected device:
![]()
- After you have finished configuring the device, press Save to device button.
![]()
- When configuration is saved, disconnect the device from USB and reattach the cover.


More details about device configuration using Teltonika Configurator can be found in the Teltonika TELEMEDIC wiki knowledge base https://wiki.teltonika-mobility.com
LED INDICATIONS
| BEHAVIOR | MEANING |
| Blinking every second | Normal mode |
| Blinking every two seconds | Sleep mode |
| Blinking fast for a short time | Modem activity |
| Off | Device is not working or Device is in boot mode |
| Permanently switched on | GNSS signal is not received |
| Blinking every second | Normal mode, GNSS is working |
| Off | GNSS is turned off because Device is not working or Device is in sleep mode |
| Blinking fast constantly | Device firmware is being fl ashed |
CHARACTERISTICS
| MODULE | |
| Name | Teltonika TM2500 |
| Technology | GSM, GPRS, GNSS, BLUETOOTH (4.0 + LE) |
| GNSS | GPS, GLONASS, GALILEO, BEIDOU, SBAS, QZSS, DGPS, AGPS |
| Receiver | 33 channel |
| Tracking sensitivity | -165 dBM |
| Accuracy | < 3 m |
| GNSS receiver start times | Hot < 1s, Warm < 25s, Cold < 35s |
| CELLULAR | |
| Technology | GSM |
| 2G bands | Quad-band 850 / 900 / 1800 / 1900 MHz |
| Data transfer | GPRS Multi-Slot Class 12 (up to 240 kbps), GPRS Mobile Station Class B |
| Data support | SMS (text) |
| POWER | |
| Input voltage range | 8-50 V DC with overvoltage protection |
| Back-up battery | 170 mAh Li-ion battery 3.7 V internal back-up battery |
| INTERFACE | |
| Modifications | UART |
| GNSS antenna | Internal High Gain |
| Cellular antenna | Internal High Gain |
| Sensors | Accelerometer |
| Interface | 2.0 Micro-USB, Micro-SIM, 128 MB internal fl ash memory |
| LED indication | 2 status LED lights |
| Buzzer | Internal |
| PHYSICAL SPECIFICATION | |
| Dimensions | 78 x 75 x 70 (L x W x H) |
| Weight | 130g |
| Ingress Protection Rating | IP67 |
| SOFTWARE | |
| Configuration and firmware update | FOTA WEB (cloud-based solution), Teltonika Configurator (USB, Bluetooth) |
| Features | Jamming detection, Unplug detection, Fall Down, Auto Geofence, Manual Geofence, Trip start and stop detection, Permanent link with server and many more. |
| Data reading* | Current speed, Average speed, Total mileage, Scooter temperature, Built-in battery temperature, Predicted remaining range, Battery percentage, Current operation mode, Error codes, Riding time |
| Scooter control* | Power on/off the engine, Lock/unlock, Lights on/off /blink, Siren on/off /beep, Set speed limit (per mode) |
| Sleep modes | GPS Sleep, Online Deep Sleep |
| Protocols | UDP/TCP/SMS |
| Data sending | Main, Duplicate and Backup servers |
| Security | Configuration password, SMS login and password, Authorized GSM numbers list, Alarm played through a buzzer |
| Time Synchronization | GNSS, NTP, NITZ |
| Supported peripherals | Temperature and humidity sensor, Universal BLE sensors support, Solebe BT lock and Segway wired lock support* |
* Depends on scooter model
WARRANTY AND RETURN POLICIES
TELTONIKA gives guarantee for its products for a period of 24 months. All batteries carry a reduced 6 month warranty period.
How to submit a warranty claim
To obtain warranty service, please register Return Merchandise Authorization (RMA) query in VIP Helpdesk or contact your sales manager. After gathering information support engineer will initiate RMA form, which the user would need to fill in. Once the form is confirmed, it must be printed and sent with the shipment.
More information can be found at:
https://teltonika-iot-group.com/warranty-repair/
CERTIFICATIONS AND APPROVALS
- TST100 CE / RED
- TST100 EAC
- TST100 Ukrainian UCRF
- TST100 RoHS
- TST100 Declaration of IP rating
- Declaration of IMEI assignment
- Declaration of IMEI security
- REACH Regulation Declaration
SAFETY INFORMATION
This message contains information on how to operate the device safely. By following these requirements and recommendations, you will avoid dangerous situations. Please read these instructions carefully and follow them strictly before operating the device!
Do not disassemble the device
If the device is damaged, the power supply cables are not isolated or the isolation is damaged, DO NOT touch the device before unplugging the power supply
Interference
All wireless data transferring devices produce interference that may aff ect other devices which are placed nearby.
The device must be connected only by qualified personnel.

The device must be firmly fastened in a predefined location.

The programming must be performed using a PC with autonomic power supply.

 Installation and/or handling during a lightning storm is prohibited.
The device is susceptible to water and humidity if the device housing is not properly closed.

Risk of explosion if battery is replaced by an incorrect type.
Dispose of used batteries according to the instructions.
Battery should not be disposed of with general household waste.
Bring damaged or worn-out batteries to your local recycling center or dispose them to battery recycle bin found in stores.


Documents / Resources
References
Download manual
Here you can download full pdf version of manual, it may contain additional safety instructions, warranty information, FCC rules, etc.
Download TELTONIKA TST100 - Kick E-Scooter Tracker Quick Start Guide
Advertisement


Need help?
Do you have a question about the TST100 and is the answer not in the manual?
Questions and answers