Table of Contents
Advertisement
Quick Links
Version: V.2019.04.01
All the rights to this manual are reserved, especially reproduction, publication and translation rights. No portion of this manual may be
reproduced by no means (photocopy, microfilm or other methods) without previous written authorization from ECLERIS. Neither can it
be reproduced, multiplied or published through any electronic data processing form.
The information contained in this manual may be modified or broaden without previous notification, without it representing any
responsibility to ECLERIS.
ECLERIS USA.
11801 NW 100th Rd
Suite 17
Medley, FL 33178, U.S.A.
Phone: +1 786 483 7490
USER MANUAL
PROCAM HD 3D
3D SPLITTER
ABOUT THIS MANUAL
Year: 2019
Language: English
CMC Medical Devices & Drugs S.L.
C/ Horacio Lengo Nº18, CP29006,
Málaga, Spain
Ph. +34951214054
Email: info@cmcmedicaldevices.com
Advertisement
Table of Contents

Subscribe to Our Youtube Channel
Related Manuals for Ecleris PROCAM HD 3D


Summary of Contents for Ecleris PROCAM HD 3D
- Page 1 All the rights to this manual are reserved, especially reproduction, publication and translation rights. No portion of this manual may be reproduced by no means (photocopy, microfilm or other methods) without previous written authorization from ECLERIS. Neither can it be reproduced, multiplied or published through any electronic data processing form.
-
Page 2: Table Of Contents
USER MANUAL – PROCAM HD 3D CONTENT SYMBOLS ..........................3 SAFETY INFORMATION ......................3 WARNINGS .......................... 3 INTRODUCTION ........................4 INTENDED USE ........................5 INTENDED USER ........................ 5 COMPONENTS ........................5 MAIN UNIT – FRONT PANEL ..................6 3.3.1 MAIN UNIT – REAR PANEL ..................6 3.3.2... -
Page 3: Symbols
2.1 WARNINGS It is important to read this manual carefully before using the device. ECLERIS will not be held responsible for damage that can occur to the equipment due to not following the instructions or not observing the following criteria: ... -
Page 4: Introduction
3D Splitter and the other equipment to minimize these effects. Do not open the equipment. Maintenance and repairs must be done by ECLERIS or an authorized company. ECLERIS will not be responsible for the consequences of repairs or maintenance carried out by non-authorized personal. -
Page 5: Intended Use
3D or 2D- HD images on the monitor, and use the binocular in a conventional way simultaneously. The main unit can be attached to the forearm of the pantographic arm of Ecleris microscopes and colposcopes, or on a flat surface. -
Page 6: Main Unit - Front Panel
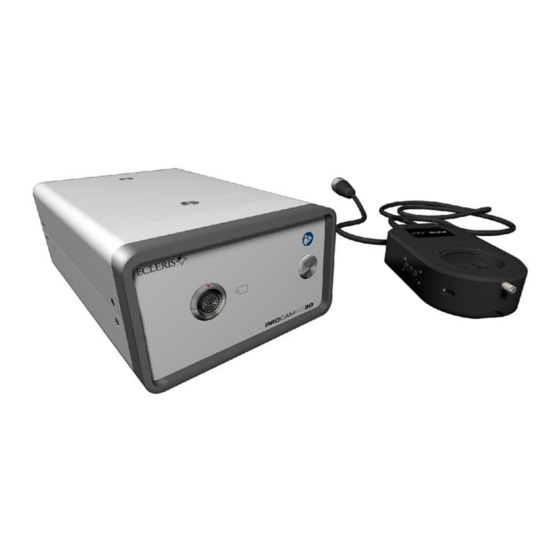
USER MANUAL – PROCAM HD 3D POWER CORD OPTIONAL: EXTENSION CABLE 4m. 3.3.1 MAIN UNIT – FRONT PANEL 1. Video Input for 3D Splitter cable 2. ON/ OFF button. 3.3.2 MAIN UNIT – REAR PANEL 1. Video Output 3D-HD. 2. Video Output 2D-HD. -
Page 7: Installation And Set Up
These heads of screws shall be anchored to the bottom side of the light source. The base of the light source has two holes where the head of the screws of the Ecleris 3D main unit shall be introduced. Once the head of the anchor screws are in place, you will need to slightly push back the 3D main unit in order to attach it completely to the light source. - Page 8 USER MANUAL – PROCAM HD 3D 5) Connect one HDMI video cable between the monitor and the main unit. Both video signals, 2D and 3D-HD are simultaneously active. 6) Place the 3D beam splitter between the optical head and the binocular and adjust the fixing screw.
-
Page 9: Functions
USER MANUAL – PROCAM HD 3D 9) Carry out para-focalization. To perform a correct para-focalization, place the object to be displayed at the appropriate focal distance under the objective lens of the microscope. If your microscope has fine focus control, place it in the middle of its path. Place the eyepieces in the neutral position (uncorrected) and select the largest magnification of the microscope. -
Page 10: Windows Function
USER MANUAL – PROCAM HD 3D 1. Windows function. 2. Brightness / Gain function. 3. White Balance function. 4. Brightness level indicator. 5. White Balance function indicator. 6. Windows level indicator 5.1 WINDOWS FUNCTION With the Windows function activated, the active portion where the video camera performs a gain... -
Page 11: White Balance Function
USER MANUAL – PROCAM HD 3D After five seconds of selecting a level for this function, it will be stored in memory. This means that, in case you turn the splitter off, the Brightness/Gain level set in the equipment when you turn it on again will be the last one you selected before turning the splitter off. -
Page 12: Fuse Replacement
USER MANUAL – PROCAM HD 3D Wait at least 15 minutes after cleaning the device before connecting it and using it again. 6.2 FUSE REPLACEMENT To avoid wasting time due to unavailability it is recommended to have spare fuses: 1) Disconnect the power cord from the power supply and equipment. -
Page 13: Troubleshooting
USER MANUAL – PROCAM HD 3D COOLING Forced VIDEO OUTPUT- 2D 1920x1080p60 (HDMI) VIDEO OUTPUT- 3D 1920x1080p30 (HDMI) VIDEO GENERATION 2 x 1920x1080p30 3D MODE Side by Side BINOCULAR ADAPTERS Ecleris/Carl Zeiss®, Leica®, Global®, Kaps® 10 - 40 ºC (50 – 104ºF) - Page 14 USER MANUAL – PROCAM HD 3D in bad conditions. one. Faulty system. Contact Ecleris nearest Technical Service. Monitor OFF. Turn ON the monitor. Incorrect connection of HDMI In case the monitor has several cable on monitor. HDMI inputs, select the correct LED lights are ON one.
-
Page 15: Technical Service
WARRANTY ECLERIS declares that the device has passed our Quality Control and no defects have been found in its manufacture, therefore guarantees proper working order under adequate conditions that are indicated in this manual. The guarantee is for the term of one (1) year starting on the purchase date.
Need help?
Do you have a question about the PROCAM HD 3D and is the answer not in the manual?
Questions and answers