Table of Contents
Advertisement
Available languages
Available languages
Quick Links
FITBOARD 3D VIBRATION PLATFORM
English, Page 1~12
Français, Page 13~24
EXERCISE MACHINE
SF-VP822057
USER MANUAL
IMPORTANT!
Please retain owner's manual for maintenance and adjustment instructions. Your
satisfaction is very important to us, PLEASE DO NOT RETURN UNTIL YOU HAVE CONTACTED US:
support@sunnyhealthfitness.com
IMPORTANT!
Veuillez conserver le manuel du propriétaire pour les instructions de réglage et d'entretien.
Votre satisfaction est très importante pour nous, VEUILLEZ NE PAS EFFECTUER DE RETOUR AVANT DE
NOUS AVOIR CONTACTÉ: support@sunnyhealthfitness.com ou 1-877-90SUNNY (877-907-8669).
or 1-877-90SUNNY (877-907-8669).
Advertisement
Table of Contents

Subscribe to Our Youtube Channel
Related Manuals for Sunny SF-VP822057


Summary of Contents for Sunny SF-VP822057
- Page 1 FITBOARD 3D VIBRATION PLATFORM EXERCISE MACHINE SF-VP822057 USER MANUAL IMPORTANT! Please retain owner’s manual for maintenance and adjustment instructions. Your English, Page 1~12 satisfaction is very important to us, PLEASE DO NOT RETURN UNTIL YOU HAVE CONTACTED US: support@sunnyhealthfitness.com or 1-877-90SUNNY (877-907-8669).
-
Page 2: Important Safety Information
IMPORTANT SAFETY INFORMATION We thank you for choosing our product. To ensure your safety and health, please use this equipment correctly. It is important to read this entire manual before assembling and using the equipment. Safe and effective use can only be achieved if the equipment is assembled, maintained, and used properly. -
Page 3: Important Safety Instructions
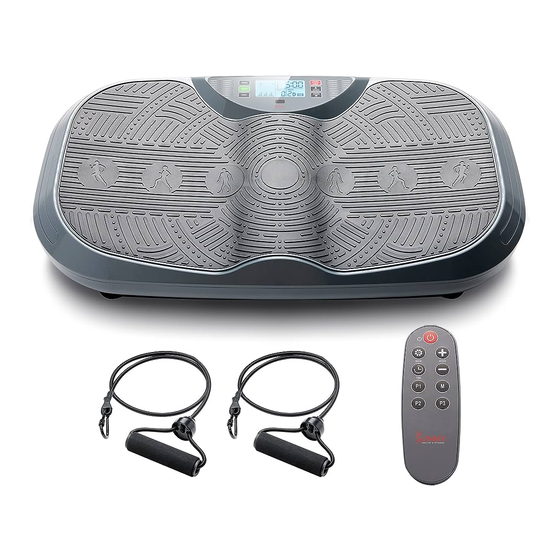
IMPORTANT SAFETY INSTRUCTIONS When using an electrical appliance, basic precautions should always be followed, including the following: Read all instructions before using (this appliance). DANGER – To reduce the risk of electric shock: 1) Always unplug this appliance from the electrical outlet immediately after using and before cleaning. WARNING –... - Page 4 ASSEMBLY CONTENTS WHEN OPENING THE CARTON, THE FOLLOWING PARTS CAN BE FOUND: Manual Main Product Remote Control Thank You Card Power Cord Button Cell Battery Resistance Band...
-
Page 5: Assembly Instruction
ASSEMBLY INSTRUCTION We value your experience using Sunny Health and Fitness products. For assistance with parts or troubleshooting, please contact us at support@sunnyhealthfitness.com or 1-877-90SUNNY (877- 907-8669). STEP 1 Turn the 2 Resistance Band Fixed Pieces (No. 50) out of the Bottom Metal Frame (No. -
Page 6: Important Electrical Information
IMPORTANT ELECTRICAL INFORMATION IMPORTANT NOTE: This machine requires a power source of 110 Volts in order to properly operate. For your safety, as well as the safety of others, please verify that the power source is correct before powering the machine. Any power supply source above or below this level could cause significant damage to the machine and/or user. -
Page 7: Battery Installation And Replacement
BATTERY INSTALLATION AND REPLACEMENT Battery Cover BATTERY INSTALLATION: 1. Take out 2 AAA Batteries (No. 59 ) from the PE bag. 2. Press the buckle of the battery cover on the back of Remote Control (No. 55), then remove the battery cover. -
Page 8: The Display Console
THE DISPLAY CONSOLE CONTROL PANEL REMOTE CONTROL FUNCTION DESCRIPTION NOTE: Before using, connect one end of Power Cord (No. 54) to the machine, then plug the other end of Power Cord (No. 54) in a suitable power socket. Turn the switch on the rear of the machine to the “I”... -
Page 9: Manual Program
To select the program, the user could press the “ PROG” button on the console panel. The user could also press the desired button on the remote control to select the program. P1: Program 1 P2: Program 2 P3: Program 3 M: Manual program Once the program is selected, the user can set the time by pressing or holding the “TIME”... -
Page 10: Troubleshooting
Speed levels for each pre-set program are showed in the following table. P1 (Speed levels) P2 (Speed levels) P3 (Speed levels) TIME (Minutes) Oscillation+Linear Oscillation+Linear Linear 10-9 TROUBLESHOOTING 1. No lights; does not respond to control panel or remote control. a) Check the machine if it is plugged in and switched on. -
Page 11: Usage Instruction
USAGE INSTRUCTION 1. The machine is with 2 Resistance Bands (No. 58). The user could do the vibration as below pictures showed. 2. Except the resistance bands, there are also some ways to use the machine, as below pictures showed. 3. -
Page 12: Moving The Machine
MOVING THE MACHINE There are 2 Transportation Wheels (No. 47) under the right side of the machine (console panel side is front). Hold the left side of the machine and lift the machine to a 45° angle, pull out the Pushing Rod (No. -
Page 13: Parts List
PARTS LIST Qty. Qty. Description Spec. Description Spec. Control Panel Sticker Bushing Spindle for Up and Screen Fender Down Vibration Hexagonal Socket M8*42 Pedal Leather Head Screw Hexagonal Socket M10*48.5 Decorative Cover Head Bolt Cross Tapping Screw ST3*8 Bearing Seat Cross Tapping Screw ST4*12 Bottom Metal Frame... -
Page 14: Informations De Sécurité Importantes
INFORMATIONS DE SÉCURITÉ IMPORTANTES ous vous remercions d’avoir choisi notre produit. Pour votre santé et votre sécurité, veuillez utiliser correctement cet appareil. Il est important de lire entièrement le présent manuel avant d’assembler l’appareil et de l’utiliser. L’utilisation sûre et efficace n’est possible que si l’appareil est correctement assemblé, entretenu et utilisé. -
Page 15: Consignes De Sécurité Importantes
CONSIGNES DE SÉCURITÉ IMPORTANTES Lors de l'utilisation d'un appareil électrique, des précautions de base doivent toujours être prises, notamment les suivantes : Lisez toutes les instructions avant d'utiliser (cet appareil). DANGER - Pour réduire le risque de choc électrique: 1) Débranchez toujours cet appareil de la prise électrique immédiatement après l'avoir utilisé et avant de le nettoyer. - Page 16 CONTENUS D'ASSEMBLAGE EN OUVRANT LE CARTON, ON PEUT TROUVER LES PIÈCES SUIVANTES: Manuel Produit Principal Télécommande Carte de Remerciement Cordon d'Alimentation Pile Bouton Bande de Résistance...
-
Page 17: Instructions D'assemblage
INSTRUCTIONS D’ASSEMBLAGE Nous apprécions votre expérience d'utilisation des produits Sunny Health and Fitness. Pour obtenir l'aide concernant pièces dépannage, veuillez nous contacter à support@sunnyhealthfitness.com ou au 1-877-90SUNNY (877-907-8669). ÉTAPE 1: Tournez les 2 Bandes de Résistance Pièces Fixes (N° 50) hors du Cadre Métallique Inférieur (N°... - Page 18 INFORMATIONS ÉLECTRIQUES IMPORTANTES REMARQUE IMPORTANTE: Cette machine nécessite une source d'alimentation de 110 volts pour pouvoir fonctionner correctement. Pour votre sécurité, ainsi que pour celle des autres, veuillez vérifier que la source d'alimentation est correcte avant de mettre la machine sous tension. Toute source d'alimentation supérieure ou inférieure à...
-
Page 19: Installation Et Remplacement Des Piles
INSTALLATION ET REMPLACEMENT DES PILES Cache-Piles INSTALLATION DES PILES: 1. Sortez 2 AAA Piles (N° 59) du sac PE. 2. Appuyez sur la boucle du couvercle des piles à l'arrière de la Télécommande (N° 55), puis retirez le couvercle des piles. 3. -
Page 20: Panneau De Contrôle
LA CONSOLE D'AFFICHAGE PANNEAU DE CONTRÔLE TÉLÉCOMMANDE DESCRIPTION DES FONCTIONS REMARQUE: Avant de l'utiliser, connectez une extrémité du Cordon d'Alimentation (N° 54) à la machine, puis branchez l'autre extrémité du Cordon d'Alimentation (N° 54) dans une prise de courant appropriée. Tournez l'interrupteur situé à l'arrière de la machine sur la position "I" en vous assurant que l'interrupteur s'allume. - Page 21 Avant de démarrer la vibration, l'utilisateur pouvait sélectionner le programme souhaité (programme manuel, programme 1, programme 2, programme 3). Le panneau de la console affiche le programme que l'utilisateur a choisi. Pour sélectionner le programme, l'utilisateur peut appuyer sur le bouton "PROG" du panneau de la console.
-
Page 22: Dépannage
Les niveaux de vitesse pour chaque programme préétabli sont indiqués dans le tableau suivant. P1 (Niveaux de Vitesse) P2 (Niveaux de P3 (Niveaux de Vitesse) TEMPS Oscillation+Linéaire Vitesse) Linéaire (Minutes) Oscillation+Linéaire 10-9 DÉPANNAGE 1. Aucune lumière ; ne répond pas au panneau de commande ou à la télécommande. a. - Page 23 INSTRUCTION D'USAGE 1. La machine est équipée de 2 Bandes de Résistance (N° 58). L'utilisateur peut effectuer les vibrations comme le montrent les photos ci-dessous. 2. En dehors des bandes de résistance, il existe également d'autres façons d'utiliser la machine, comme le montrent les photos ci-dessous.
-
Page 24: Déplacer La Machine
DÉPLACER LA MACHINE Il y a 2 Roues de Transport (N° 47) sous le côté droit de la machine (le côté du panneau de la console est à l'avant). Tenez le côté gauche de la machine et soulevez-la à un angle de 45°, puis tirez sur la Tige de Poussée (N°... -
Page 25: Liste Des Éléments
LISTE DES ÉLÉMENTS Qté Qté Description Spéc. Description Spéc. Autocollant pour Panneau de Douille Commande Aile d'Écran Broche pour les Vibrations Ascendantes et Descendantes Cuir de Pédale Vis à tête Creuse M8*42 Hexagonale Couvercle Décoratif Boulon à Tête Cylindrique M10*48.5 Hexagonale Vis à... -
Page 26: Exploded Diagram
EXPLODED DIAGRAM Version 1.2...
Need help?
Do you have a question about the SF-VP822057 and is the answer not in the manual?
Questions and answers