Table of Contents
Advertisement
Available languages
Available languages
Quick Links
IT
Manuale uso e installazione
EN
Use and Installation manual
POMPE DI CALORE ACS
DOMESTIC HOT WATER HEAT PUMP
APHPDHW200
APHPDHW300S
Leggere attentamente le presenti istruzioni di montaggio prima dell'installazione e l'utilizzo e conservarle per riferimenti futuri. In caso di
smarrimento delle presenti istruzioni, consultare la versione elettronica sul sito www.argoclima.com.
Read this assembling instructions carefully before installation and use and keep it for future reference. If this assembling instructions is lost,
consult the electronic version on the website www.argoclima.com.
rev. 02-09/22
Advertisement
Chapters
Table of Contents

Related Manuals for Argo APHPDHW200


Summary of Contents for Argo APHPDHW200
- Page 1 Use and Installation manual POMPE DI CALORE ACS DOMESTIC HOT WATER HEAT PUMP APHPDHW200 APHPDHW300S Leggere attentamente le presenti istruzioni di montaggio prima dell'installazione e l’utilizzo e conservarle per riferimenti futuri. In caso di smarrimento delle presenti istruzioni, consultare la versione elettronica sul sito www.argoclima.com.
- Page 2 Gentile Cliente, La ringraziamo per la preferenza accordataci scegliendo un nostro prodotto, frutto di decenni di esperienza e innovazione. Siamo certi che sarà soddisfatto di questa scelta, il Suo acquisto è stato progettato e realizzato avvalendosi delle migliori tecnologie disponibili. Usato responsabilmente questo prodotto...
-
Page 3: Table Of Contents
Schema elettrico per modelli APHPDHW300S e APHPDHW200 ........ -
Page 4: Generale
GENERALE Avvertenze generali Verifica pavimento. Installatore qualificato. Verificare ogni mese il pavimento di installazione per La pompa di calore deve essere installata da evitare deformazioni o danni al pavimento, che personale qualificato modo evitare potrebbero risultare in danni o infortuni. installazioni improprie possono risultare... -
Page 5: Refrigerante R290
Refrigerante R290 L’unità contiene gas infiammabile R290. Prima di installare e utilizzare l’unità, leggere le istruzioni. Prima di installare l’unità, leggere il manuale di installazione. Per eventuali riparazioni, rivolgersi sempre ad un Centro Assistenza ed attenersi rigorosamente a quanto contenuto nel service manual. IL REFRIGERANTE R290 utilizzare artifici... -
Page 6: Dati Unita
DATI UNITA' Contenuto Pompa di calore ACS × 1 Valvola di sicurezza (pressione e temperatura) × 1... -
Page 7: Dimensioni
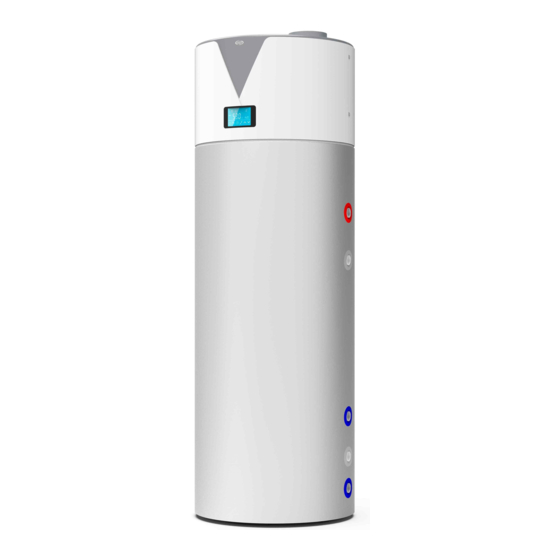
Uscita acqua calda Anodo magnesio Ingresso solare Ingresso ricircolo acqua Sensore temp. Uscita solare Ingresso acqua Scarico fredda APHPDHW300S APHPDHW200 CONNESSIONI ["] [mm] [mm] 1905 1600 1467 1162 Uscita acqua calda: G3/4"; Valvola di sicurezza: G3/4" 1208 Anodo magnesio: G3/4"... -
Page 8: Schemi Di Installazione
SCHEMI DI INSTALLAZIONE Installazione in configurazione non canalizzata INTERNO / INTERNO − Sito non riscaldato con temperature superiori a 5 °C ed isolato da altri locali riscaldati. − Il parametro "canalizzazione" deve essere impostato su "interno/interno". − Sito raccomandato: interrato o semi-interrato, sito con temperatura superiore a 10 °C tutto l'anno. -
Page 9: Movimentazione E Installazione
MOVIMENTAZIONE E INSTALLAZIONE Requisiti luogo di installazione Nell'installazione assicurarsi di lasciare spazio sufficiente per la manutenzione, minimo 600 mm intorno all'unità e 600 mm verso il soffitto. Scelta del luogo di installazione. Attenzione: La pompa di calore deve essere installata da personale qualificato, installazioni improprie possono risultare in perdite d'acqua, scosse elettriche o incendi. -
Page 10: Connessioni Idrauliche
ATTENZIONE:I seguenti luoghi di installazione Trasporto di apparecchi contenenti refrigeranti infiammabili potrebbero determinare malfunzionamenti dell'unità. Conformità con i regolamenti di trasporto. (Una consultazione preventiva è necessaria se tale sito non è evitabile.) Marcatura di apparecchi − Luoghi in cui l'aria ha alta concentrazione di Conformità... -
Page 11: Connessioni Elettriche
Assicurarsi che il dispositivo non sia intasato. La Installazione delle tubazioni di ingresso e temperatura dell'acqua scaricata dalla valvola di uscita dell'acqua: sicurezza può essere molto elevata, prestare La filettatura per l'ingresso e l'uscita dell'acqua è attenzione. G3/4" (filetto interno). Le tubazioni devono essere Prevedere un'adeguato isolamento per il tubo di resistenti al calore e durature. -
Page 12: Manutenzione
MANUTENZIONE Precauzioni preliminari ATTENZIONE: ATTENZIONE: La manutenzione deve essere eseguita rispettando le Per mantenere un buon scambio termico ed un buon indicazioni del costruttore. L'assemblaggio in loco risparmio energetico è necessario l'unità posizionata in un ambiente asciutto, pulito e ben ventilato. deve essere eseguito rispettando le indicazioni del Controllare le parti dell'unità... -
Page 13: Informazioni Sulla Manutenzione E Assistenza
5.3 Informazioni sulla manutenzione e assistenza Verifiche del sito Ventilazione del sito Prima di eseguire qualsiasi intervento su apparecchi Assicurarsi che l'area sia aperta o ben ventilata prima di contenenti refrigeranti infiammabili è necessario intervenire sul sistama o intraprendere alcun lavoro. La prevedere alcune verifiche per minimizzare il rischio ventilazione deve essere anche garantita durante lo svolgiemnto del lavoro. - Page 14 L'equipaggiamento la rilevazione deve essere Riparazione di componenti sigillati settato ad una percentuale dell' LFL del refrigerante, deve essere calibrato per lo specifico refrigerante 1) Durante le riparazioni di componenti sigillati, tutte le apparecchiature/componenti elettrici devono essere deve essere confermata la corretta scollegati prima di iniziare qualsiasi attività...
- Page 15 i) Non superare la pressione massima di lavoro Procedure di carica delle bombole, nemmeno temporaneamente j) Dopo aver riempito le bombole correttamente ed In aggiunta alle procedure di carica convenzionali, è aver terminato procedura, assicurarsi necessario rispettare i seguenti requisiti: rimuovere prontamente bombole...
-
Page 16: Dati Tecnici
DATI TECNICI Dati tecnici per modelli APHPDHW300S e APHPDHW200 Modello APHPDHW300S APHPDHW200 Alimentazione 230V~/50Hz 230V~/50Hz Resistenza acqua/polvere IPX1 IPX1 Classe isolamento elettrico Capacità di riscaldamento Potenza assorbita 0.41 0.41 Corrente assorbita COP ** 3.51 3.53 COP * 3.02 3.08 Tempo di riscaldamento (solo pompa di calore) *** 8.25... -
Page 17: Schema Elettrico
SCHEMA ELETTRICO Schema elettrico per modelli APHPDHW300S e APHPDHW200 AT:Temperatura ambiente BTT:Temperatura serbatoio basso AN01 COMP:Compressore CT:Temperatura batteria AN02 EEV: Valvola di espansione elettronica E2V: Elettrovalvola 2 vie AN03 ET:Temperatura uscita compressore FM:Motore ventilatore AN04 HP:Protezione alta pressione SUT:Temperatura ingresso compressore AN05 TTT:Temperatura serbatoio alto... -
Page 18: Operazioni Da Display
OPERAZIONI DA DISPLAY Funzioni del display Area principale del Area display ausiliaria display 1)Funzioni dei tasti Tasto Nome Funzione ON/OFF Accendere/spegnere l'unità Cambiare modalità di funzionamento o Modalità confermare impostazioni Orologio Impostare l'orologio o il timer Accendere/spegnere la resistenza elettrica o Resistenza elettrica cambiare modalità... - Page 19 Icona Nome Cosa indica L'unità è in modalità riscaldamento. Riscaldamento Riscaldamento Eco. L'unità è in modalità riscaldamento eco. Vacanza L'unità è in modalità vacanza. Raffreddamento L'unità è in modalità raffreddamento. Il ventilatore è acceso e ne indica la velocità. Ventilatore La resistenza elettrica è...
-
Page 20: Uso Del Display
8.2 Uso del display NOTE: L'impostazione e la modifica di parametri protetti da password può essere eseguita solo da personale qualificato. Premere " " e tenere premuto per 0.5 s nella Accendere/Spegnere l'unità schermata di funzionamento del display per spegnere l'unità... - Page 21 Modalità riscaldamento Temperatura dell’acqua in uscita ON 1 Premere tenere premuto per 2s Premere annullare l’impostazione Premere e tenere premuto per 2s per entrare nell'impostazione successiva senza confermare la precedente ON 2 OFF 1 Premere tenere premuto per 2s per entrare nell'impostazione successiva senza confermare la...
- Page 22 Esempio: timer 1: 8:00~10:00; timer 2: 16:30~20:00. Temperatura ON 1 dell’acqua in uscita Ora corrente Premere tenere premuto per 2s Confermare l’ora dopo l’impostazione OFF 1 ON 2 Confermare l’ora dopo l’impostazione Confermare l’ora dopo l’impostazione OFF 2 Impostazione di successo Senza salvare...
- Page 23 Esempio: Impostare la data di accensione su 28 2) In modalità vacanza Settembre. (Nota: Spegnere l'unità prima di uscire) Premere " " per 2 s per entrare nell'interfaccia di impostazione. Il simbolo "ON" ed il parametro della data lampeggeranno. Impostare data come impostazione data/ora.
- Page 24 3) Per cancellare le impostazioni del timer Temperatura dell’acqua in uscita Le icone “ON” e “1” lampeggiano Stato del tempo Premendo per 2s Premere annullare tutte le operazioni Impostazione resistenza elettrica Modalità riscaldamento elettrico La resistenza elettrica può essere accesa mentre Mentre l'unità...
- Page 25 Selezione modalità Premere " " selezionare modalità Standard, Eco, Vacanza, Intelligente Alta Richiesta dallo stato acceso spento. Temperatura dell’acqua Modalità in uscita riscaldamento Modalità riscaldamento Eco Premere Modalità Standard Modalità Eco La pompa di calore si avvierà in base alla temperatura La pompa di calore si avvierà...
- Page 26 Modalità Alta Richiesta Modalità alta richiesta Premere La differenza tra la modalità Standard e Alta Richiesta è il tempo di attesa R06 per l'accensione della resistenza elettrica. Nella modalità Alta Richiesta la resistenza elettrica viene alimentata immediatamente per raggiungere più velocemente la temperatura impostata.
- Page 27 Impostazione ora e data Se non viene effettuata alcuna operazione per 10 s, il programma uscirà dalla schermata di modifica e le Nella schermata stand-by quella modifiche saranno confermate. funzionamento, impostare l'ora e la data con l'unità in modalità riscaldamento. Premere " "...
- Page 28 Impostazione della modalità ventilatore Legenda dell'icona ventilatore 1. (in movimento) : indica che il ventilatore è in funzione Premere " " per 2 s una prima volta per passare alla alla massima velocità. velocità minima della modalità ventilatore; il ventilatore 2.
-
Page 29: Lista Errori E Risoluzione Dei Problemi
LISTA ERRORI E RISOLUZIONE DEI PROBLEMI Suggerimenti − Perchè il compressore non parte quando l'unità − Perchè la temperatura di uscita dell'acqua viene accesa? diminuisce molto improvvisamente? Risposta: Quando l'unità viene accesa dopo uno Risposta: Se la temperatura dello strato spegnimento, il compressore non partirà... - Page 30 Display Descrizione anomalia Azione correttiva Avaria sensore di temperatura Controllare o sostituire il 'solare' sensore di temperatura (il sensore è scollegato o danneggiato) 'solare' Controllare se il sistema Protezione surriscaldamento uscita frigorifero ha perdite o è compressore bloccato. Protezione alta pressione (La pressione Controllare il pressostato di di uscita dal compressore è...
-
Page 31: Dati Erp
DATI ERP 10.1 Scheda prodotto per modello APHPDHW200 Scheda prodotto EU 812/2013 Scaldaacqua a pompa di calore Modello: APHPDHW200 Produttore: Argoclima S.p.A. Indirizzo: Via Alfeno Varo 35, 25020 Alfianello (BS) Denominazione : Scaldaacqua a pompa di calore Destinazione d'uso: Acqua calda sanitaria... -
Page 32: Scheda Prodotto Erp Per Modello Aphpdhw300S
10.2 Scheda prodotto per modello APHPDHW300S Scheda prodotto EU 812/2013 Scaldaacqua a pompa di calore Modello: APHPDHW300S Produttore: Argoclima S.p.A. Indirizzo: Via Alfeno Varo 35, 25020 Alfianello (BS) Denominazione : Scaldaacqua a pompa di calore Destinazione d'uso: Acqua calda sanitaria Alimentazione: Ph/V/Hz 1, 220-240V~, 50Hz... - Page 34 Dear Customer, we would like to thank You for choosing one of our products, it's the outcome of decades of experience and innovation. We are sure You will be pleased with this purchase because it has been designed and manufactured according to the best available technology. A conscientious use of the product will bring You years of high-level comfort, safety and energy savings.
- Page 35 Technical data for models APHPDHW300S and APHPDHW200 ........
-
Page 36: General Warnings
GENERAL General warnings Check the installation floor. Professional installer is required. The heat pump must be installed by qualified Please check the installation floor regularly (once a personals, to avoid improper installation which may month), to avoid any tilting or damage on the lead to water leakage, electrical shock or fire. -
Page 37: R290 Refrigerant
R290 refrigerant Appliance is filled with flammable gas R290. Before installing and using the appliance, read the owner manual. Before installing the appliance, read the installation manual. Any repairs you need, contact the nearest authorized Service Centre and strictly follow manufacturer’s Service Manual. The Refrigerant R290 Warning: −... -
Page 38: Unit Info
UNIT INFO Packing list Heat Pump Water Heater × 1 Pressure & Temperature Release valve × 1... -
Page 39: Dimensions
Hot water outlet Magnesium anode Solar water inlet Circulation water inlet Temp.Sensor Solar water outlet Cold Drainage water inlet APHPDHW300S APHPDHW200 CONNECTIONS ["] [mm] [mm] 1905 1600 1467 1162 Hot water outlet: G3/4"; Safety valve: G3/4" 1208 Magnesium anode: G3/4"... -
Page 40: System Installation Shematics
SYSTEM INSTALLATION SHEMATICS Installation in a non-ducted configuration INTERIOR / INTERIOR − Unheated location at temperatures above 5°C and isolated from the heated rooms of the house. − "Ducting" setting to be set to "Interior/Interior" − Recommended location = underground or semi- underground, room where the temperature is higher than 10°C all year round. -
Page 41: Handling And Installation
HANDLING AND INSTALLATION Installation Site Requirement Upon installation, please ensure that you leave enough space for maintenance, minimum 600 mm all around the unit and 600 mm above the unit. Choice of the installation site of the unit. Warning: The heat pump must be installed by qualified person to avoid improper installation which may lead to water leakage,... -
Page 42: Hydraulic Connection
ATTENTION:The following installation site would Transport equipment containing flammable refrigerants lead to machine malfunction (Prior consultation is Compliance with the transport regulations. necessary if the following site is unavoidable.) Marking of equipment − The places in which the air is filled with Compliance with local regulations. -
Page 43: Wire Connection
Installation of the water inlet or outlet Please ensure device is with jam. pipes: drainage outlet water temperature high, please attention it. Please make The specification of the water inlet and outlet good insulation to drainage pipe to prevent pipe thread is G3/4"... -
Page 44: Maintenance
MAINTENANCE Preliminary Cautions ATTENTION: WARNING: It should be dry, clean and well-ventilated around the Servicing shall be performed only as recommended units to maintain its good effect of heat transfer and by the manufacturer. The local assembly should be energy saving. ones established manufacturer. -
Page 45: Information On Maintenance And Servicing
5.3 Information on Maintenance and servicing Ventilated area Checks to the area Ensure that the area is in the open or that it is adequately Prior to beginning work on systems containing ventilated before breaking into the system or conducting flammable refrigerants, safety checks are necessary to work. - Page 46 Electronic leak detectors shall be used to detect Repairs to sealed components flammable refrigerants, but the sensitivity may not be adequate, or may need re-calibration. (Detection During repairs to sealed components, all equipment shall be calibrated in a refrigerant-free electrical supplies shall be disconnected from the area.) Ensure that the detector is not a potential source equipment being worked upon prior to any removal of sealed covers, etc.
- Page 47 Labelling Charging procedures Equipment shall be labelled stating that it has been In addition to conventional charging procedures, the de-commissioned and emptied of refrigerant. The following requirements shall be followed label shall be dated and signed. Ensure that there are labels on the equipment stating the equipment −...
-
Page 48: Technical Data For Models Aphpdhw300S And Aphpdhw200
TECHNICAL DATA Technical data for models APHPDHW300S and APHPDHW200 Model APHPDHW300S APHPDHW200 Power Supply 230V~/50Hz 230V~/50Hz Water/Dust Resistance IPX1 IPX1 Electrical Shockproof Heating Capacity Heating Power Input 0.41 0.41 Heating Current Input COP ** 3.51 3.53 COP * 3.02 3.08 Heating time (Heat pump only) *** 8.25... -
Page 49: Wiring Diagram For Models Aphpdhw300S And Aphpdhw200
WIRING DIAGRAM Wiring diagram for models APHPDHW300S and APHPDHW200 AT:Ambient temperature BTT:Bottom of tank temperature AN01 COMP:Compressor CT:Coil temperature AN02 EEV: Electronic expand valve E2V: Electromagnetic 2 way valve AN03 ET:Exhaust temperature FM:Fan motor AN04 HP:High pressure protection SUT:Suction temperature AN05 TTT:Top of tank temperature... -
Page 50: Display Operation Guide
DISPLAY OPERATION GUIDE Controller Functions 1)Function of key Button Name Function ON/OFF Turn on/off the unit. Switch unit running modes or save setting parameters. Mode Clock Set the clock or the timer. Electric Turn on/off the electric heater or switch fan modes. Heater Move up or increase parameter values. - Page 51 Status Name What it means icon. Shows that the unit is in heating mode. Heating Eco. heating Shows that the unit is in eco. heating mode. Vacation Shows that the unit is in vacation mode. Cooling Shows that the unit is in cooling mode Shows that the fan is on and the speed of the fan.
-
Page 52: Controller Use
8.2 Controller Use NOTE: The setting and modification of parameters protected by password can only be carried out by qualified proffessionals. Turn ON/OFF the unit Press " " and hold for 0.5s in the running interface of the controller to turn off the unit and at this time the main display area shows OFF. - Page 54 Example: Running period 1: 8:00~10:00; Running period 2: 16:30~20:00.
- Page 55 Example: Set the start-up date on September 28 2) In the vacation mode (Note : Turn off the unit before going out.) Press ” ” and hold for 2s to enter into the timer setting interface. The symbol ”ON ” and the date parameter are flashing at this time.
- Page 56 3) If you want to cancel the timer setting, proceed as follows: Electric heater setting Electric heating mode The electric heater can be turned on when the unit is When the unit is turned off, pressing ” ” turns on heating or standby.
- Page 57 Mode selection Press " " to select Standard heating mode, Eco heating mode, Vacation heating mode, Intelligent heating mode High requirement heating mode in power-on state and power-off state. Standard heating mode Eco heating mode The heat pump system will start according to the The heat pump system will start according to the actual actual temperature and target...
- Page 58 High requirement heating mode The difference between heating mode and high requirement mode is R06 delay time of electric heater start. In the high requirement heating mode, electric heater will start without delay, which can help user to heat water quickly in a short time. Target temperature checking and setting In the standby or running interface, press ”...
- Page 59 Time setting If no operations are performed on the keypad for 10s, the controller exits the parameter modification menu by timeout and the changes are confirmed. In the standby or running interface, do as follows to set the time when in heating mode. Pressing ” ”...
- Page 60 Fan mode setting Definition of the fan icon 1. (Running) : shows that the fan is running at Press " " and hold for 2s for the first time to change high speed the fan mode to low speed running and the fan will 2.
-
Page 61: Failure List And Troubleshooting
FAILURE LIST AND TROUBLESHOOTING Non-error tips − Why the compressor is not running when I start up − Why does the outlet water temperature decrease the unit? a lot abruptly? Answer: When the unit is powered on after the last Answer: The temperatures of hot water and cold shut-down, the compressor will not run until 3 water in the tank are different. - Page 62 Display Malfunction Description Corrective action Solar temp. sensor failure (sensor is Check or change the solar open or short circuit) temp. sensor. Check if the refrigerant Discharge overheating protection system has leak points or is blocked. High pressure protection (The exhaust Check the high pressure switch pressure is high, high pressure switch or check if the refrigerant...
-
Page 63: Erp Info
ERP INFO 10.1 ERP Datasheet for model APHPDHW200 Product Datasheet EU 812/2013 Heat pump water heater Model: APHPDHW200 Manufacturer: Argoclima S.p.A. Address: Via Alfeno Varo 35, 25020 Alfianello (BS) Denomination : Heat pump water heater Intended use: Domestic hot water... -
Page 64: Erp Datasheet For Model Aphpdhw300S
10.2 ERP Datasheet for model APHPDHW300S Product Datasheet EU 812/2013 Heat pump water heater APHPDHW300S Model: Argoclima S.p.A. Manufacturer: Via Alfeno Varo 35, 25020 Alfianello (BS) Address: Denomination : Heat pump water heater Intended use: Domestic hot water Power supply: Ph/V/Hz 1, 220-240V~, 50Hz Assembly type:... - Page 68 www.argoclima.com Argoclima non si assume responsabilità per eventuali errori o inesattezze nel contenuto di questo manuale e si riserva il diritto di apportare al presente, in qualunque momento e senza preavviso, eventuali modifiche ritenute opportune per qualsiasi esigenza di carattere tecnico o commerciale. Argoclima assumes no responsability for any errors or inaccuracies regarding the contents of this catalogue, and reserves the right to make any necessary changes to its products, at any time and without prior notice, for any technical or commercial reason.
Need help?
Do you have a question about the APHPDHW200 and is the answer not in the manual?
Questions and answers