Table of Contents
Advertisement
Available languages
Available languages
Quick Links
Advertisement
Table of Contents

Related Manuals for Rossmax AC1000f


Summary of Contents for Rossmax AC1000f
- Page 1 AC1000f Model: Blood Pressure Monitor www.rossmax.com...
-
Page 2: Table Of Contents
Table of Contents: Introduction ............................3 Cautionary Notes ..........................3-5 Notes on Safety ..........................5, 6 Name/Function of Each Part ....................7, 8 PARR (Pulse Arrhythmia) Technology ..................9 Atrial Fibrillation Detection (AF, AFib) ................9-10 Premature Contraction Detection (PC) ..............10-11 Tachycardia Detection (TACH) ....................11 Bradycardia Detection (BRAD) .................... -
Page 3: Introduction
The patient is an intended operator. Do not use this device on infants or neonates. AC1000f is protected against manufacturing defects by an estab- lished International Warranty Program. For warranty information, you can con- tact the manufacturer, Rossmax International Ltd. - Page 4 blood, kidney problems, or for users suffered from stroke, or for unconscious users. 8. This unit is able to detect common arrhythmia (atrial or ventricular premature beats or atrial fibrillation). The ARR, AF(AFib) and PC icons are displayed after the measurement if Atrial Fibrillation and Premature Contraction was detect- ed during the measurement.
-
Page 5: Notes On Safety
19. Avoid any mechanical restriction, compression or bending of the cuff line. 20. Do not allow sustained pressure in the cuff or frequent measurements. The resulting restriction of the blood flow may cause injury. 21. Ensure that the cuff is not placed on an arm in which the arteries or veins are undergoing medical treatment, e.g. - Page 6 • Do not use any cuff other than the models exclusive for this unit. • Do not use this unit on infants. • Do not use this unit on patients using a pump oxygenator. • Do not use an AC adaptor or battery pack no specified for this unit. •...
-
Page 7: Name/Function Of Each Part
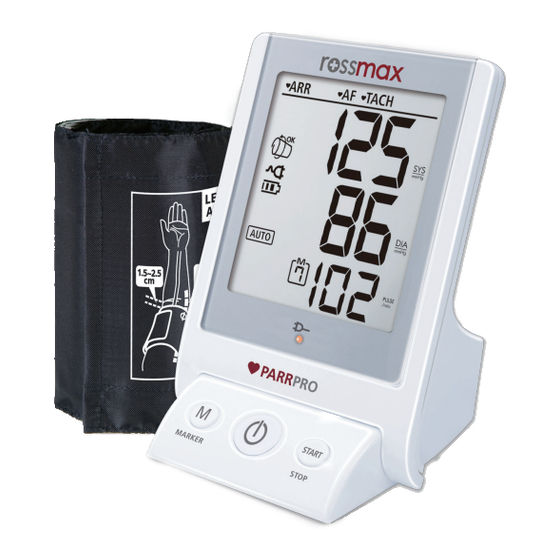
Name/Function of Each Part Charging LCD Display Arm Cuff START/ STOP key ON/OFF key Air Tube and Memory/ Connector Marker key Auto / Manual Deflation Rate Switching Key setting key AC Adaptor Data Link Jack Socket Battery Cover Protection Jelly (Located on back of unit) Battery Pack: 4.8V, 1800mAh... - Page 8 Monitor Installation - Trolley (Optional) Placing Protection Jelly onto the Monitor Installing Monitor on the Trolley...
-
Page 9: Parr (Pulse Arrhythmia) Technology
PARR (Pulse Arrhythmia) Technology Pulse Arrhythmia (PARR) technology specifically detects the existence of pulse arrhythmia, including atrial fibrillation (AF, AFib), Atrial and / or Ventricu- lar Premature Contractions (PC), Tachycardia (TACH), and Bradycardia (BRAD). Pulse Arrhythmia may be related to cardiac disorders, needs medical atten- tion and thus early diagnosis is of paramount importance. -
Page 10: Premature Contraction Detection (Pc)
Atrial fibrillation most often initially occurs with temporary periods of arrhyth- mia and may progress to a permanent state of this disorder in the course of time. No matter, whether you intent to safeguard yourself from an undetect- ed AF(AFib) state, or you measure during an ongoing period of active atrial fibrillation, or you measure in between periods of AF(AFib), the PARR technol- ogy can be applied at any of these conditions. -
Page 11: Tachycardia Detection (Tach)
Note: It is strongly recommended, that you consult your physician, if either the PC icon occurs newly for several times, or, if your PC is known to your doctor, but the incidence of PC readings changes over time. Your doctor will then be able to provide all required medical test and pos- sible therapeutic procedures. -
Page 12: Pulse Arrhythmia Detection (Arr)
Pulse Arrhythmia Detection (ARR) Once the occurrence of pulse arrhythmia has been detected in the course of your blood pressure measurement, the icon ARR is displayed. In the case, that the found pulse arrhythmia can be specified by the PARR technology, the ARR icon is accompanied by the specifically detected type of arrhythmia, e.g. -
Page 13: Real Fuzzy Measuring Technology
Real Fuzzy Measuring Technology This unit uses the oscillometric method to detect your blood pressure. Be- fore the cuff starts inflating, the device will establish a baseline cuff pressure equivalent to the air pressure. This unit will automatically determine the ap- propriate inflation level based on pressure oscillations, followed by cuff defla- tion. -
Page 14: Display Explanations
Display Explanations 1. Arrhythmia Detection (ARR) 2. Premature Contraction Detection (PC) 3. Atrial Fibrillation Detection (AF, AFib) 4. Tachycardia Detection (TACH) 5. Bradycardia Detection (BRAD) 6. Movement Mark 7. Cuff Wrap Detection 8. AC Power Mark 9. Battery Mark 10. Auto Mode 11. -
Page 15: Error Codes For Your Reference
Loose Cuff Detection If the cuff was applied too loosely, it may cause unreliable measurement re- sults or measurements can fail to start. The “Cuff Wrap Detection” can help to determine if the cuff is wrapped snugly enough. The specified icon appears once a “loosen cuff”... -
Page 16: How To Use The Power Source
How to Use the POWER Source How to Use the AC Adaptor 1. Connect the AC adaptor with the AC adaptor jack in the back of the unit. 2. Plug the AC adaptor into the socket. Please use the compatible AC adap- tors. - Page 17 How to Use the POWER Source Warning: • Do not use this unit in places where inflammable gas, such as highly inflammable anesthetic, may be generated or in a high pressure oxy- gen room or an oxygen tent. It may cause ignition and explosion. •...
- Page 18 How to Use the POWER Source 1. Remove the screw on the battery cover (Located on back of unit) of this unit. 2. Installation: Connect the battery pack to the connector in the battery cover to install it. Replacement: Disconnect the battery pack from the connector and re- place with a new one.
- Page 19 How to Use the POWER Source Battery life: • You can use the unit for approximately six hundred measurements with one charge. • Approximate life of battery pack is two years. However the battery pack life from each charging may be shortened depending on the state of using. Charging time: •...
-
Page 20: Applying The Cuff
Applying the Cuff 1. Select cuff according to arm size: Rossmax Cuff size circumference 34~46 cm L size (13.4”~18.1”) 24~36 cm M size (9.4”~14.2”) 16~26 cm S size (6.3”~10.2”) 2. Connect the air tube securely. • Connect the air tube to the main unit by securing the air plug to the base of the air connector. - Page 21 Applying the Cuff 3. Place the cuff over the bare upper arm, wrap it with the tube point- ing your palm, and the artery mark INDEX must be over your main artery. in OK range 4. The edge of the cuff should be at approximately 1.5 to 2.5 cm above the inner side of the elbow joint.
- Page 22 Applying the Cuff AUTO Mode: MANUAL without Mode: Stethoscope with Stethoscope 7. This cuff is suitable for your use if the arrow falls within the OK range line. If the arrow falls outside the OK range line, you will need a cuff with other circumferences.
-
Page 23: Measurement Procedures
Measurement Procedures Here are a few helpful tips to help you obtain more accurate readings: • Blood pressure changes with every heartbeat and is in constant fluctuation throughout the day. • Blood pressure recording can be affected by the position of the user, his or her physiological condition and other factors. - Page 24 Measurement Procedures 3. Auto Mode • In Auto mode, mark appears on the display. • Press the START key, the monitor will automatically inflate the cuff slowly to start measurement. • When the measurement is completed, the cuff will exhaust the pressure inside. Systolic pressure, diastol- ic pressure and pulse will be shown simultaneously on the LCD screen.
- Page 25 Measurement Procedures Korotkoff sound of Systolic pressure Korotkoff sound of Diastolic pressure • When the measurement is completed, the cuff will exhaust the pressure inside. Systolic pressure and diastolic pressure will be showed simultane- ously on the LCD screen. Note: 1. This blood pressure monitor will re-inflate automatically to higher pressure if the system detects that more pressure is needed to take a blood pressure measurement.
-
Page 26: Setting Deflation Rate
Setting Deflation Rate In the Manual mode, select the deflation rate of 2.5 mmHg/sec, 4.5 mmHg/sec, 6.5 mmHg/sec by pressing the key on the back of the unit. Recalling Values from Memory 1. Press the Memory key to view the last previously stored measurement. Every measurement comes with a assigned memory sequence number. -
Page 27: Clearing Values From Memory
Clearing Values from Memory Under Auto mode, press and hold the Memory key for approximately 5 sec- onds, then the data can be erased automatically. How to clean the unit after use Caution: • When cleaning this unit, please unplug the AC adaptor from the electric outlet. -
Page 28: Specifications
Specifications Measurement Method Oscillometric Measurement Range Pressure: 30~260mmHg; Pulse: 40~199 beats/ minute Pressure Sensor Semi conductor Accuracy Pressure: ±3mmHg; Pulse : ±5% of reading Inflation : Pump Driven Deflation Automatic Pressure Release Valve Memory capacity 7 memories Auto-shut-off 5 minute after last key operation Operation Environment 10°C~40°C (50°F~104°F);... -
Page 29: Emc Guidance And Manufacturer's Declaration
8.10. Manufacturer’s declaration-electromagnetic immunity The AC1000f is intended for use in the electromagnetic environment specified below. The cus- tomer or the user of the AC1000f should assure that is used in such and environment. Immunity test IEC 60601 test... -
Page 30: Blood Pressure Log
Blood Pressure Log... - Page 31 Blood Pressure Log...
- Page 32 WARNING: The symbol on this product means that it's an electronic product and following the European directive 2012/19/EU the electronic products have to be disposed on your local recycling centre for safe treatment. Rossmax Swiss GmbH, Widnauerstrasse 1, CH-9435 Heerbrugg, Switzerland...
- Page 33 AC1000f Modello: Misuratore di Pressione Sanguigna www.rossmax.com...
- Page 34 Il paziente è un utente preparato. Non usare questo apparecchio su Installazione del misuratore - Carrello (opzionale) ............8 bambini piccoli o neonati. AC1000f è protetto nei confronti di difetti di fabbri- Tecnologia PARR (aritmia del battito cardiaco) ..............9 cazione da un Programma di Garanzia Internazionale stabilito.
- Page 35 diabete, scarsa circolazione sanguigna, problemi ai reni o per coloro che han- 18. Durante la misurazione della pressione, la circolazione sanguigna non deve no avuto un infarto o sono incoscienti. essere interrotta per un tempo inutilmente lungo. Se il dispositivo non fun- 8.
- Page 36 • Non utilizzare il pacco batterie per dispositivi diversi da questa unità. Nome/funzione di ciascuna parte • Non smontare la batteria. • Non toccare l’adattatore CA con le mani bagnate. • Non utilizzare bracciali diversi dai modelli esclusivi previsti per questo dispo- Indicatore sitivo.
- Page 37 Installazione del misuratore - Carrello (opzionale) Tecnologia PARR (aritmia del battito cardiaco) La tecnologia dell’aritmia del battito cardiaco (PARR) rileva la presenza di aritmia Applicazione della del battito cardiaco, incluse la fibrillazione atriale (AF, AFib) e le contrazioni pre- cover protettiva mature atriali e/o ventricolari (PC), la tachicardia (TACH) e la bradicardia (BRAD).
- Page 38 di una condizione di insufficienza cardiaca cronica o acuta e può essere asso- Nota: si consiglia vivamente di consultare il proprio medico, se recentemente è stata visualizzata l’icona PC per diverse volte, oppure se le proprie con- ciata ad altre complicanze cardiache. A seconda dell’ e tà, circa il 10%- 20 % dei trazioni premature sono note al medico, ma l’incidenza delle letture di pazienti che soffrono di ictus ischemico soffrono anche di fibrillazione atriale.
- Page 39 Rilevamento dell’aritmia del battito cardiaco (ARR) Tecnologia di misurazione Real Fuzzy Se stata rilevata l’insorgenza di aritmia del battito cardiaco, nel corso della misu- Questo apparecchio utilizza il metodo oscillometrico per rilevare la pressione razione della pressione sanguigna, viene visualizzata l’icona ARR. Nel caso in cui sanguigna.
- Page 40 Spiegazioni del display Rilevamento bracciale allentato Se il bracciale non è stato avvolto intorno al braccio in modo sufficientemente 1. Rilevazione di aritmia (ARR) stretto, si potrebbero ottenere risultati di misurazione inaffidabili, oppure po- 2. Rilevamento di contrazioni trebbero non iniziare le misurazioni. Il “Rilevamento bracciale allentato” può premature (PC) aiutare a determinare se il bracciale è...
- Page 41 Come usare l’ALIMENTATORE Come usare l’ALIMENTATORE Come usare l’adattatore CA Avvertenza: 1. Collegare l’adattatore CA alla presa dell’adattatore CA, sul retro del disposi- • Non utilizzare questo dispositivo in luoghi in cui si può generare gas tivo. infiammabile, ad esempio anestetico altamente infiammabile, o in una 2.
- Page 42 Come usare l’ALIMENTATORE Come usare l’ALIMENTATORE Durata della batteria: • É possibile utilizzare il dispositivo per circa seicento misurazioni, con una carica. • La durata approssimativa del pacco batterie è di due anni. Tuttavia, la du- rata del pacco batterie può ridursi ad ogni ricarica, a seconda dello stato di utilizzo.
- Page 43 1. Selezionare il bracciale in base alla misura del braccio: 3. Posizionare il bracciale sull’avambrac- cio nudo, avvolgerlo con il tubo rivolto Misura brac- Circonferenza ciale Rossmax braccio verso il palmo e il segno dell’arteria so- La linea di riferimento pra l’arteria principale.
- Page 44 Applicazione del bracciale Procedure di misurazione Ecco alcuni suggerimenti utili per ottenere letture più accurate: Modalità AUTOMATICA: Modalità MANUALE: • La pressione sanguigna cambia ad ogni battito cardiaco ed è in costante senza Stetoscopio con Stetoscopio oscillazione nell’arco del giorno. •...
- Page 45 Procedure di misurazione Procedure di misurazione Suono di Korotkoff di Pressione sistolica 3. Modalità Automatica • In modalità Automatica, sul display viene visualizzato il simbolo . • Premere il tasto di AVVIO, il misuratore gonfierà auto- Suono di Korotkoff di maticamente e lentamente il bracciale per iniziare la Pressione diastolica misurazione.
- Page 46 Impostazione della velocità di sgonfiamento Come pulire il dispositivo dopo l’uso Nella modalità Manuale, selezionare la velocità di sgonfiamento di 2,5 mmHg/ Attenzione: sec, 4,5 mmHg/sec, 6,5 mmHg/sec premendo il tasto sul retro del dispo- • Quando si pulisce il dispositivo, scollegare l’adattatore CA dalla presa sitivo.
- Page 47 30 Pressione: battiti/minuto cm, rispetto a qualsiasi parte dello AC1000f, compresi i cavi specificati dal produttore. In caso contrario, potrebbero verificarsi alterazioni nelle prestazioni di questo dispositivo. Sensore di pressione Semiconduttore Se si utilizzano LIVELLI DI PROVA DI IMMUNITÀ...
- Page 48 Registro della pressione sanguigna Registro della pressione sanguigna Nome: Età: Peso: Nome: Età: Peso:...
- Page 49 Batterie, bracciale e accessori non sono inclusi. L’apertura o la modifica dello strumento fa decadere la garanzia. La garanzia non copre danni, incidenti o il mancato rispetto del manuale di istruzioni. Contattare il venditore/rivenditore locale o www.rossmax.com. Nome del cliente: _________________________________________________ Indirizzo: ________________________________________________________...
- Page 50 • monitoring • therapy • professional DE Installation des Monitors auf dem Trolley Installation du moniteur sur le chariot Installazione del misuratore sul carrello www.rossmax.com OBM_OP_AC1000f_DEFRIT_ver2204...
- Page 51 • monitoring • therapy • professional DE Installationsanleitung für den Wagen des AC1000f Installation du moniteur sur le chariot Guida di installazione per il carrello di AC1000f Einstecken Einstecken Verschrauben mit Schrauben- schlüssel Inserire Visser avec une clé à molette...
Need help?
Do you have a question about the AC1000f and is the answer not in the manual?
Questions and answers