Advertisement
- 1 Overview
- 2 Introduction
- 3 Real Fuzzy Measuring Technology
- 4 Preliminary Remarks
- 5 Blood Pressure Standard
- 6 Display Explanations
- 7 Movement Detection
- 8 Guest Mode
- 9 Hypertension Risk Indication
- 10 Irregualr Heartbeat (IHB) Detection
- 11 Using the AC Adaptor (Optional)
- 12 Installing Batteries
- 13 Applying the Cuff
- 14 Measurement Procedures
- 15 Recalling Values from Memory
- 16 Recalling average values of morning and nighttime
- 17 Clearing Values from Memory
- 18 Time Adjustment
- 19 Data Transfer to PC
- 20 Troubleshooting
- 21 Cautionary Notes
- 22 Specifications
- 23 Documents / Resources
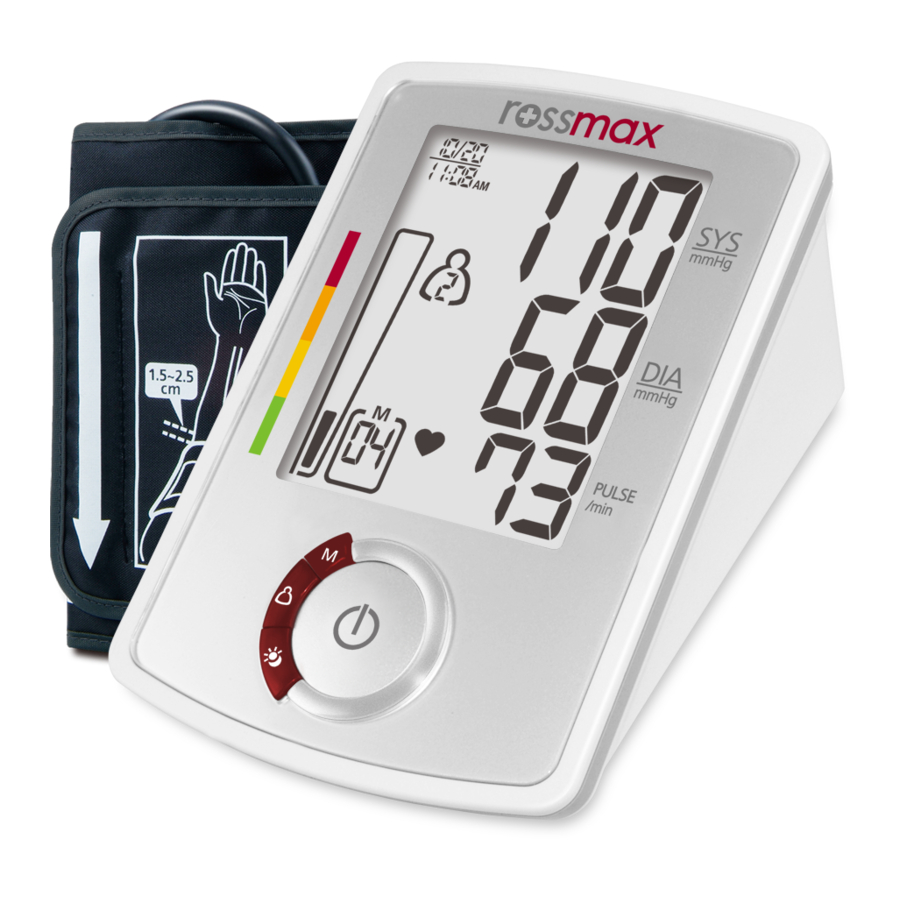
Overview

- Arm Cuff
- Morning and Nighttime Average key
- LCD Display
- Air Tube and Connector
- User-Switching key
- ON/OFF/START key
- Memory Key
- Battery Cover
- Data Link Socket
- AC Adaptor Jack

- Date/Time Indication
- Movement Mark
- Memory Zone
- Morning and Nighttime Mark
- Memory Average Mark
- Hypertension Risk Indication
- Memory/Date Mark
- Irregular Heartbeat Detection (IHB)
- Systolic Pressure
- Diastolic Pressure
- Pulse Rate
- Pulse Mark
- Weak Battery Mark
Introduction
Blood pressure measurements determined with AU941f are equivalent to those obtained by a trained observer using cuff/stethoscope auscultation method, within the limits prescribed by the American National Standard, Electronic or Automated Sphygmomanometers. This unit is to be used by adult consumers in a home environment. The patient is an intended operator. Do not use this device on infants or neonates. AU941f is protected against manufacturing defects by an established International Warranty Program. For warranty information, you can contact the manufacturer, Rossmax International Ltd.

 Attention: Consult the accompanying documents. Please read this manual carefully before use. For specific information on your own blood pressure, contact your physician. Please be sure to keep this manual.
Real Fuzzy Measuring Technology
This unit uses the oscillometric method to detect your blood pressure. Before the cuff starts inflating, the device will establish a baseline cuff pressure equivalent to the air pressure. This unit will determine the appropriate inflation level based on pressure oscillations, followed by cuff deflation.
During the deflation, the device will detect the amplitude and slope of the pressure oscillations and thereby determine for you the systolic blood pressure, diastolic blood pressure, and pulse.
Preliminary Remarks
This Blood Pressure Monitor complies with the European regulations and bears the CE mark "CE 1639". The quality of the device has been verified and conforms to the provisions of the EC council directive 93/42/EEC (Medical Device Directive), Annex I essential requirements and applied harmonized standards.
EN 1060-1: 1995/A2: 2009 Non-invasive sphygmomanometers - Part 1 - General requirements
EN 1060-3: 1997/A2: 2009 Non -invasive sphygmomanometers - Part 3 - Supplementary requirements for electro-mechanical blood pressure measuring systems
EN 1060-4: 2004 Non-invasive sphygmomanometers - Part 4: Test Procedures to determine the overall system accuracy of automated non-invasive sphygmomanometers.
ISO 81060-2: 2013 Non-invasive sphygmomanometers - Part 2: Clinical investigation of automated measurement type.
This blood pressure monitor was designed for long service time. Ensure continued accuracy, it's recommended that all digital blood pressure monitors require re-calibration. This monitor (under normal usage with approx. 3 measurements a day) does not require recalibration for 2 years. Once the unit should be re-calibrated the device will display  . The unit should also be re-calibrated if the monitor sustains damage due to blunt force (such as dropping) or exposure to fluids and / or extreme hot or cold temperature / humidity changes. When appears, simply return to your nearest dealer for re-calibration service.
Blood Pressure Standard
The National High Blood Pressure Education Program Coordinating Committee has developed a blood pressure standard, classifying blood pressure ranges into 4 stages. (Ref. The Seventh Report of the Joint National Committee on Prevention, Detection, Evaluation, and Treatment of High Blood Pressure-Complete Report JNC-7, 2003). This blood pressure classification are based on historical data, and may not be directly applicable to any particular patient. It is important that you consult with your physician regularly. Your physician will tell you your normal blood pressure range as well as the point at which you will be considered at risk. For reliable monitoring and reference of blood pressure, keeping long- term records is recommended. Please download the blood pressure log at our website www.rossmax.com.
| Blood Pressure Standard (JNC7: 2003, unit: mmHg) | |||
| Systolic Pressure | Diastolic Pressure | ||
| Normal | <120 | and | <80 |
| Suspected Hypertension | 120~139 | or | 80~89 |
| Suspected Stage 1 Hypertension | 140~159 | or | 90~99 |
| Suspected Stage 2 Hypertension | ≥160 | or | ≥100 |
Display Explanations
EE / Measurement Error: Make sure the L-plug is securely connected to the air socket and measure again quietly. Wrap the cuff correctly and keep arm steady during measurement. If the error keeps occurring, return the device to your local distributor or service center.
E1 / Air Circuit Abnormality: Make sure the L-Plug is securely connected to the air socket on the side of the unit and measure again quietly. If the errors still occur, return the device to your local distributor or service center for help.
E2 / Pressure Exceeding 300 mmHg: Switch the unit off and measure again quietly. If the error keeps occurring, return the device to your local distributor or service center.
E3 / Data Error: Remove the batteries, wait for 60 seconds, and reload. If the error keeps occurring, return the device to your local distributor or service center.
Er / Exceeding Measurement Range: Measure again quietly. If the error keeps occurring, return the device to your local distributor or service center.
Movement Detection
The "Movement Detection" helps reminding the user to remain still and is indicating any body movement during measurement. The specified icon appears once a "body movement" has been detected during and after each measurement.
Note: It's highly recommended that you measure again if the icon  appears.
Guest Mode
This monitor has a non-stored single measurement function. Press the User-Switching key to select the memory zone of guest  , and follow the Measurement Procedure to take a measurement correctly. When the measurement is completed, the measurement value will not be stored in memory zone.
Hypertension Risk Indication
The National High Blood Pressure Education Program Coordinating Committee has developed a blood pressure standard, classifying blood pressure ranges into 4 stages. This unit is equipped with innovative blood pressure risk indication, which visually indicates the assumed risk level (normal  / prehypertension
  / stage 1 hypertension
  / stage 2 hypertension
  ) of the result after each measurement.
Irregualr Heartbeat (IHB) Detection
This unit is equipped with an Irregular Heartbeat (IHB) Detection which allows those who have an irregular heartbeat to obtain accurate measurements alerting the user of the presence of an irregular heart beat during the measurement.
Note: It is strongly recommended that you consult your physician if the IHB icon ( ) appears often.
Using the AC Adaptor (Optional)
- Connect the AC adaptor with the AC adaptor jack on the back side of the unit.
- Plug the AC adaptor into the socket. (AC adaptors with required voltage and current indicated near the AC adaptor jack.)

- Please unload the batteries when operating with the AC mode for a longer period of time. Leaving the batteries in the compartment for a long time may cause leakage, which may lead to damage of the unit.
- No batteries are needed when operating with the AC mode.
- AC adaptors are optional. Please contact the distributor for the compatible AC adaptors.
- Use only the authorized AC Adaptor with this blood pressure monitor. Information for the authorized AC adaptor, please refer to APPENDIX 1.
Installing Batteries
- Press down and lift the battery cover in the direction of the arrow to open the battery compartment.
- Install or replace 4 "AA" sized batteries in the battery compartment according to the indications inside the compartment.
- Replace the battery cover by clicking in the bottom hooks first, then push in the top end of the battery cover.
- Replace the batteries in pairs. Remove batteries when unit is not in use for extended periods of time.
You need to replace the batteries when
- Low battery icon appears on display.
- The ON/OFF/START key is pressed and nothing appears on display.
- Batteries are hazardous waste. Do not dispose them together with the household garbage.
- There are no user serviceable parts inside. Batteries or damage from old batteries are not covered by warranty.
- Use exclusively brand batteries. Always replace with new batteries together. Use batteries of the same brand and same type.
Applying the Cuff
- Unwrap the arm cuff, leaving the end of the cuff through the D-ring of the cuff.
- Put your left arm through the cuff loop. The color strip indication should be positioned closer to you with the tube pointing in the direction of your arm (Fig.
![]() ). Turn your left palm upward and place the edge of the arm cuff at approximately 1.5 to 2.5 cm above the inner side of the elbow joint (Fig.
). Turn your left palm upward and place the edge of the arm cuff at approximately 1.5 to 2.5 cm above the inner side of the elbow joint (Fig. ![]() ‚). Tighten the cuff by pulling the end of the cuff.
‚). Tighten the cuff by pulling the end of the cuff.

- Center the tube over the middle of the arm. Press the hook and loop material together securely. Allow room for 2 fingers to fit between the cuff and your arm. Position the artery mark
![]() over the main artery (on the inside of your arm) (Fig. ƒ
over the main artery (on the inside of your arm) (Fig. ƒ![]() „).
„).
Note: Locate the main artery by pressing with 2 fingers approximately 2 cm above the bend of your elbow on the inside of your left arm. Identify where the pulse can be felt the strongest. This is your main artery.


- Plug in the cuff connecting tube into the unit (Fig.
![]() …).
…).

- Lay your arm on a table (palm upward) so the cuff is at the same height as your heart. Make sure the tube is not kinked (Fig.
![]() †).
†).

- This cuff is suitable for your use if the arrow falls within the solid color line as shown on the right (Fig. ‡
![]() ). If the arrow falls outside the solid color line, you will need a cuff with other circumferences. Contact your local dealer for additional size cuffs.
). If the arrow falls outside the solid color line, you will need a cuff with other circumferences. Contact your local dealer for additional size cuffs.


 over the main artery (on the inside of your arm) (Fig. ƒ
 „).
„).


 †).
†).

Measurement Procedures
Here are a few helpful tips to help you obtain more accurate readings:
- Blood pressure changes with every heartbeat and is in constant fluctuation throughout the day.
- Blood pressure recording can be affected by the position of the user, his or her physiological condition and other factors. For greatest accuracy, wait one hour after exercising, bathing, eating, drinking beverages with alcohol or caffeine, or smoking to measure blood pressure.
- Before measurement, it's suggested that you sit quietly for at least 5 minutes as measurement taken during a relaxed state will have greater accuracy. You should not be physically tired or exhausted while taking a measurement.
- Do not take measurements if you are under stress or tension.
- Sit upright in a chair, and take 5-6 deep breaths. Avoid leaning back while the measurement is being taken.
- Do not cross the legs while sitting and keep the feet flat on the floor during measurement.
- During measurement, do not talk or move your arm or hand muscles.
- Take your blood pressure at normal body temperature. If you are feeling cold or hot, wait a while before taking a measurement.
- If the monitor is stored at very low temperature (near freezing), have it placed at a warm location for at least one hour before using it.
- Wait 5 minutes before taking the next measurement.
- Press the User-Switching key to select memory zone 1, memory zone 2 or guest mode. After a memory zone is selected, press the ON/OFF/START key to reset the monitor so it can start measurement in the chosen memory zone.
- Press the ON/OFF/START key. All digits will light up, checking the display functions. The checking procedure will be completed in 2 seconds.
- After all symbols appear, the display will show a blinking "0". The monitor is ready to measure and will automatically inflate the cuff slowly to start measurement.
- When the measurement is completed, the cuff will exhaust the pressure inside. Systolic pressure, diastolic pressure and pulse will be shown simultaneously on the LCD screen. The measurement is then automatically stored into the pre-designated memory zone. This blood pressure monitor will re-inflate automatically to higher pressure if the system detects that more pressure is needed to take a blood pressure measurement.
Note:
- This monitor automatically switches off approximately 1 minute after last key operation.
- To interrupt the measurement, simply press the Memory or ON/OFF/START key; the cuff will deflate immediately.
Recalling Values from Memory
- The monitor has two memory zones (1 and 2). Each zone can store up to 60 measurements.
- To read memory values from a selected memory zone, use the User-Switching key to select a memory zone (1 or 2) from which you want to recall values. Press the Memory key. The first reading displayed is the average of the last 3 measurements stored in memory.
- Continue to press the Memory key to view the last previously stored measurement. Every measurement comes with an assigned memory sequence number.
Note: The memory bank can store up to 60 readings per memory zone. When the number of readings exceeds 60, the oldest data will be replaced with the new record.
Recalling average values of morning and nighttime
- This monitor has 7, 14, 21, 28 days averaging function of morning and nighttime.
- To read averaging value from a selected memory zone, use the User-Switching key to select a memory (1 or 2) from which you want to recall values.
- Press the Morning and Nighttime Average key, the first reading displayed is the average of all morning readings from the last 7 days.
- Continue to press the Morning and Nighttime Average key to view the average of all morning readings of last 14, 21, and 28 days, then all nighttime readings of last 7, 14, 21, and 28 days. Every average value comes with a day number, Morning and Nighttime mark and Average mark.
Note: AM is defined as 4:00 AM – 11:59 AM
Note: PM is defined as 6:00 PM – 2:00 AM
Clearing Values from Memory
- Press the User-Switching key to select memory zone 1 or memory zone 2.
- Press and hold the Memory key for approximately 5 seconds, then the data in the memory zone can be erased automatically.
Time Adjustment
- To adjust the date/time in the monitor after installing or replaces batteries. The display will show a blinking number showing the date.
- Change the date by pressing the Memory key, each press will increase the number. Press the ON/OFF/START key to confirm the entry and the screen will show a blinking number representing the month.
- Change the month, the hour and the minute as described in Step 2 above, using the Memory key to change and the ON/OFF/START key to confirm the entries.
- "0" will reappear as the Blood Pressure Monitor is ready for measurement again.
Data Transfer to PC
Rossmax provides a free, integrated and user-friendly blood pressure management software which can be downloaded and installed on your computer. You may purchase a special designed USB cable in order to connect Rossmax's blood pressure monitor and your PC. Please visit the website at http://www.rossmax.com for proceeding the downloading and installation process.
Troubleshooting
If any abnormality will arise during use, please check the following points.
| Symptoms | Check Points | Correction |
| No display when the ON/OFF/START key is pressed | Have the batteries run down? | Replace them with four new batteries. |
| Have the batteries' polarities been positioned incorrectly? | Re-insert the batteries in the correct positions. | |
| EE mark shown on display or the blood pressure value is displayed excessively low (high) | Is the cuff placed correctly? | Wrap the cuff properly so that it is positioned correctly. |
| Did you talk or move during measurement? | Measure again. Keep arm steady during measurement. | |
| Did you vigorously shake the cuff during measurement? |
Note: If the unit still does not work, return it to your dealer. Under no circumstance should you disassemble and repair the unit by yourself.
Cautionary Notes
- The unit contains high-precision assemblies. Therefore, avoid extreme temperatures, humidity, and direct sunlight. Avoid dropping or strongly shocking the main unit, and protect it from dust.
- Clean the blood pressure monitor body and the cuff carefully with a slightly damp, soft cloth. Do not press. Do not wash the cuff or use chemical cleaner on it. Never use thinner, alcohol or petrol (gasoline) as cleaner.
- Leaky batteries can damage the unit. Remove the batteries when the unit is not used for a long time.
- The unit should not be operated by children so to avoid hazardous situations.
- If the unit is stored near freezing, allow it to acclimate at room temperature before use.
- This unit is not field serviceable. You should not use any tool to open the device nor should you attempt to adjust anything inside the device. If you have any problems, please contact the store or the doctor from whom you purchased this unit or please contact Rossmax International Ltd.
- As a common issue for all blood pressure monitors using the oscillometric measurement function, the device may have difficulty in determining the proper blood pressure for users diagnosed with common arrhythmia (atrial or ventricular premature beats or atrial fibrillation), diabetes, poor circulation of blood, kidney problems, or for users suffered from stroke, or for unconscious users.
- To stop operation at any time, press the ON/OFF/START key, and the air in the cuff will be rapidly exhausted.
- Once the inflation reaches 300 mmHg, the unit will start deflating rapidly for safety reasons.
- Please note that this is a home healthcare product only and it is not intended to serve as a substitute for the advice of a physician or medical professional.
- Do not use this device for diagnosis or treatment of any health problem or disease. Measurement results are for reference only. Consult a healthcare professional for interpretation of pressure measurements. Contact your physician if you have or suspect any medical problem. Do not change your medications without the advice of your physician or healthcare professional.
- Electromagnetic interference: The device contains sensitive electronic components. Avoid strong electrical or electromagnetic fields in the direct vicinity of the device (e.g. mobile telephones, microwave ovens). These may lead to temporary impairment of measurement accuracy.
- Dispose of device, batteries, components and accessories according to local regulations.
- This monitor may not meet its performance specification if stored or used outside temperature and humidity ranges specified in Specifications.
- Please note that when inflating, the functions of the limb in question may be impaired.
- During the blood pressure measurement, blood circulation must not be stopped for an unnecessarily long time. If the device malfunctions, remove the cuff from the arm.
- Avoid any mechanical restriction, compression or bending of the cuff line.
- Do not allow sustained pressure in the cuff or frequent measurements. The resulting restriction of the blood flow may cause injury.
- Ensure that the cuff is not placed on an arm in which the arteries or veins are undergoing medical treatment, e.g. intravascular access or therapy, or an arteriovenous (AV) shunt.
- Do not use the cuff on people who have undergone a mastectomy.
- Do not place the cuff over wounds as this may cause further injury.
- Only ever use the cuffs provided with the monitor or original replacement cuffs. Otherwise erroneous results will be recorded.
- Batteries can be fatal if swallowed. You should therefore store the batteries and products where they are inaccessible to small children. If a battery has been swallowed, call a doctor immediately.
- Do not use the tubing and/or AC adaptor for any other purpose than those specified, as they can cause risk of strangulation.
- Do not service or maintain device and cuff while in use.
Specifications
| Measurement Method | Oscillometric | |
| Measurement Range | Pressure: 30~260 mmHg; Pulse: 40~199 beats/ minute | |
| Pressure Sensor | Semi conductor | |
| Accuracy | Pressure: ± 3mmHg; Pulse: ± 5% of reading | |
| Inflation | Pump Driven | |
| Deflation | Automatic Air Release Valve | |
| Memory capacity | 60 memories for each zone x 2 zones | |
| Auto-shut-off | 1 minute after last key operation | |
| Operation Environment | 10°C~40°C (50°F~104°F); 40%~85% RH; 700~1060 hPa | |
| Storage and Transportation Environment | -10°C~60°C (14°F~140°F); 10%~90% RH; 700~1060 hPa | |
| DC Power Source | DC 6V four AA Batteries | |
| AC Power Source | DC 6V, ≥600mA (Plug size: outer(-) is Ø4.0, inner(+) is Ø1.7) | |
| Dimensions | 168 (L) X 115 (W) X 82 (H) mm | |
| Weight | 358g (G.W.) (w/o Batteries) | |
| Arm circumference | Adult: 24~40 cm (9.4"~15.7") | |
| Limited Users | Adult users | |
 | Type BF: Device and cuff are designed to provide special protection against electrical shocks. | |
| IP Classification | IP21: Protection against harmful ingress of water and particulate matter | |
| * Specifications are subject to change without notice. | ||

Rossmax Swis GmbH,
Widnauerstra se 1, CH-9435 H erbrugg,
Switzerland


Documents / Resources
References
Download manual
Here you can download full pdf version of manual, it may contain additional safety instructions, warranty information, FCC rules, etc.
Advertisement


Need help?
Do you have a question about the AU941f and is the answer not in the manual?
Questions and answers