Table of Contents
Advertisement
Available languages
Available languages
Quick Links
Advertisement
Chapters
Table of Contents

Related Manuals for GreenWorks 82TB20


Summary of Contents for GreenWorks 82TB20
- Page 1 82TB20 OPERATOR MANUAL BIKE HANDLE TRIMMER & BRUSH CUTTER MANUEL D’OPÉRATEUR COUPE-HERBE & DÉBROUSSAILLEUSE MANUAL DEL OPERADOR CORTABORDES & DESBROZADORA www.greenworkscommercial.com www.shopgreenworksgear.com...
-
Page 3: Table Of Contents
English Start the machine..........9 Description......... 4 Stop the machine..........10 Purpose.............. 4 Operation tips..........10 Overview............4 Cutting tips ............. 10 Packing list............4 Line cut-off blade..........11 Important safety instructions...4 Adjust the length of the cutting line....11 Symbols on the machine....6 10 Maintenance........11 Risk levels...........6 10.1 General information.........11... -
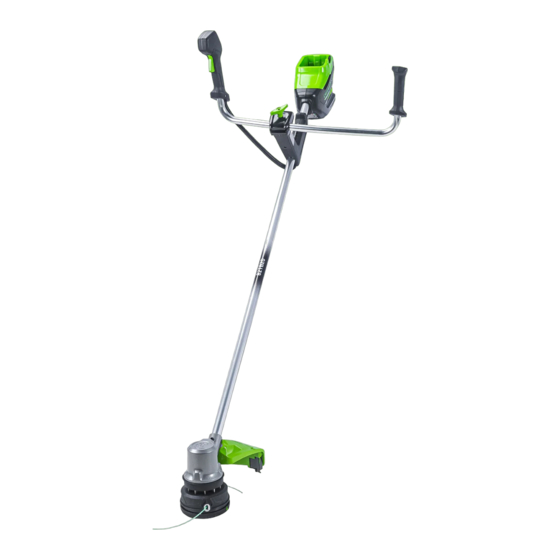
Page 4: Description
English DESCRIPTION String trimmer guard Hex wrench assembly Metal rod PURPOSE Brush cutter guard Wrench assembly 10 Wrench This machine is used to cut grass, light weeds, and other Brush cutter blade 11 Operator manual similar vegetation at or around ground level. The cutting assembly plane must be approximately parallel to the ground surface. - Page 5 Keep cutting attachment below waist level. Keep all parts battery pack may create a risk of fire when used with of your body away from the rotating cutting attachment. another battery pack. Use only Greenworks 82DPC8A charger or other Greenworks Commercial 82V chargers. •...
-
Page 6: Symbols On The Machine
English • Blade thrust is more likely to occur in areas where it Symbol Explanation is difficult to see the material being cut. Time • Condition of Unit before Use – Inspect unit before each use. Replace damaged parts. Make sure all fasteners are Revolutions, strokes, surface speed, or- /min in place and secure. -
Page 7: Service
English WARNING SYM- SIGNAL MEANING If the battery pack cracks or breaks, with or without leaks, do not recharge it and do not use. Discard it and replace CAUTION (Without Safety Alert Sym- with a new battery pack. DO NOT TRY TO REPAIR IT! To bol) Indicates a situation that prevent injury and risk of fire, explosion, or electric shock, may result in property dam-... -
Page 8: Unpack The Machine
English UNPACK THE MACHINE NOTE Do not miss the spring in the support. WARNING 3. Put the bike handle (4) in the lower support (C). Make sure that you correctly assemble the machine before use. 4. Put the cap (B) on the lower support. 5. -
Page 9: Install The Battery Pack
English OPERATION IMPORTANT Before you operate the machine, read and understand the safety regulations and the operation instructions. WARNING Be careful when you operate the machine and always observe your surroundings before operating tool. ON/OFF BUTTON 2. Put on the shoulder strap. Push this button to turn power on and off for the machine. -
Page 10: Stop The Machine
English STOP THE MACHINE 1. Release the trigger. 2. Push the on/off button again to turn the machine off. OPERATION TIPS WARNING Keep clearance between the body and the machine. WARNING Do not operate the machine without guard in place. Do these tips when you use the machine: •... -
Page 11: Line Cut-Off Blade
English MAINTENANCE IMPORTANT Read and understand the safety regulations and the maintenance instructions before you clean, repair or do the maintenance work on the machine. IMPORTANT Make sure that all nuts, bolts and screws are tight. Check regularly that the handles are firmly mounted. IMPORTANT Use only the replacement parts and accessories of the initial manufacturer. -
Page 12: Install The Cutting Line
English 1. Push the tabs (13) on the sides of the trimmer head at the 2. Line up the slot (16) on the spool cap with the line exit same time. hole (17) on the trimmer head. 2. Pull and remove the spool cover (14). 3. -
Page 13: Remove The Guard
English 10.5 REMOVE THE GUARD IMPORTANT You must install the cut-off blade when you use the trimmer 1. Remove the screws from the trimmer head with the head. supplied torx wrench. 2. Remove the guard. 10.8 ATTACH THE BRUSH CUTTER GUARD 10.6 REMOVE THE TRIMMER HEAD... -
Page 14: 10.10 Remove The Brush Cutter
English TROUBLESHOOTING 6. Tighten the lock-nut counter-clockwise with included wrench (27). Problem Possible Cause Solution The ma- No electrical con- 1. Remove battery pack. chine does tact between the 2. Check contact and in- not start machine and the stall the battery pack when you battery pack. -
Page 15: Technical Data
2 year commercial power in time. train warranty, 2 year commercial battery warranty against defects in materials, parts or workmanship. Greenworks, at its own discretion will repair or replace any and all parts found TECHNICAL DATA to be defective, through normal use, free of charge to the customer. - Page 16 6. Routine maintenance items such as lubricants, blade sharpening. 7. The unit, if it has not been operated and/or maintained in accordance with the owner's manual. GREENWORKS HELPLINE: Warranty service is available by calling our toll-free helpline, at 1-855-470-4267. TRANSPORTATION CHARGES:...
- Page 17 Français Indication de la vitesse........24 Description........18 Démarrer la machine........24 But..............18 Arrêter la machine........... 24 Aperçu............. 18 Conseils sur l'utilisation........24 Liste du contenu de l’emballage...... 18 Cutting tips ............. 25 Instructions importantes sur la Lame de coupe de la ligne....... 25 sécurité..........
-
Page 18: Description
Français DESCRIPTION LISTE DU CONTENU DE L’EMBALLAGE Coupe-herbe Harnais Cette machine est utilisée pour couper l'herbe, les mauvaises Ensemble de la Clé hexagonale herbes légères et d'autres végétaux similaires au niveau du sol poignée de vélo Tige métallique ou à proximité. La surface de coupe doit être Ensemble de la Clé... - Page 19 Rangez toujours les outils électriques inutilisés à d'incendie. Utilisez uniquement la batterie Greenworks l'intérieur – Lorsqu'ils ne sont pas utilisés, entreposez-les 82BD400 ou autres batteries Greenworks Commercial de à l'intérieur dans un endroit sec, hors de portée des 82V. enfants.
-
Page 20: Symboles Figurant Sur La Machine
Français • Ne jetez pas les batteries au feu. Les cellules peuvent position recommandée par le fabricant. N’utilisez que les exploser. Consultez les règlements locaux pour connaître tuyaux non métalliques flexibles recommandés par le les instructions d'élimination spéciales. fabricant. Par exemple, n’utilisez jamais de fil ou de câble métallique qui peut se briser et devenir un projectile •... -
Page 21: Niveaux De Risques
Français Symbole Explication SYM- SIGNAL SIGNIFICATION BOLE Heure MISE EN Indique une situation poten- Tours, coups, vitesse périphérique, or- GARDE tiellement dangereuse qui, si /min bites, etc., par minute elle n'est pas évitée, pourrait causer des blessures mineures Courant direct ou modérées. -
Page 22: Proposition 65
Français AVERTISSEMENT AVERTISSEMENT Si la batterie se fend ou se brise, avec ou sans fuites, ne la N’utilisez pas d’accessoire non recommandé pour cette rechargez pas et ne l'utilisez pas. Jetez-la et remplacez-la machine. par une nouvelle batterie. N'ESSAYEZ PAS DE LA RÉPARER ! Pour prévenir les blessures et les risques DÉBALLER LA MACHINE d'incendie, d'explosion ou de décharge électrique, et pour... -
Page 23: Attachez La Poignée De Vélo
Français FIXEZ LA BANDOULIÈRE ① ② ATTACHEZ LA POIGNÉE DE VÉLO 1. Fixez le mousqueton à l’anneau de transport sur le tube. 1. Desserrez la poignée centrale (A). 2. Retirez le capuchon (B) et le support inférieur (C). REMARQUE N'oubliez pas le ressort du support. 3. -
Page 24: Retirer Le Bloc-Batterie
Français RETIRER LE BLOC-BATTERIE 2. Redémarrez la machine. 1. Poussez et maintenez enfoncé le bouton de déblocage de INDICATION DE LA VITESSE la batterie (1). 2. Retirez le bloc-batterie de la machine. 1. Le voyant du lapin s'allume lorsque vous passez à la vitesse supérieure. -
Page 25: Cutting Tips
Français • Retirez le bloc-batterie. • Retirez l’herbe. LAME DE COUPE DE LA LIGNE Ce coupe-herbe est équipé d'une lame de tronçonnage (11) sur la garde protectrice. La lame de coupe de la ligne coupe en continu la ligne pour assurer un diamètre de coupe constant et efficace. -
Page 26: Entretien
Français ENTRETIEN 10.3 RETIREZ LA LIGNE RESTANTE REMARQUE IMPORTANT Pour une utilisation normale, le démontage de la tête n'est Lisez et comprenez les consignes de sécurité et les pas nécessaire. Cependant, si les circonstances nécessitent instructions d'entretien avant de nettoyer, de réparer ou un démontage, suivez ces instructions. -
Page 27: Installez La Ligne De Coupe
Français 5. Tournez le capuchon de bobine dans le sens des aiguilles d'une montre pour enrouler la ligne de coupe dans la tête de coupe. Conservez environ 5" de ligne de coupe au- dessus de chaque côté de la tête de coupe. 10.4 INSTALLEZ LA LIGNE DE COUPE REMARQUE... -
Page 28: Assemblez La Tête De Coupe
Français 10.9 MONTER LE TAILLE- BROUSSAILLES 10.7 ASSEMBLEZ LA TÊTE DE COUPE AVERTISSEMENT 1. Placez la tête de coupe dans le boîtier. Portez des gants et faites attention aux extrémités 2. Installez l'écrou. tranchantes. 3. Insérez la tige métallique dans le trou de transmission angulaire spécifié... -
Page 29: Retirez Le Taille-Broussailles
Français 10.10 RETIREZ LE TAILLE- Problème Cause possible Solution BROUSSAILLES La machine La garde protec- Retirez la batterie et in- s’arrête trice n’est pas atta- stallez la garde protec- 1. Placez la tige orifice du dans orifice du boîtier du moteur lorsque chée à... -
Page 30: Données Techniques
Avancez la ligne. visible- temps. ment. Greenworks garantit ce produit, à l'acheteur original avec preuve d'achat, 2 ans de garantie sur le groupe motopropulseur commercial, 2 ans de garantie sur la batterie DONNÉES TECHNIQUES commerciale contre les défauts de matériaux, pièces ou main d'œuvre. - Page 31 7. L'appareil, s'il n'a pas été utilisé et/ou entretenu conformément au manuel du propriétaire. ASSISTANCE TÉLÉPHONIQUE DE GREENWORKS: Le service de garantie est disponible en appelant notre ligne d'assistance téléphonique sans frais, au 1-855-470-4267. FRAIS DE TRANSPORT : Les frais de transport pour le déplacement de tout équipement...
- Page 32 Español Puesta en marcha de la máquina......39 Descripción........33 Detención de la máquina......... 39 Finalidad............33 Consejos de funcionamiento......39 Perspectiva general.......... 33 Consejos de corte ..........40 Lista de embalaje..........33 Cuchilla de corte de hilo........40 Instrucciones importantes de Ajuste de la longitud del hilo de corte..... 40 seguridad..........
-
Page 33: Descripción
Español DESCRIPCIÓN Conjunto de Arnés para el hombro protección de Llave hexagonal cortabordes FINALIDAD Varilla metálica Conjunto de Llave Esta máquina se utiliza para cortar hierba, maleza ligera y protección de 10 Llave otra vegetación similar a nivel del suelo. El plano de corte desbrozadora debe estar aproximadamente paralelo a la superficie del suelo. - Page 34 El uso de cualquier otra batería puede dar lugar a un partes del cuerpo alejadas del accesorio de corte giratorio. riesgo de lesiones e incendio. Utilice únicamente la batería 82BD400 de Greenworks u otras baterías de 82V • Permanezca atento – Observe lo que está haciendo.
-
Page 35: Símbolos En La Máquina
Español repuesto idénticas. Esto garantizará el mantenimiento de mascotas fuera de un radio de 15 m; fuera de la zona de la seguridad del producto. 15 m, sigue existiendo el riesgo de lesiones por objetos proyectados. Se recomienda encarecidamente que los •... -
Page 36: Niveles De Riesgo
Español ELIMINACIÓN DE BATERÍA Símbolo Explicación SEGURA PARA EL MEDIO Lleve calzado de seguridad. AMBIENTE Lleve guantes de protección. Riesgo de lesiones debidas al empuje de las cuchillas. Los materiales tóxicos y corrosivos que figuran a continuación se encuentran en las baterías utilizadas en esta Mantenga a todos los transeúntes al me- máquina: Ion de litio, un material tóxico. -
Page 37: Propuesta 65
Español PROPUESTA 65 AVISO Por su seguridad personal, no inserte la batería antes de AVISO haber montado la herramienta por completo. Este producto contiene una sustancia química conocida en el estado de California como causante de cáncer, defectos FIJACIÓN DE LA PROTECCIÓN de nacimiento u otros daños reproductivos. -
Page 38: Fijación De La Correa De Hombro
Español INSTALACIÓN DE LA BATERÍA AVISO • Si la batería o el cargador ha sufrido daños, sustituya la batería o el cargador. • Detenga la máquina y espere hasta que el motor se pare antes de instalar o retirar la batería. •... -
Page 39: Botón De Inversión
Español NOTA Si no utiliza la máquina durante más de 30 s, la máquina se detiene. Pilotos apagados: el circuito eléctrico está desactivado (OFF). IMPORTANTE No mantenga el dedo sobre el botón cuando mueva la máquina para evitar la puesta en marcha accidental. BOTÓN DE INVERSIÓN CONSEJOS DE FUNCIONAMIENTO... -
Page 40: Consejos De Corte
Español CUCHILLA DE CORTE DE HILO Este cortabordes está equipado con una cuchilla de corte de hilo (11) en la protección. La cuchilla de corte de hilo recorta continuamente el hilo para garantizar un diámetro de corte uniforme y eficaz. Avance el hilo cada vez que escuche que el motor funciona más rápido de lo normal, o cuando la eficiencia del corte disminuya. -
Page 41: Mantenimiento
Español MANTENIMIENTO 10.3 RETIRADA DEL HILO RESTANTE NOTA IMPORTANTE Para un uso normal, el desmontaje del cabezal no es Debe leer y entender los reglamentos de seguridad y las necesario. No obstante, si las circunstancias requieren el instrucciones de mantenimiento antes de limpiar, reparar o desmontaje, siga estas instrucciones. -
Page 42: Instalación Del Hilo De Corte
Español 5. Gire la tapa del carrete en sentido horario para enrollar el hilo de corte en el cabezal de corte. Mantenga aproximadamente 12,5 cm (5") de hilo de corte por encima de cada lado del cabezal de corte. 10.4 INSTALACIÓN DEL HILO DE CORTE NOTA... -
Page 43: Montaje Del Cabezal De Corte
Español 10.9 MONTAJE DE LA DESBROZADORA 10.7 MONTAJE DEL CABEZAL DE AVISO CORTE Lleve guantes y tenga cuidado con los bordes afilados. 1. Ponga el cabezal de corte en la carcasa. 2. Instale la tuerca. AVISO 3. Coloque la varilla metálica en el orificio de transmisión Aplique la protección a la cuchilla. -
Page 44: Retirada De La Desbrozadora
Español 10.10 RETIRADA DE LA Problema Posible causa Solución DESBROZADORA La máquina La protección no Retire la batería y fije la se detiene está fijada a la má- protección a la máquina. 1. Introduzca la varilla metálica en el orificio de la carcasa cuando cor- quina. -
Page 45: Datos Técnicos
2 años para la batería comercial frente a defectos en miento a batería materiales, piezas o mano de obra. A su entera discreción Greenworks reparará o sustituirá cualquiera y todas las piezas Motor 82V Sin escobillas de CC que resulten ser defectuosas, con un uso normal, sin coste Velocidad sin carga 4700-5500 ±10% min... - Page 46 Es responsabilidad del comprador pagar los costes de transporte de cualquier pieza enviada para su sustitución bajo esta garantía, a menos que dicha devolución sea solicitada por escrito por Greenworks. Dirección en EE.UU.: Greenworks Tools...
Need help?
Do you have a question about the 82TB20 and is the answer not in the manual?
Questions and answers