
Related Manuals for KNX GIRA 5065 00


Summary of Contents for KNX GIRA 5065 00
- Page 1 Operating instructions Dimming actuator 1-gang 200 W with binary input, 3-gang Order no. 5065 00...
-
Page 2: Table Of Contents
Dimming actuator 1-gang 200 W with binary input, 3-gang Table of Contents Safety instructions ...................... 3 Device components...................... 4 Function .......................... 5 Information for electrically skilled persons ................ 7 Mounting and electrical connection................ 7 Commissioning ...................... 9 Technical data ......................... 11 Troubleshooting ...................... 13 Accessories ........................ 15 Warranty.......................... 15 82404412 02.12.2022... -
Page 3: Safety Instructions
4 mm must be maintained between bus conductors and mains voltage cores. Danger of electric shock on the KNX installation. Do not connect any external voltage to the inputs. The device might be damaged, and the SELV potential on the KNX bus line will no longer be available. -
Page 4: Device Components
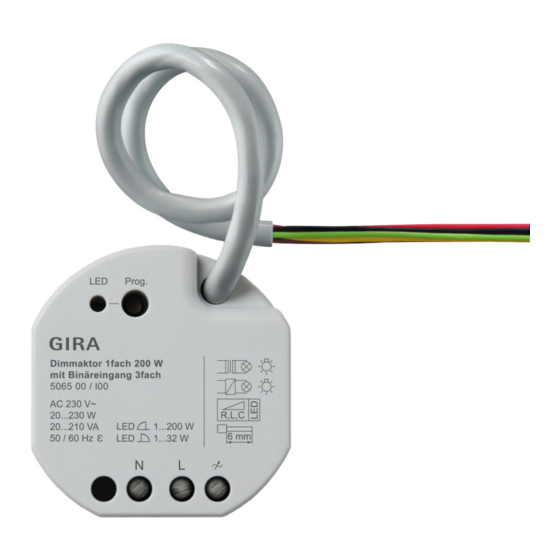
Dimming actuator 1-gang 200 W with binary input, 3-gang Device components Image 1: Device components Programming LED Programming button Control cable (KNX connection and extension inputs) Load connection (dimming output) Image 2: Connection assignment of control cable (example) red (RD) KNX +... -
Page 5: Function
Dimming actuator 1-gang 200 W with binary input, 3-gang Function System information This device is a product of the KNX system and complies with the KNX directives. Detailed technical knowledge obtained in KNX training courses is a prerequisite to proper understanding. - Page 6 Power extension possible by means of power boosters. Delivery state: Operation of the output via extension inputs 1 and 2 possible with existing supply via KNX. Flickering of the connected lamps due to undershoot of the specified minimum load or through centralised pulses from the power stations. This does not rep- resent any defect in the device.
-
Page 7: Information For Electrically Skilled Persons
DANGER! When connecting the bus/extensions and mains voltage wires in a shared appliance box, the KNX bus line may come into contact with the mains voltage. This endangers the safety of the entire KNX installation. People at remote devices may also receive an electric shock. - Page 8 Dimming actuator 1-gang 200 W with binary input, 3-gang Image 3: Mounting example in electronic appliance box with partition wall, series push-button and NTC temperature sensor Appliance box Partition potential-free contacts (e.g. series push-button) NTC temperature sensor (optional) Image 4: Cable spacing Minimum spacing between the mains voltage and bus/extension wires: 4 mm (see figure 4) Image 5: Connection of load...
-
Page 9: Commissioning
In the as-delivered state, the actuator is passive, i.e. no telegrams are transmitted to the KNX. The output is set to the universal dimming principle with automatic recogni- tion of the load type. Control of the output is possible via inputs 1 and 2, provided the bus voltage is switched on. - Page 10 ■ Press and hold down the programming button. ■ Switch on the bus voltage or connect the device to KNX. Release the pro- gramming button only after the programming LED starts flashing slowly. The safe-state mode is activated. By briefly pressing the programming button again, the programming mode can also be switched on and off in the safe-state mode as usual.
-
Page 11: Technical Data
Dimming actuator 1-gang 200 W with binary input, 3-gang Technical data KNX medium TP256 Commissioning mode S-mode Rated voltage KNX DC 21 ... 32 V SELV Current consumption KNX 5 ... 18 mA Connection mode KNX Device connection terminal on control... - Page 12 Dimming actuator 1-gang 200 W with binary input, 3-gang Image 7: Connected load conventional lamps Power reduction when installed in wooden or dry construction walls -15% when installed in multiple combinations -20% Clampable conductor cross-section Single stranded 0.5 ... 4 mm² Finely stranded without conductor sleeve 0.5 ...
-
Page 13: Troubleshooting
Dimming actuator 1-gang 200 W with binary input, 3-gang Troubleshooting Connected LED lamps or compact fluorescent lamps switch off in the lowest dimming position or flicker The set minimum brightness is too low. Increase minimum brightness. Connected LED lamps or compact fluorescent lamps flicker Cause 1: Lamps are not dimmable. - Page 14 Dimming actuator 1-gang 200 W with binary input, 3-gang Exchange lamps for another type. The response of the surge protection can be signalled by sending a short-cir- cuit telegram or can be determined by polling the "short-circuit" communication object. Cause 3: short-circuit in output circuit Disconnect the output from the mains supply.
-
Page 15: Accessories
Dimming actuator 1-gang 200 W with binary input, 3-gang Use a compensation module, see accessories. Use another type of LED lamp or an LED lamp of another manufacturer. Accessories Remote sensor (NTC temperature sensor) 1493 00 Condensation sensor 5069 00 Leakage sensor 5068 00 Warranty...
Need help?
Do you have a question about the GIRA 5065 00 and is the answer not in the manual?
Questions and answers