Table of Contents
Advertisement
Advertisement
Table of Contents

Related Manuals for Mahr umaxum II


Summary of Contents for Mahr umaxum II
- Page 1 Instruction Manual Digital Indicator Document Part No. 2249001 Rev. C...
- Page 2 These instructions cover the following µMaxµm II Digital Indicators: ® µMaxµm II Standard Model NOTE: Features available for the Standard Version are noted with this symbol “[S]” where applicable throughout this manual. Advanced features are not included. Part Description Stem Diameter Stem Length 2034101 Standard Version...
- Page 3 ® µMaxµm II Advanced Model Part Description Stem Diameter Stem Length 2034201 Advanced Version 0.375in 0.46in 2034203 Advanced Version 0.375in 1.5in 2034205 Advanced Version 11.68mm 2034207 Advanced Version 38.1mm Advanced 2034401 0.375in 0.46in Perpendicular Range = ± 0.040 in / ± 1.0 mm For model number ordering assistance see the product catalog or call: 1-800-343-2050...
-
Page 4: Table Of Contents
CONTENTS µMaxµm II Standard Model ................2 µMaxµm II Advanced Model ................3 1.0 Precautions and General Information .............. 7 2.0 Product Features ....................7 2.1 Hardware Display ................... 7 2.2 Control Features ..................... 8 2.3 Setup Features ....................9 2.4 Special Options Available in µMaxµm II Indicators ........ - Page 5 6.2 Analog Magnification [S] ................33 6.3 Preset [S] ...................... 34 6.4 Tolerances [S] ....................34 6.4.1 Analog Bargraph Operation [S] ............35 6.4.2 Digital GO/NOGO operation [S] ............35 6.5 Resolution [S] ....................36 6.6 Multiplier ....................... 36 6.7 Difference Mode ................... 37 6.7.1 Dynamic Max, Min, TIR ...............
- Page 6 11.0 Quick User Flow Chart ..................60 11.1 Measuring Mode Flow Chart ..............60 11.2 Setup Mode Flow Chart ................61 [C] 1861 [S] 1918...
-
Page 7: Precautions And General Information
1.0 Precautions and General Information All µMaxµm II Series Models: µMaxµm II (Micro-Maxum) Series Models are ruggedly built to withstand hard use, and their gasketed case, crystal and stem assemblies resist encroachment by most fluids. However, µMaxµm II Series Models should never be immersed. Regularly inspect all seals to guard against fluid penetration. -
Page 8: Control Features
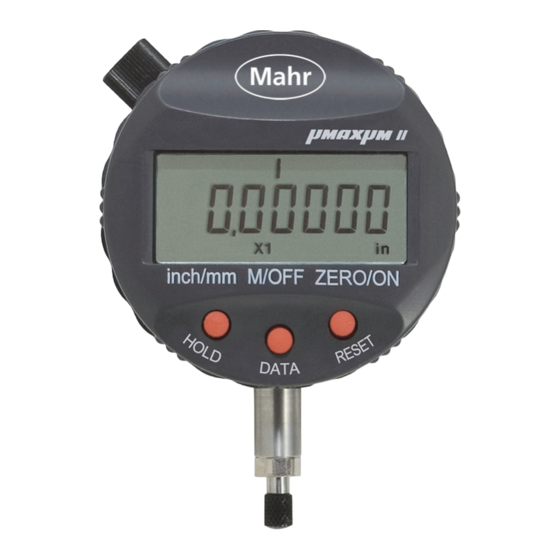
Range Signal Notifies an “off-scale” condition when the digital range is exceeded. The digital display will turn off and the analog left or right arrow will be left on. 2.2 Control Features Makes use of three push buttons (inch/mm, M/OFF, ZERO/ON). NOTE: If the unit is configured with a lockout feature, it will prompt the operator for a fac- tory set password. -
Page 9: Setup Features
The button can also be used to place the unit into a Non-Zero or True Spindle Position (TSP) mode. To enter this mode, press and hold ZERO/ON for 1+ second. Once the mode is selected, the unit displays the actual position of the spindle in the indicator’s measuring range and the analog display changes to a single element mode showing the position of the spindle to its range. - Page 10 SWITCHABLE RESOLUTION (Mode M13) Resolution can be selected per the resolution table Ref: (Section 5.5, page 21). From 0.00001in to 0.01in (0.0002 to 0.2mm) depending on the indicator unit. MULTIPLIER (Mode M3) Allows the indicator to display a reading that is a multiple of the scale movement. Any mul- tiplier from 00.001 to 99.999 may be entered to satisfy ratio type applications.
-
Page 11: Special Options Available In Μmaxµm Ii Indicators
DIFFERENCE MODE (Mode M1 X1) Allows the indicator to collect two measurements sequentally and display the difference or centerline value. Useful for preset or dynamic operation. DYNAMIC MODE (Mode M2 X1) Allows the indicator display to hold a live (static) reading or display and hold a dynamic maximum, minimum or total indicated reading (TIR). - Page 12 LOCKED MULTIPLIER The indicator can be set to lock out the multiplier used in setup mode. This function is fac- tory locked out (default unlocked multiplier entry). LOCKED CALIBRATION (µMaxµm II only) [P] The calibration mode is locked and accessible using the entry of a factory password (default: unlocked Calibration Mode).
- Page 13 NOTE: Factory Lockout: The standard indicator allows access to all the features using the appropriate combination of the three interface buttons. If the lock out option is specified, the user will not be able to access those lock out features. All features are enabled or disabled at the factory. Locked fea- tures identified by a [P] are accessible by entry of a fixed password that is factory set.
-
Page 14: Inspection
3.0 Inspection The µMaxµm II indicator is shipped without batteries installed. Refer to Section 7.0 for battery installation instructions. After batteries have been installed, turn the unit on by pressing the ON button. -
Page 15: Mounting Gage For Setup
4.0 Mounting Gage for Setup The µMaxum II indicator, normally stem mounted, can be mounted in a gage or fixture using an optionally available back or adapter. 1) If the unit is OFF press and release the ZERO/ON button to turn the unit ON. If unit is already ON, press and hold ZERO/ON button to enter TSP Mode. -
Page 16: Setup Mode
5.0 Setup Mode All µMaxµm II style indicators are covered in this manual. NOTE: If the unit is configured with a lockout feature, a prompt to enter a 4 digit numeric password will appear. Only the Setup and Calibration modes are accessible by entering the correct password. - Page 17 Setup Modes - Standard Model signifies Measurement Direction / Analog Scale Magnification signifies Preset Entry Mode signifies Limit #1 Tolerance Entry Mode signifies Limit #2 Tolerance Entry Mode signifies Digital Resolution Selection Mode Setup Modes - Advanced Model signifies Measurement Direction / Analog Scale Magnification signifies Preset Entry Mode signifies Limit #1 Tolerance Entry Mode signifies Limit #2 Tolerance Entry Mode...
-
Page 18: Changing Measurement Direction (M1) [S]
5.1 Changing Measurement Direction (M1) [S] 1) Simultaneously press and hold M/OFF (1), then quickly press and release inch/ mm (2) once to enable the setup mode. (M1 icon appears in the lower left cor- ner of the LCD) (Figure 1). Figure 1 - Entering the Set-Up Mode 2) Press and release ZERO/ON to select the desired measurement direction signi-... -
Page 19: Changing Analog Magnification (M1) [S]
5.2 Changing Analog Magnification (M1) [S] 1) Simultaneously press and hold M/OFF (1), then quickly press and release inch/ mm (2) once to enable the setup mode. (M1 icon appears in the lower left cor- ner of the LCD) (Figure 3). Figure 3 - Entering the Set-Up Mode 2) Press and release inch/mm to select the desired Analog Magnification signified... -
Page 20: Entering A Preset (M2) [S]
Figure 4 - Changing Analog Magnification 5.3 Entering a Preset (M2) [S] 1) Simultaneously press and hold M/OFF (1), then quickly press and release inch/ mm (2) once to enable the setup mode. (M1 icon appears in the lower left cor- ner of the LCD) (Figure 3). - Page 21 4) Press and release inch/mm to move the cursor to the position above the digital character to be changed. Continuous use of inch/mm will cause the cursor to move one space at a time to the right and then begin again at the leftmost posi- tion (Figure 6).
-
Page 22: Entering Tolerances (M12, M23) [S]
NOTE: There are two ways to clear the PRESET VALUE to zero. One way is to set each digit value to zero or, (to simultaneously clear all digits) press and hold the inch/mm and then press and release ZERO/ON. 6) Press and release M/OFF until it returns to the gaging mode. No “Mx” icon is displayed. - Page 23 4) Follow the same procedure as the Preset Mode as in Section 5.3 for entering the tolerance value. inch/mm = move cursor position, ZERO/ON = change digit value. 5) Press and release M/OFF to display the M23 icon signifying the unit is in the limit #2 tolerance entry mode.
-
Page 24: Changing Digital Resolution (M13) [S]
5.5 Changing Digital Resolution (M13) [S] 1) Simultaneously press and hold M/OFF (1), then quickly press and release inch/ mm (2) once to enable the setup mode. (M1 icon appears in the lower left cor- ner of the LCD) (Figure 3). 2) Continue to press and release M/OFF until the M13 icon is displayed, signifying the unit is in the selectable resolution mode. -
Page 25: Multiplier Entry (M3)
5.6 Multiplier Entry (M3) 1) Simultaneously press and hold M/OFF (1), then quickly press and release inch/ mm (2) once to enable the setup mode. (M1 icon appears in the lower left cor- ner of the LCD) (Figure 3). 2) Continue to press and release M/OFF until the M13 icon is displayed, signifying the unit is in the selectable resolution mode. -
Page 26: Changing Operation To Difference Mode (M1 X1)
5) Change the selected character by pressing and releasing ZERO/ON (Figure 12). Figure 12 - Changing the Digital Character 6) To return to the gaging mode, press and release M/OFF once. If a multiplier other than 01.000 has been entered, an “M” will be visible in the display (Figure 13). - Page 27 4) Press and release the M/OFF button until the display shows the M1 X1 icon. The display shows the following text when the feature is off or disabled. Figure 14 - diFF.oFF 5) Press and release the inch/mm button to enable/disable the feature. dif = enables the Difference mode and only the difference value is sent to the data output port.
-
Page 28: Changing To Dynamic Max, Min Or Tir Operation (M2 X1)
5.8 Changing to Dynamic Max, Min or TIR Operation (M2 X1) 1) Simultaneously press and hold M/OFF (1), then quickly press and release inch/ mm (2) once to enable the setup mode. (M1 icon appears in the lower left cor- ner of the LCD) (Figure 3). -
Page 29: Changing Dynamic Hold Operation (M2 X1)
Figure 18 - Max, Min and TIR Modes • Operating mode set to dynamic maximum reading. This is indicated by the partial bargraph segments from the center to the right. • Operating mode set to dynamic minimum reading. This is indicated by the partial bargraph segments from the center to the left. -
Page 30: Changing Data Output Configuration (M3 X1)
Figure 19 - Mode of Operation Select Display The indicator arrives so that the units are selectable by using the inch/mm button. The inch/ mm button may be disabled and re-assigned to the Hold function. The Hold function is used to freeze a reading on the display. 5) Press and release the inch/mm button to enable the hold function. - Page 31 3) Press and hold M/OFF for 2 seconds until the M3 icon appears signifying that the unit is in the Multiplier Mode (Default Value 1.000). 4) Press and release the M/OFF button until the display shows the M3 X1 icon. The display shows the current setting.
-
Page 32: Calibration Mode (M123) [S]
Figure 23 - Continuous Data Output Mode displays new setting The selection is toggled using the ZERO/ON button. NOTE: The continuous output operation may inhibit use of certain data collection cables, devices, or software. 5.11 Calibration Mode (M123) [S] 1) Fit the indicator into a calibration device so that it is “on-scale”. The indicator should remain “on-scale”... - Page 33 j) Press and hold M/OFF for 2+ seconds until M123 is displayed. M123 is the Calibration Mode. The unit will be in the True Spindle Position Mode. 3) Mechanically position the indicator to read zero against a zero master or refer- ence and lock into place.
- Page 34 6) Replace the min reference with the max reference to displace the indicator to +.030 for inch mode. a) Press and release inch/mm to make digits count down to the number desired. b) Press and release ZERO/ON to make digits count up to the number desired.
-
Page 35: User Operation
6.0 User Operation 6.1 Measurement Direction [S] The µMaxµm II Series indicator has two measuring directions; normal and reverse. When set for reverse operation an R icon is displayed on the indicator. The reverse operation is typically used for ID (internal diameter) type measurements. Normal Reverse Figure 26 -... - Page 36 No icon indicates that the bargraph is disabled. Analog bargraph range and graduation resolution are shown in the table below: uMaxumII Display Icon ± Full Scale Grad Value (in/mm) (in/mm) no icon bar graph disabled 0.040 / 1.00 0.0020 / 0.050 0.020 / 0.20 0.0010 / 0.010 0.010 / 0.10...
-
Page 37: Preset [S]
6.3 Preset [S] The µMaxµm II Series indicator has the ability to read actual dimension size or compara- tive size from a master. When the preset is set to all zeros the indicator displays a com- parative size, which is the difference between the master and the part. When a preset is entered it is typically entered as the actual size of a certified nominal master. -
Page 38: Analog Bargraph Operation [S]
6.4.1 Analog Bargraph Operation The center bargraph line blinks when tolerance value(s) have been entered in the setup mode. If the center line is solid (not blinking) then there is no tolerance value(s) entered into the indicator and tolerance indication is disabled. The left and right arrows of the bargraph are used to indicate the tolerance condition as shown here: OOT Low Indication... -
Page 39: Resolution [S]
When in GO/NOGO selection the indicator replaces the numeric reading with a symbol. This is useful for visual sorting of parts by size or class. Up to three classes are available as shown here. The GO/NOGO symbols are represented in the figures below: NOGO NOGO Under Lower... -
Page 40: Difference Mode
Figure 32 - Multiplier In the gaging mode the M icon signifies that the indicator is not set to 1:1 ratio. This means that the reading displayed is a ratio of the actual mechanical movement of the spindle. 6.7 Difference Mode The µMaxµm II indicator has the ability to read the difference and centerline of two mea- surements. - Page 41 Step 2 Step 1 Step 3 Reset Indicator Collect Collect Display Location 1 Location 2 Difference Measurement Measurement Result Figure 33 - Difference Mode 2) Press and release the M/OFF button (step 2) to collect the second measure- ment into memory. The indicator will then flash the number “3” icon and display the difference result (Reading 1 - Reading 2).
-
Page 42: Dynamic Max, Min, Tir
6.7.1 Dynamic Max, Min, TIR The µMaxµm II Series advanced indicator has the ability to display dynamic measure- ments. The dynamic modes are max, min, and TIR (total indicated reading or max-min). • Dynamic max displays the most positive (maximum) reading relative to its reset/starting location. -
Page 43: Hold Function
1) Position and lock the indicator on the part or surface to be measured. 2) Press and release the ZERO/ON button to reset the indicator and start the dynamic data collection. 3) The reading on the indicator will hold the dynamic reading until it is reset again for the next measurement (step 2). -
Page 44: Lockout
When the Message “bAt Lo” is displayed on the digital display it indicates that the battery power is too low for dependable readings and the indicator will no longer operate. Replace batteries to resume use of the indicator. Refer to Section 7.2 for battery replace- ment. -
Page 45: Maintenance
Alcohol or equivalent to clean the spindle. Do not disassemble the spindle or transducer. Do not lubricate the spindle assembly. Since this is a completely modular assembly it is ® recommended that this unit be returned to Mahr Inc. should there become a problem. Any tampering with this unit will void the warranty. - Page 46 1) Using a small flat blade screw driver (Figure 36) carefully slide the blade into the slot above the tray and pry out to release the battery tray from its locked position enough to grasp with fingers (Figure 37). Battery Tray Battery Tray Slot Figure 36 -...
- Page 47 Figure 37 - Removing the Battery Tray 3) The Battery tray contains two CR2450 style batteries, Mahr Inc.Part number EBY-1018. Remove the two expired batteries and replace with new ones with the large diameters (+ Positive) facing away from the tray. Snap into place (Fig-...
-
Page 48: Data Output
Positive (+) Figure 38 - Changing the Battery 4) With the Indicator display facing up, orient the Battery Tray with the batteries facing away from display. Firmly slide the tray in until it locks into position (Refer to Figure 37). An initialization routine should be observed on the LCD display. 7.3 Data Output The µMaxµm II Series indicator has available three standard output formats based on the cable connected to it. - Page 49 The µMaxµm II Series indicator has the ability to output one reading at a time or continu- ous readings all the time. It can also have the serial number as part of the data output with each specific reading that is sent. When the indicator is set for single data output the data is triggered manually by the M/OFF Data button.
- Page 50 USB Data Cable 2000 SB 2000 USB Data Cable Order No. 4346023 Figure 39 - USB Data Cable 2000 SB Virtual COM-Interface Driver: The Driver emulates for every connected cable an additional virtual COM-Port. The appli- cation software communicates to the instrument in exactly the same manner as a normal hardware COM-Port.
- Page 51 Opto RS232C Data Cable Detailed description of Duplex commands available on demand. RS232C Duplex: Figure 40 - RS232C Duplex Cable...
- Page 52 RS232C Simplex: Figure 41 - RS232C Simplex Cable...
- Page 53 Digimatic Data Cable ATTENTION: Digimatic interfaces can only transmit 6 digits. 7-digit displays do not show the highest decimal place. Figure 42 - Digimatic Cable...
-
Page 54: Parts And Service
8.0 Parts and Service µMaxµm II Series Indicator parts and service are available from Mahr Inc, Providence RI USA. Contact your Mahr Inc. representative or Mahr Inc. in Providence. • Carefully pack items to prevent damage in shipment. • Include a brief description of the problem and the name, address and tele- phone number of the person to contact if we have any questions. -
Page 55: Replacement Parts
8.1 Replacement Parts Batteries: EBY-1018 Lithium coin cell, commercial part # CR-2450. PARTS Refer to Figures in following pages for part locations Description µMaxµmII ±0.040in Range: ±1.0mm EBY-1018 Batteries: Lithium 3V CR-2450 PT-223 (3/8" Stem) Contact Point: EPT-1037-W1 (8mm stem) Other contact points available. - Page 56 8.1.1 µMaxµm II Integral Model .750” .4619mm 2.30” 1.58” 40mm 58mm .250” 6.3mm” EBK-1010 .46”/11.7mm 1.50”/38mm Display .95”/24.1mm 270° Rotates 2.25”/57.2mm 2.11”/53.6mm 3.41”/86.6mm “A” “B” “C” Figure 43 - Integral Model Perpendicular Model 2.30” 58mm 3.75” 0.625” 9.5mm 16mm 1.339” 34mm .46”/11.7mm .95”/24.1mm...
- Page 57 Figure 45 - Spindle Components Spindle Components (µMaxµm II Only) De scrip tio n 2034201 2034203 2034205 2034207 P T-233 P T-223 E P T-1037-W 1 E P T-1037-W 1 Co n ta ct P o in t Bo o t NO NE E G U-1022 NO NE...
-
Page 58: Μmaxµmii
8.2 Accessories Accessory µMaxµmII Range: ±0.040in ±1.0mm USB Cable: 4346023 RS232 Cable: 4346020 Digimatic Cable: 4346021 Splash Cover: ECV-1307-W2 Adaptor Bushing: BU-197 (8mm stem) (8mm to 3/8") Thread Adaptor: AD-185 (m2.5 thread) (m2.5 to 4-48thd) Spring: SP-351 (lite force 35gm) Flat Back: EBK-1018 Lug Back:... - Page 59 Standard Flat Back Back Figure 46 - Indicator Back NOTE: Exercise care when installing Indicator Back accessories. make sure gasket seals are in good condition and properly oriented. DO NOT OVERTIGHTEN SCREWS.
-
Page 60: Specifications - Μmaxµm Ii
μMaxμm II 9.0 Specifications - μMaxμmII ±0.042in Display Range: ±1.067mm 0.050 to +0.060in. Spindle Range: -1.25 to 1.50mm 0.00002in / 0.00001in Resolution: 0.0005mm /0.0002mm ±0.020"range: 50uin(0.25%) Accuracy: ±0.040"range: 200uin(0.50%) ±0.5mm range: 1.25um(0.25%) (% of range) ±1.0mm range: 5.0um(0.50%) 3 to 4 Ounce - Gaging Force: 85 to 122 grams - - at center of travel... -
Page 61: Special Options
10.0 Special Options µMaxµm II Series Indicators may also be available pre-configured with various accesso- ries. Contact Mahr Inc. for specific needs. 10.1 Program Codes Some models may be factory configured with special program options. The list of pro- grammed options is below;... -
Page 62: Lockout Password
Program codes are factory installed and labeled left-to-right on the indicator. When order- ing special indicators the program code must be specified along with the indicator order number. The program code must be clearly visible and follow the listing structure as pro- vided here. - Page 63 entry the indicator will exit back to its gaging/measurement mode (for setup lockout option) or exit forward to the next “M” icon in the setup menu (for calibration lockout option). Figure 49 - Password Error Incorrect password error (displays for 3 seconds)
- Page 64 11.0 Quick User Flow Chart 11.1 Measuring Mode Flow Chart MEASURING MODE FLOWCHART inch/mm M/OFF ZERO/ON HOLD DATA RESET MEASURING MODE Primary Function Power On Standard: in / mm Send Data Zero / Preset Advanced: Hold / Resume Difference Collect Difference / Centerline "3"...
- Page 65 11.2 Setup Mode Flow Chart S E T UP M O D E F L O W C HART T o e n te r se tu p m o d e : in c h /m m M /O F F ZE R O /O N (pres s &...
- Page 66 (from M 2 m ode) CURS O R M 12 DIG IT 00.00000 [ - T O L ] { 0, 1, 2, … , 9 } CURS O R M 23 DIG IT 00.00000 [ + T O L ] { 0, 1, 2, …...
- Page 67 in c h /m m M /O F F ZE R O /O N (from M 13 m ode) CURS O R DIG IT 01.00000 [M UL T IP L IER] { 0, 1, 2, … , 9 } when ≠1.0, M O F F M 1 X 1 AL L DAT A...
- Page 68 (from M 2 X1 m ode) NO S /N M 3 X 1 S ING L E .--. .O nE [DAT A CO NF IG ] S ERIAL # CO NT IN. .S n. .Con (hold for > 3s ec .) CAL IBRAT IO N M O DE ADJ.
- Page 69 NOTES...
- Page 70 NOTES...
- Page 71 NOTES...
- Page 72 Document Part No. 2249001 Rev. C Copyright © 2018 Mahr Inc. All rights reserved. Due to technical improvements and/or further product developments, all of the specifications shown in this doc- ument are subject to change without notice. Other product and company names listed are trademarks or trade names of their respective companies...
Need help?
Do you have a question about the umaxum II and is the answer not in the manual?
Questions and answers