Arista 7000 Series Quick Start Manual
1ru (gen1) data center switches
Hide thumbs
Also See for 7000 Series:
- Quick start manual (54 pages) ,
- Quick start manual (38 pages) ,
- Quick start manual (40 pages)

Related Manuals for Arista 7000 Series


Summary of Contents for Arista 7000 Series
- Page 1 Quick Start Guide 7000 Series 1RU (Gen1) Data Center Switches DCS-7124SX DCS-7048T-A DCS-7050S-64 Arista Networks www.arista.com...
- Page 2 © Copyright 2016 Arista Networks, Inc. The information contained herein is subject to change without notice. Arista Networks and the Arista logo are trademarks of Arista Networks, Inc in the United States and other countries. Other product or service names may be trademarks or service marks of others.
-
Page 3: Table Of Contents
Status Indicators ..................17 Front Indicators ............................17 A.1.1 Switch Indicators........................17 A.1.2 Port Indicators........................... 18 Rear Status Indicators ........................... 19 Appendix: B Important Safety Instructions..............21 Appendix: C Parts List ....................... 25 Quick Start Guide: 7000 Series 1RU (Gen1) Data Center Switches... - Page 4 Rack Mount Parts ..........................25 C.1.1 Two-Post Rack Mount....................... 25 C.1.2 Four-Post Rack Mount ......................26 Cables..............................26 Appendix: D Front Panel ....................27 Appendix: E Rear Panel ..................... 29 Quick Start Guide: 7000 Series 1RU (Gen1) Data Center Switches...
-
Page 5: Chapter: 1 Overview
Step 3 Attach the mounting brackets and install the switch in an equipment rack as described in Chapter Step 4 Connect the switch to the power source and network devices as described in Chapter Step 5 Configure the switch as described in Chapter Quick Start Guide: 7000 Series 1RU (Gen1) Data Center Switches... -
Page 6: Specifications
Only Class 1 laser devices, certified for use in the country of installation by the cognizant agency are to be utilized in this product. Obtaining Technical Assistance Any customer, partner, reseller or distributor holding a valid Arista Service Contract can obtain technical support in any of the following ways: •... -
Page 7: Chapter: 2 Preparation
The switch uses power cables that comply with IEC-320 and have a C13 plug. The accessory kit provides two IEC-320 C13 to C14 power cables (two meters). Quick Start Guide: 7000 Series 1RU (Gen1) Data Center Switches... -
Page 8: Tools Required For Installation
Keep replacement parts in their original static-free packaging. • Remove all plastic, foam, vinyl, paper, and other static-generating materials from the work area. • Use tools that do not create ESD. Quick Start Guide: 7000 Series 1RU (Gen1) Data Center Switches... -
Page 9: Chapter: 3 Mounting The Switch
Figure 3-1: Chassis and Mounting Bracket Alignment for Front and Rear Rack Mounts Bracket holes are horizontally equidistant, allowing bracket placements where the flange is not flush with either panel (Figure 3-2 on page 6). This placement supports a center-rack mount. Quick Start Guide: 7000 Series 1RU (Gen1) Data Center Switches... -
Page 10: Two-Post Rack Mount
Three sets of screws attach each mounting bracket to the chassis. Figure 3-3 displays proper bracket mount configuration examples. Figure 3-4 on page 7 displays improper bracket mount configuration examples. Figure 3-3: Bracket Mount Examples for Two-Post Rack Mount Quick Start Guide: 7000 Series 1RU (Gen1) Data Center Switches... -
Page 11: Attaching Mounting Brackets To The Chassis
Figure 3-6 on page 8 displays the front-mount switch installation. Step 2 Select mounting screws that fit your equipment rack. Step 3 Attach the bracket flanges to the rack posts. Quick Start Guide: 7000 Series 1RU (Gen1) Data Center Switches... -
Page 12: Four-Post Rack Mount
Figure 3-7 displays proper bracket mount configuration examples. Figure 3-8 on page 9 displays an improper bracket mount configuration example. Figure 3-7: Bracket Mount Examples for Four-Post Rack Mount Quick Start Guide: 7000 Series 1RU (Gen1) Data Center Switches... -
Page 13: Attaching Mounting Brackets To The Chassis
The rails attach to the rear rack posts to support the switch. Before attaching the rails to the rack posts, verify that, when the switch is mounted, the distance between the bracket flanges and rail flanges does not exceed 30 inches, as shown in Figure 3-10 on page Quick Start Guide: 7000 Series 1RU (Gen1) Data Center Switches... -
Page 14: Attaching The Switch To The Rack
Step 4 Verify the distance between the mounting bracket flanges and rail flanges does not exceed 30 inches (see Figure 3-10 on page 10). Step 5 Attach the bracket flanges to the rack posts (Figure 3-13 on page 11). Quick Start Guide: 7000 Series 1RU (Gen1) Data Center Switches... - Page 15 Chapter 3: Mounting the Switch Four-Post Rack Mount Figure 3-12: Inserting the Switch onto the Rails Figure 3-13: Attaching the Switch to the Rack Posts After completing the four-post rack mount, proceed to Chapter Quick Start Guide: 7000 Series 1RU (Gen1) Data Center Switches...
- Page 16 Four-Post Rack Mount Chapter 3: Mounting the Switch Quick Start Guide: 7000 Series 1RU (Gen1) Data Center Switches...
-
Page 17: Chapter: 4 Cabling The Switch
Connect power cords to both power supply inputs. • Power down the Switch: Remove all power cords from the power supply inputs. Important! This equipment must be grounded. Never defeat the ground conductor. Quick Start Guide: 7000 Series 1RU (Gen1) Data Center Switches... -
Page 18: Connecting Serial And Management Cables
10/100/1000 management network. • USB Port: The USB port may be used for software or configuration updates. Figure 4-2: Front Panel Ports Caution Excessive bending can damage interface cables, especially optical cables. Quick Start Guide: 7000 Series 1RU (Gen1) Data Center Switches... -
Page 19: Chapter: 5 Configuring The Switch
Chapter 5 Configuring the Switch Arista fixed configuration switches ship from the factory in Zero Touch Provisioning (ZTP) mode, which configures a switch without user intervention by downloading a startup configuration file or a boot script from a location specified by a DHCP server. - Page 20 When the management port IP address is configured, use this command to access the switch from a host, using the address configured in step 11: ssh admin@192.0.2.8 Refer to the Arista Networks User Manual for complete switch configuration information. Quick Start Guide: 7000 Series 1RU (Gen1) Data Center Switches...
-
Page 21: Appendix: A Status Indicators
System powering up. Green All power supplies and fans are operating normally. Blue The locator function is active. A power supply or fan is missing or in a failed state. Quick Start Guide: 7000 Series 1RU (Gen1) Data Center Switches... -
Page 22: Port Indicators
Figure A-2: Port LEDs Table A-4 Port LED States LED State Status Port link is down. Green Port link is up. Yellow Port is software disabled. Flashing Yellow Port failed diagnostics. Quick Start Guide: 7000 Series 1RU (Gen1) Data Center Switches... -
Page 23: Rear Status Indicators
Table A-6 Power Supply Status LED States LED State Status No AC power to any power supply. Green Power supply operating normally. Amber AC loss to this power supply (in redundant mode). Quick Start Guide: 7000 Series 1RU (Gen1) Data Center Switches... - Page 24 Rear Status Indicators Appendix A: Status Indicators Quick Start Guide: 7000 Series 1RU (Gen1) Data Center Switches...
-
Page 25: Appendix: B Important Safety Instructions
Ne placez pas ce châssis sur un autre appareil. En cas de chute, il pourrait provoquer de graves blessures corporelles et d'importants dommages. Achtung Das Gehäuse nicht auf andere Geräte stellen. Wenn das Gehäuse herunterfällt, besteht Gefahr schwerer Personenverletzungen und Geräteschäden. Quick Start Guide: 7000 Series 1RU (Gen1) Data Center Switches... - Page 26 électrique de l'unité, toutes les connexions d'alimentation doivent être débranchées. Warnung Dieses Gerät kann mehr als eine Stromzufuhr haben. Um sicherzustellen, dass der Einheit kein Strom zugeführt wird, müssen alle Verbindungen entfernt werden. Quick Start Guide: 7000 Series 1RU (Gen1) Data Center Switches...
- Page 27 Ne pas ouvrir. Warnung Enthält keine Teile, die vom Benutzer gewartet werden müssen. Bitte nicht öffnen. Statement 1036 — Any Power cords provided by Arista are intended for use with Arista products only. Warning Any power cords provided by Arista are intended for use with Arista products only.
- Page 28 Warnung Nicht direkt in den Strahl blicken und ihn nicht direkt mit optischen Geräten prüfen. Refer also to the Arista Networks document Safety Information and Translated Safety Warnings available at: http://www.aristanetworks.com/media/system/pdf/7000_Series_Safety_Information.pdf Quick Start Guide: 7000 Series 1RU (Gen1) Data Center Switches...
-
Page 29: Appendix: C Parts List
Table C-1 Rack Mount Parts Quantity Description Installation Usage Mounting Brackets Two-Post and Four-Post Rails Four-Post M4x5 flat head Phillips screws Two-Post and Four-Post C.1.1 Two-Post Rack Mount Figure C-1: Two-Post Rack Mount Parts Quick Start Guide: 7000 Series 1RU (Gen1) Data Center Switches... -
Page 30: Four-Post Rack Mount
Figure C-2: Four-Post Rack Mount Parts Cables Table C-2 Switch Cables Quantity Description Power cables: IEC-320/C13-C14, 13 A, 250 V, 2 meter RJ-45 Patch Panel Cable, 2 meter RJ-45 to DB9 Adapter Cable, 2 meter Quick Start Guide: 7000 Series 1RU (Gen1) Data Center Switches... -
Page 31: Appendix: D Front Panel
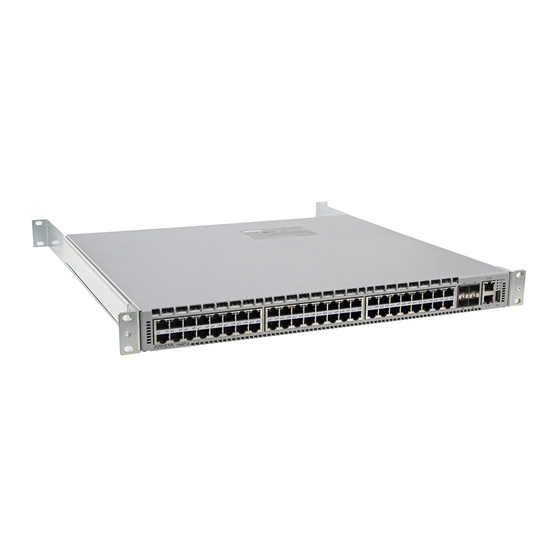
Appendix D Front Panel This appendix displays the front panel of all switches covered by this guide. DCS-7048T-A Figure D-1: DCS-7048T-A Front Panel DCS-7050S-64 Figure D-2: DCS-7050S-64 Front Panel Quick Start Guide: 7000 Series 1RU (Gen1) Data Center Switches... - Page 32 Appendix D: Front Panel DCS-7124SX Figure D-3: DCS-7124SX Front Panel Quick Start Guide: 7000 Series 1RU (Gen1) Data Center Switches...
-
Page 33: Appendix: E Rear Panel
Appendix E Rear Panel This appendix displays the rear panel of all switches covered by this guide. All Models Figure E-1: Rear Panel Quick Start Guide: 7000 Series 1RU (Gen1) Data Center Switches... - Page 34 Appendix E: Rear Panel Quick Start Guide: 7000 Series 1RU (Gen1) Data Center Switches...
Need help?
Do you have a question about the 7000 Series and is the answer not in the manual?
Questions and answers