Table of Contents
Advertisement
Quick Links
Under no circumstances should the towing vehicle manufacturer's recommended vehicle towing capacity be
exceeded. Failure to follow instructions for installation and use may cause property damage, injury or death.
READ ALL INSTRUCTIONS BEFORE STARTING THE INSTALLATION OR USE
Kit Number
66091
66092
66093
Max Gross Weight (GVWR)
Please Visit
https://qr.towingproducts.net
For purchasing the Reese Dual Cam II, Reese's premium Weight Distribution Kit. Please read the
©2022 Horizon Global America Inc.
Installation Instructions
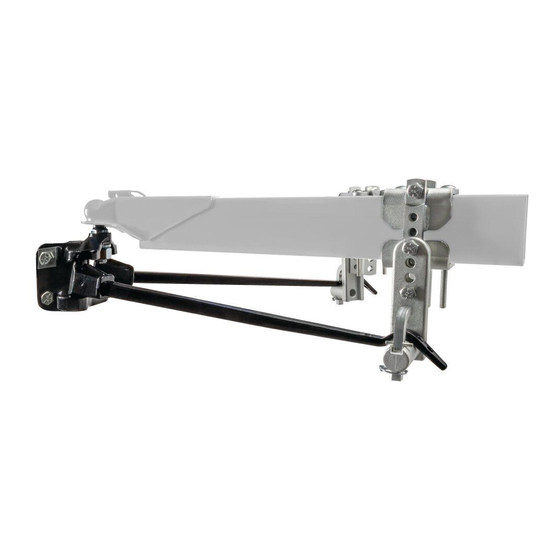
Dual Cam II
WEIGHT DISTRIBUTION
Spring Bar
Weight Rating
600
800
1,200
WEIGHT CARRY (WITHOUT SPRING BARS)
Max Tongue Weight
Shank not included. Please Use
Appropriately Rated Shank.
Or call Technical Service at: 1-800-632-3290
THANK YOU
Instruction manual carefully & follow all Safety Guidelines.
Max Tongue
Weight
600
800
1,200
for the most updated version of the Installation Instructions
Page 1 of 16
Part Number(s):
66091, 66092, 66093
Max Gross
Weight (GVWR)
12,000
12,000
12,000
1,000
10,000
Tools and Equipment Required to Install:
• 1-1/8" socket
• 1-1/8" wrench
• 15/16" socket
• 15/16" wrench
• ¾" Socket
• ¾" Wrench
• Torque wrench capable of going up to 450 ft-lbs
• Tape measure
Scan QR code For Questions
66091N
02/03/2022
Rev. E
Advertisement
Table of Contents

Subscribe to Our Youtube Channel
Related Manuals for Reese Dual Cam II


Summary of Contents for Reese Dual Cam II
- Page 1 Installation Instructions Or call Technical Service at: 1-800-632-3290 THANK YOU For purchasing the Reese Dual Cam II, Reese’s premium Weight Distribution Kit. Please read the Instruction manual carefully & follow all Safety Guidelines. ©2022 Horizon Global America Inc.
-
Page 2: Frequently Asked Questions
The stronger the sway force, the more the Dual Cam II System works to stop it. It’s the difference between active sway and passive sway control where our unique design literally forces the trailer to stay in a straight line behind the tow vehicle. The newly redesigned Dual Cam II system is now easier than ever to install and offers even broader application coverage to work with the most popular trailer frames. -
Page 3: Cam & Bracket Assembly
Installation Instructions Part Number(s): Dual Cam II 66091, 66092, 66093 BALL MOUNT ASSEMBLY CAM & BRACKET ASSEMBLY ©2022 Horizon Global America Inc. Page 3 of 16 66091N 02/03/2022 Rev. E... - Page 4 Installation Instructions Part Number(s): Dual Cam II 66091, 66092, 66093 HEX BOLT: ¾” 10x 5-1/2” . LOCK WASHER: ¾”. ADJUSTABLE WASHERS. BALLMOUNT . QTY -1 QTY -1 QTY -2 QTY -2 SPRING BARS: 600lbs FOR WD KIT No: 66091. QTY-2 SPRING BARS: 800lbs FOR WD KIT No: 66092..
-
Page 5: Required Tools
Installation Instructions Part Number(s): Dual Cam II 66091, 66092, 66093 CONICAL WASHERS: ½” . CARRIAGE BOLT: ½” – 13X 8-1/2” . QTY -4 CONICAL WASHERS: 5/8 . QTY -4 QTY -2 LOCK WASHER: 5/8”. HEX NUT: ½ ” -13. QTY -4 BOLT ON CAM. -
Page 6: Assembly And Installation
(Not provided with the kit). Depending on the towing setup the Hitch Bar can be used in Rise or Drop position Note: Dual Cam II WD Kit does not include Hitch Bar. Reese part number: 3357 ( 2-Inch Hitch Bar) is shown in the picture as reference. - Page 7 Installation Instructions Part Number(s): Dual-Cam II 66091, 66092, 66093 ➢ Slide the Ball mount (1) from the top or bottom of the Hitch Bar, aligning the holes until the top of the Ball is ~1 from the top of coupler ➢...
- Page 8 Installation Instructions Part Number(s): Dual-Cam II 66091, 66092, 66093 ➢ Install Spring Bars (7) into Ball mount (1) by rotating the bars horizontally, slipping the lower trunnion posts into the pockets, then rotating the bars into position parallel to trailer frame rails ➢...
-
Page 9: Installation Instructions
Installation Instructions Part Number(s): Dual-Cam II 66091, 66092, 66093 ➢ For proper bracket positioning, couple the trailer to the truck. Make sure to secure the coupler on to the ball mount with the lock. ➢ Reinstall the Spring Bars ➢ Using Brackets fastener kit . For one side of the trailer, loosely assemble, Upper Cam Weldment (9), inner frame bracket (10) upper bracket hex bolt (11)(4”... - Page 10 Installation Instructions Part Number(s): Dual-Cam II 66091, 66092, 66093 ➢ Slide the lower frame bracket (13) around the inner frame bracket (10), between the outside of the trailer frame and the outer frame bracket as shown in picture. Secure the lower bracket with the appropriate lower bracket bolt (14)(3”...
- Page 11 Installation Instructions Part Number(s): Dual-Cam II 66091, 66092, 66093 ➢ Slide Cam (19) over Upper Cam Weldment (9). Position the bottom of the Cam (19) surface ~ 4” above the top of the spring bar surface. ➢ Bolt the cam in position using the 5/8” bolts (21) and lock washers (20). ➢...
-
Page 12: Part Numbers
Installation Instructions Part Number(s): Dual-Cam II 66091, 66092, 66093 ➢ With the trailer coupled to the Ball mount, use the trailer jack to lower the trailer to remove the load on the spring bars so that the spring bars can be swung on top of the cams without any excessive force. - Page 13 Installation Instructions Part Number(s): Dual-Cam II 66091, 66092, 66093 ➢ LOADED BALL HEIGHT SHOULD NEVER BE GREATER THAN UNCOUPLED BALL HEIGHT. Front wheel overload and loss of rear wheel traction can result, and can lead to unstable handling, reduced braking ability, and a tendency to "jackknife" when turning and braking at the same time.
-
Page 14: Towing Tips
Installation Instructions Part Number(s): Dual-Cam II 66091, 66092, 66093 IMPORTANT INFORMATION ON TOWING Failure to heed warnings and follow instructions may result in serious personal injury or death, vehicle crash, and/or property damage. ➢ Do not modify. ➢ Do not tow one trailer behind another (Tandem Towing). ➢... - Page 15 Installation Instructions Part Number(s): Dual-Cam II 66091, 66092, 66093 IMPORTANT INFORMATION ON TOWING ➢ TRAILER LOADING: Proper trailer loading is important. Heavy items should be placed close to the floor near the trailer axle. The load should be balanced side-to-side and firmly secured to prevent shifting. Tongue weight should be about 10-15 percent of the gross trailer weight for most trailers.
-
Page 16: Product Instructions
Part Number Purchased: Place of Purchase: Product Instructions: Date of Purchase: Part Manufactured Date (located on the ball mount): Dual-Cam II Product Registration: www.reeseprod.com/support/products/registration NOTES: LIMITED LIFETIME WARRANTY 1. Limited Lifetime Warranty (“Warranty”). Horizon Global (“We” or “Us”) warrants to the original consumer purchaser only (“You”) that the product will be free from material defects in both material and workmanship for a period of lifetime of ownership, ordinary wear and tear excepted;...
Need help?
Do you have a question about the Dual Cam II and is the answer not in the manual?
Questions and answers