
Related Manuals for EOS Skiff


Summary of Contents for EOS Skiff
- Page 1 EOS Skiff Sauna Heater with Water Splash Event Device Installation and Operating Instructions Made in Germany Druck-Nr.: 2902 5145 Stand: 06/20...
-
Page 2: Documentation
Additional information about an operating step Cross-reference to a page Read instructions Result of a step Table title Title of figure Revision history Date Version Description 10 Apr. 2021 01.00 First version EN-2 Installation and Operating Instructions - EOS Skiff... -
Page 3: Table Of Contents
Filling rock stores with stones ............EN-33 Setting the water level .................EN-34 Function test....................EN-37 Mounting the external housing............EN-37 4.10 Warning plate..................EN-39 5 Commissioning ....................EN-40 Starting the sauna heater..............EN-40 Commissioning by remote control..........EN-41 Water splash event ................EN-41 EOS Skiff - Installation and Operating Instructions EN-3... - Page 4 6.4.1 Trapezoidal spindle and bevel gears ......EN-51 6.4.2 Chain..................EN-52 Replacing the tubular heating elements........EN-60 Troubleshooting..................EN-66 7 General terms and conditions of service ........... EN-67 8 Disposal ......................EN-70 EN-4 Installation and Operating Instructions - EOS Skiff...
-
Page 5: General Safety Instructions
Indicates a hazardous situation which, if not avoided, could result in minor or moderate injury. NOTICE Notice Indicates a hazardous situation which, if not avoided, will result in damage to the unit. EOS Skiff - Installation and Operating Instructions EN-5... -
Page 6: Mounting And Electrical Installation
76°C. Appropriate protection may need to be installed if required. Risk of burns from During operation, the sauna heater may become hot and, if hot unit touched, could cause burns. Maintain a safe distance. EN-6 Installation and Operating Instructions - EOS Skiff... -
Page 7: Operator Instruction
Inspect the sauna cabin prior to each recommissioning and en- sure that no towels, cleaning agents or other objects are lying on the sauna heater. EOS Skiff - Installation and Operating Instructions EN-7... - Page 8 The rock stores must be immersed to the lowest position on the device to prevent them from rotating. Children must be supervised to ensure they do not play with the unit. EN-8 Installation and Operating Instructions - EOS Skiff...
- Page 9 Bacteria may spread in the water inside the water tank. Replace the water regularly. the water tank Drain the water if it has not been used over an extended period. EOS Skiff - Installation and Operating Instructions EN-9...
- Page 10 Only one sauna light with a maximum of 40 W may be installed with this sauna heater. The cabin must not have a locking device that cannot be un- locked as needed. We recommend magnetic or spring locks. EN-10 Installation and Operating Instructions - EOS Skiff...
-
Page 11: Standards And Regulations
For an overview of the standards that were observed during design and construction of the sauna heaters, please refer to the individual product's technical data sheet that can be downloaded from www.eos-sauna.com. EOS Skiff - Installation and Operating Instructions EN-11... -
Page 12: Identification
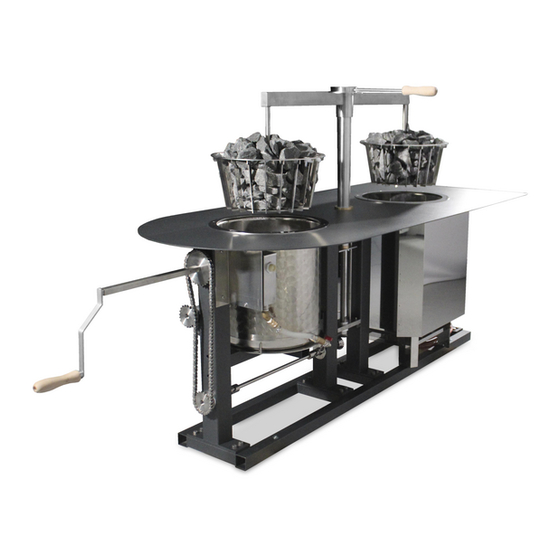
EOS Skiff is an electrically heated sauna heater with a water splash event device. It has two rock stores, which are alternately heated and immersed in a water bath. EOS Skiff can be combined with one or more sauna heaters to add a water splash event to an existing sauna. -
Page 13: Nameplate
EOS-SAUNATECHNIK GmbH, 35759 Driedorf A Unit type and name E Manufacturer B Item number F Heater output C Electrical connection G Manufacturing date D Country of origin H Serial number Nameplate EOS Skiff - Installation and Operating Instructions EN-13... -
Page 14: Scope Of Delivery
A Crank handle extension rod D Installation instructions B Crank handle E Sauna stones (available as an option) C Selector handle F Sauna heater (shape of cover plate may vary) Scope of delivery EN-14 Installation and Operating Instructions - EOS Skiff... - Page 15 Identification Definition of sides A Front C Right side B Back D Left side Definition of sides EOS Skiff - Installation and Operating Instructions EN-15...
-
Page 16: Technical Data
It is suitable for use with commer- cial cabins. Any use beyond this is considered improper use. EOS Skiff is a sauna heater that can be mounted as a free-standing unit or with its left side adjoining a wall. See Definition of sides, EN-15. -
Page 17: Installation
This chapter describes how to install the sauna heater with the mechanical device. The cabin must be constructed based on the design of the Skiff. In particu- lar, access must be provided for maintenance, cleaning and servicing. Prior to installing the unit, air inlets and outlets must be installed in the cabin. -
Page 18: Installation Site
If there is still not enough fresh air to reach the sauna heater, a fan must be installed at the opening outside of the cabin. A Cabin wall C Pedestal B Air inlet Installing the air inlet in the cabin wall EN-18 Installation and Operating Instructions - EOS Skiff... -
Page 19: Connecting Cable
The hole must be large enough to accommodate the cable. EOS Skiff - Installation and Operating Instructions EN-19... -
Page 20: Installing The Temperature Sensor In The Cabin
You should also follow the installation and operating instructions for the control unit. NOTICE Malfunction due to damaged sensor The temperature sensor is protected by its housing. Ensure that the housing and the sensor are not damaged dur- ing operation. EN-20 Installation and Operating Instructions - EOS Skiff... -
Page 21: Preparing The Pedestal
They must be selected to fit the pedestal. The holes must be drilled to fit the screws or anchors selected. A Frame B Pedestal Pedestal holes (mm) Insert anchors into the holes if required. EOS Skiff - Installation and Operating Instructions EN-21... -
Page 22: Mounting The Sauna Heater
Remove the sauna heater from the packaging and leave the sauna heat- er on the pallet. The sauna heater is already assembled apart from the selector handle (B), the crank handle (D) and the extension rod (C). EN-22 Installation and Operating Instructions - EOS Skiff... - Page 23 Align the sauna heater so that the holes in the frame are immediately above the holes in the pedestal. See Pedestal holes (mm), EN-21. Attach the sauna heater to the pedestal with 4 screws. EOS Skiff - Installation and Operating Instructions EN-23...
- Page 24 The crank handle can be brought to the water splash event by trained personnel and taken away afterwards. EN-24 Installation and Operating Instructions - EOS Skiff...
- Page 25 The external housing should not be installed until the electrical lines and water supply line are connected and a function test has been carried out. These steps are described in the chapter Connections, EN-26. EOS Skiff - Installation and Operating Instructions EN-25...
-
Page 26: Connections
If the sauna heater has not been used for a longer period of time, we rec- ommend that you switch on the heater every 6 weeks so that the heating EN-26 Installation and Operating Instructions - EOS Skiff... -
Page 27: Circuit Diagram For Skiff
When used in combination with other sauna heaters, an output controller is additionally required where total output (Skiff + additional sauna heater) is greater than 9 kW. It can be combined with different sauna heaters in many different ways and it is not possible to cover every individual case here. -
Page 28: Establishing An Electrical Connection
Opening the terminal box on the heating coil, EN-29 Connecting the connecting cable to the heating coil, EN-29 Closing the terminal box for the heating coil, EN-30 Tools: Screwdriver EN-28 Installation and Operating Instructions - EOS Skiff... - Page 29 Unscrew the bottom screw on the cover of the terminal box. Remove the cover. Connecting the connecting cable to the heating coil Feed the connecting cable through the opening in the terminal box. EOS Skiff - Installation and Operating Instructions EN-29...
-
Page 30: Heating Period Limitation
Connect the connecting cable as shown in the circuit diagram. Circuit diagram for EOS Skiff, EN-28 Closing the terminal box for the heating coil Place the cover on the terminal box. -
Page 31: Connecting The Water Supply
10 bar. Ensure that the operating pressure for the connected water supply is between 0.3 and 10 bar. Tools and hardware: Spanner Water tap adapter, if needed EOS Skiff - Installation and Operating Instructions EN-31... - Page 32 See Filling rock stores with stones, EN-33. EN-32 Installation and Operating Instructions - EOS Skiff...
-
Page 33: Filling Rock Stores With Stones
There must be enough space between the stones so that convection air can circulate sufficiently between them. Do not fill the rock stores too high with stones to prevent them falling out when the stores are moved. EOS Skiff - Installation and Operating Instructions EN-33... -
Page 34: Setting The Water Level
Setting the water level Attach the crank handle to the extension rod. Close the shut-off valve if necessary. EN-34 Installation and Operating Instructions - EOS Skiff... - Page 35 Align it vertically by hand if needed. Lower the float gauge so that the water level is set to the lowest possible setting the first time the water is poured in. EOS Skiff - Installation and Operating Instructions EN-35...
- Page 36 Adjust the water level by raising the float gauge. The water level should be set so that the water cannot overflow when the rock store is lowered. Place the cover on the water level control. EN-36 Installation and Operating Instructions - EOS Skiff...
-
Page 37: Function Test
If the sauna heater is free-standing, an inspection opening can be made to access the terminal box. The cover of the terminal box can be removed through the opening. The retaining screws on the individual tubular heating elements can then be unscrewed. EOS Skiff - Installation and Operating Instructions EN-37... - Page 38 (1+2 of 4) B Opening to gear mechanism Inspection openings on external housing, front A Openings for heater retaining screws (3+4 of 4) Inspection openings on external housing, back EN-38 Installation and Operating Instructions - EOS Skiff...
-
Page 39: Warning Plate
Consult with a doctor prior to using the sauna if you have a health impairment. Avoid alcohol, drugs, and medications when you are using the sauna. EOS Skiff - Installation and Operating Instructions EN-39... -
Page 40: Commissioning
110°C are achieved directly below the ceil- ing. These temperatures drop to approx. 30–40°C in the cabin along the floor. Therefore, it is not unusual that if the temperature sensor above the EN-40 Installation and Operating Instructions - EOS Skiff... -
Page 41: Commissioning By Remote Control
The water in the tank is not replaced until the next water change. So additive levels in the water increase rapidly, leaving deposits on the sides of the water tank. As a consequence, the water tank needs to be cleaned more often. EOS Skiff - Installation and Operating Instructions EN-41... - Page 42 We recommend that the crank handle be brought to the water splash events by trained personnel and taken away afterwards. Necessary steps: Lifting the rock stores, EN-43 Rotating the rock stores, EN-44 EN-42 Installation and Operating Instructions - EOS Skiff...
-
Page 43: Lifting The Rock Stores
NOTICE Risk of mechanical stress and bending of moving parts. Do not overwind the crank handle. Rotate the crank handle anti-clockwise until the rock stores are com- pletely clear of the tank. EOS Skiff - Installation and Operating Instructions EN-43... - Page 44 180°. Rotate the rock stores: a) Turn the selector handle slowly whilst walking around the sauna heater. b) Stop once the rock stores have swapped position. Rotating the rock stores EN-44 Installation and Operating Instructions - EOS Skiff...
- Page 45 Turn the crank handle clockwise and lower the rock stores until they are completely immersed in the tanks. Correct lowering depth of rock stores Detach the crank handle from the extension rod. EOS Skiff - Installation and Operating Instructions EN-45...
-
Page 46: Maintenance
Wait until the sauna heater is completely cool, if necessary. WARNING! Do not clean the inside of the sauna heater, as this poses a risk of electric shock. Clean the outside of the sauna heater. Use only household cleaning agents. EN-46 Installation and Operating Instructions - EOS Skiff... -
Page 47: Water Tank
Open the inspection opening for the water drainage valve in the exter- nal housing if needed. See Inspection openings on external housing, front, EN-38. EOS Skiff - Installation and Operating Instructions EN-47... - Page 48 If there is no floor drain, you will need to place a container such as a bucket underneath the unit to catch the water. Open the draining valve. Allow the water to drain completely until the water tank is empty. EN-48 Installation and Operating Instructions - EOS Skiff...
-
Page 49: Sauna Stones
Use only natural sauna stones when you refill the rock store. Due to their roughness, they produce a better water splash effect than ceramic sauna stones. The following steps must be completed: Lifting the rock stores, EN-43 EOS Skiff - Installation and Operating Instructions EN-49... -
Page 50: Gear Mechanism
Any dirt or dust that becomes lodged in the tooth flanks or chain links will affect the movement. Regular lubrication reduces wear and tear on the tooth flanks and chain links and improves performance by reducing friction. Use suitable lubricants (e.g. silicone-based). EN-50 Installation and Operating Instructions - EOS Skiff... -
Page 51: Trapezoidal Spindle And Bevel Gears
Ensure that none of the lubricant drips onto the floor. If it does, absorb it immediately using a cloth to avoid a slipping hazard. Close the inspection opening in the external housing if used. EOS Skiff - Installation and Operating Instructions EN-51... -
Page 52: Chain
Ensure that the sauna heater has been disconnected from all power sup- ply lines. a) Switch off the sauna heater. b) Switch off the fuses to disconnect the sauna heater from the mains supply. EN-52 Installation and Operating Instructions - EOS Skiff... -
Page 53: Removing The Cover Plate (Sauna Heater Is Adjoining A Wall
Removing the cover plate (sauna heater is adjoining a wall) Unscrew the 4 screws under the cover disc. Remove selector handle with guide disc. Unscrew lock nut on the cover disc. EOS Skiff - Installation and Operating Instructions EN-53... - Page 54 Maintenance Unscrew 2 screws on the cover disc. Remove the cover disc. Remove crosspiece together with rock stores. Use two people to lift the rock stores if filled with stones. EN-54 Installation and Operating Instructions - EOS Skiff...
- Page 55 Maintenance Remove retaining sleeve for crosspiece. Lift cover plate off guiding pin and remove. EOS Skiff - Installation and Operating Instructions EN-55...
-
Page 56: Removing The Cover Plate (Sauna Heater Is Free-Standing
Wipe off dirt and old lubricant with a cloth. Rotate the crank handle if required to move the chain and reach all chain links. Lubricate the chain. Use suitable synthetic, non-resinous lubricant or silicone oil only. EN-56 Installation and Operating Instructions - EOS Skiff... -
Page 57: Attaching The Cover Plate (Sauna Heater Is Adjoining A Wall
Attaching the cover plate (sauna heater is adjoining a wall) Lift cover plate off guiding pin and place in position. Ensure that the guides on the underside of the cover plate click into place. EOS Skiff - Installation and Operating Instructions EN-57... - Page 58 Lower the retaining sleeve for the crosspiece onto the holding pin. Lower the crosspiece together with the rock stores into the retaining sleeve. Use two people to lift the rock stores if filled with stones. Mount the cover disc. EN-58 Installation and Operating Instructions - EOS Skiff...
- Page 59 Screw in the 2 screws and tighten them. Screw lock nut onto the holding pin and tighten it. Mount guide disc with selector handle attached. Screw in the 4 screws under the cover disc and tighten them. EOS Skiff - Installation and Operating Instructions EN-59...
-
Page 60: Replacing The Tubular Heating Elements
A description is given for both options below. The following steps must be completed: Lifting the rock stores, EN-43 Disconnecting the sauna heater from the power supply, EN-52 EN-60 Installation and Operating Instructions - EOS Skiff... - Page 61 Turn the selector handle and rotate the rock stores until they are at a right angle to the heater. Rotating rock stores until they are at a right angle to the sauna heater EOS Skiff - Installation and Operating Instructions EN-61...
-
Page 62: Accessing The Terminal Box (Sauna Heater Is Adjoining A Wall
The process is identical on both sides. Use two people to lift the heater assembly out of the external housing. Ensure that the connecting cables are not torn or damaged. EN-62 Installation and Operating Instructions - EOS Skiff... -
Page 63: Opening The Terminal Box For The Heating Coil
Maintenance Opening the terminal box for the heating coil Unscrew the bottom screw on the cover of the terminal box. Remove the cover. EOS Skiff - Installation and Operating Instructions EN-63... -
Page 64: Replacing The Tubular Heating Elements
Identify the defective tubular heating element by taking measurements. Unscrew the 2 hexagon nuts of the tubular heating element to be re- placed located in the terminal box. Remove the tubular heating element. Insert the new tubular heating element. EN-64 Installation and Operating Instructions - EOS Skiff... -
Page 65: Closing The Terminal Box For The Heating Coil
Turn the selector handle until the rock stores are over the tank, if neces- sary. Turn the crank handle and lower the rock stores fully into the tanks. See Correct lowering depth of rock stores, EN-45. Remove the crank handle. EOS Skiff - Installation and Operating Instructions EN-65... -
Page 66: Troubleshooting
Check the position of the safety tem- limiter is not optimal. perature limiter and adjust as needed. See 3.2 Installing the temperature sen- sor in the cabin, EN-20. Replace the safety temperature limiter. EN-66 Installation and Operating Instructions - EOS Skiff... -
Page 67: General Terms And Conditions Of Service
In the case of a warranty claim, the manufacturer shall provide spare parts necessary for servicing free of charge. IV. Service visit by the manufacturer Services rendered on site by an employee of the manufacturer must be agreed in advance. EOS Skiff - Installation and Operating Instructions EN-67... - Page 68 Complaints in respect of our products shall be reported to the responsible distributor and shall be handled exclusively by said distributor. EN-68 Installation and Operating Instructions - EOS Skiff...
- Page 69 General terms and conditions of service The manufacturer's General Terms and Conditions of Business, in the ver- sion available at www.eos-sauna.com/agb, shall apply in addition to the foregoing terms and conditions of service. EOS Skiff - Installation and Operating Instructions...
-
Page 70: Disposal
Do not dispose of the unit with household waste. Packaging The packaging of the EOS Skiff can be completely separated for disposal and recycled. The following materials are used in the packaging: Used paper/cardboard ... - Page 71 EOS Skiff - Installation and Operating Instructions EN-71...
- Page 72 Store this address with the Installation and Operating Instructions in a safe place. Please always provide us with nameplate data, such as model, item num- ber and serial number so we can provide fast and efficient support. Date of sale Stamp/retailer signature: © EOS Saunatechnik GmbH - All rights reserved.
Need help?
Do you have a question about the Skiff and is the answer not in the manual?
Questions and answers