
Subscribe to Our Youtube Channel
Related Manuals for Feider Machines FSOR17210


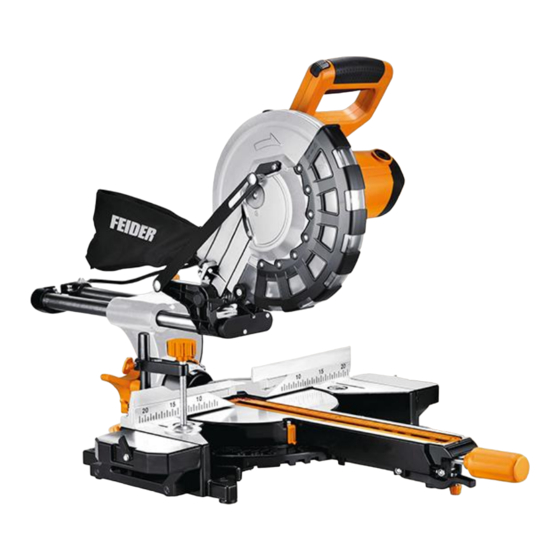
Summary of Contents for Feider Machines FSOR17210
- Page 1 ORIGINAL INSTRUCTIONS >EN MITRE SAW FSOR17210 USER GUIDE CAUTION: Read the instructions before using the machine!
-
Page 2: Table Of Contents
CAUTION: Read the instructions before using the machine! CONTENTS 1. SAFETY INSTRUCTIONS ................3 2. TECHNICAL DATA..................9 3. PRODUCT DESCRIPTION ( . 1-22)............11 4. SCOPE OF DELIVERY ................14 5. INTENDED USE ..................14 6. BEFORE STARTING THE EQUIPMENT ........... 15 7. -
Page 3: Safety Instructions
1. SAFETY INSTRUCTIONS 1.1 GENERAL POWER TOOL SAFETY WARNINGS WARNING Read all safety warnings, instructions, illustrations and specifications provided with this power tool. Failure to follow all instructions listed below may result in electric shock, fire and/or serious injury. Save all warnings and instructions for future reference. The term "power tool"... - Page 4 d) Remove any adjusting key or wrench before turning the power tool on. A wrench or a key left attached to a rotating part of the power tool may result in personal injury. e) Do not overreach. Keep proper footing and balance at all times. This enables better control of the power tool in unexpected situations.
- Page 5 b) Use clamps to support the workpiece whenever possible. If supporting the workpiece by hand, you must always keep your hand at least 100 mm from either side of the saw blade. Do not use this saw to cut pieces that are too small to be securely clamped or held by hand. If your hand is placed too close to the saw blade, there is an increased risk of injury from blade contact.
- Page 6 blade. If confined, i.e. using length stops, the cut-off piece could get wedged against the blade and thrown violently. o) Always use a clamp or a fixture designed to properly support round material such as rods or tubing. Rods have a tendency to roll while being cut, causing the blade to “bite” and pull the work with your hand into the blade.
- Page 7 Periodically check that all fasteners, screws, bolts and nuts are properly tightened. Do not put materials or equipment above the saw to prevent the possibility of an unfortunate fall. Use the saw to cut parts that are insulated from electricity. If you accidentally cut a wire hidden in the workpiece or cut the power cable of the saw, the metal parts of the saw are covered by the current, the power must then be switched off immediately and the plug removed from the saw outlet.
- Page 8 1.4 RESIDUAL RISKS Warning: When using a power tool, basic safety precautions should be taken to avoid the risk of fire, electric shock or injury to persons. Please read the additional safety instructions in this manual carefully and note that even if the power tool is used in accordance with the operating instructions, it is not entirely certain that all residual risk factors will be eliminated.
-
Page 9: Technical Data
Check with your local authority or retailer for recycling advice. Do no touch. Laser radiation - Do not fix the laser beam – Laser product of class II 2. TECHNICAL DATA Model FSOR17210 220-240 V˜ 50 Hz Mains voltage/ frequency Power S1 1700W S6 25% 2000W... - Page 10 Information The declared noise emission value(s) have been measured in accordance with a standard test method and may be used for comparing one tool with another; The declared noise emission value(s) may also be used in a preliminary assessment of exposure.
-
Page 11: Product Description (Fig. 1-22)
3. PRODUCT DESCRIPTION (fig. 1-22) -
Page 14: Scope Of Delivery
1. Handle 22. Set screw 2. ON/OFF switch 23. Locking bolt 3. Lock switch 24. Screw for cutting depth limiting 4. Machine head 25. Stop for cutting depth limiting 5. Moving saw blade guard 26. Adjusting screw (90°) 6. Saw blade 27. -
Page 15: Before Starting The Equipment
The equipment is to be used only for its prescribed purpose. Any other use is deemed to be a case of misuse. The user / operator and not the manufacturer will be liable for any damage or injuries of any kind caused as a result of this. -
Page 16: Attachment And Operation
identical to the mains data. 6.1 CHECKING THE MOVING SAW BLADE GUARD SAFETY DEVICE (5) The saw blade guard protects against accidental contact with the saw blade and from chips flying around. 6.2 CHECK FUNCTION To do so, fold the saw downwards: ... - Page 17 7.3 CROSSCUT 90° AND TURNTABLE 0° (FIG. 1/2/7) In the case of cutting widths up to approx. 100 mm it is possible to fix the traction function of the saw with the set screw (20) in the rear position. In this position the machine can be operated in cross cutting mode. If the cutting width is over 100 mm then it is necessary to ensure that the set screw (20) is loose and the machine head (4) can move.
- Page 18 7.5 PRECISION ADJUSTMENT OF THE STOP FOR MITRE CUT 45° (FIG.1/2/5/9/10) No stop angle included. Lower the machine head (4) and secure it using the locking bolt (23). Fix the rotary table (14) in the 0° position. Attention! For mitre cuts (inclined saw head), the left side of the moveable stop rails (16a) must be fixed in the outer position.
- Page 19 Open the set screw (16b) for the moveable stop rail (16a) and push the moveable stop rail (16a) outwards. The moveable stop rail (16a) must be fixed far enough in front of the innermost position that the distance between the stop rail (16a) and the saw blade (6) amounts to a minimum of 8 mm.
-
Page 20: Transport (Fig. 1, 2)
Turn the flange screw (28) right out and remove the outer flange (29). Take the blade (6) off the inner flange (31) and pull out downwards. Carefully clean the flange screw (28), outer flange (29) and inner flange (32). ... -
Page 21: Maintenance
9. MAINTENANCE Warning! Prior to any adjustment, maintenance or service work disconnect the mains power plug! 9.1 GENERAL MAINTENANCE MEASURES Wipe chips and dust off the machine from time to time using a cloth. In order to extend the service life of the tool, oil the rotary parts once monthly. -
Page 22: Electrical Connection
11. ELECTRICAL CONNECTION The electrical motor installed is connected and ready for operation. The connection complies with the applicable VDE and DIN provisions. The customer ‘s mains connection as well as the extension cable used must also comply with these regulations. -
Page 23: Disposal And Recycling
12. DISPOSAL AND RECYCLING The equipment is supplied in packaging to prevent it from being damaged in transit. The raw materials in this packaging can be reused or recycled. The equipment and its accessories are made of various types of material, such as metal and plastic. Defective components must be disposed of as special waste. Ask your dealer or your local council. -
Page 24: Troubleshooting
13. TROUBLESHOOTING Fault Possible cause Remedy Motor does not work Motor, cable or plug defective, fuses Arrange for inspection of the machine by burnt a specialist. Never repair the motor yourself. Danger! Check fuses and replace as necessary The motor starts up Voltage too low, coils damaged, Contact the utility provider to check the slowly and does not... -
Page 25: Declaration Of Conformity
Phone: +33 (0) 5.34.508.508 Fax: +33(0) 5.34.508.509 Declares that the machinery designated below: MITER SAW FSOR17210 Serial number: 20210843449-20210843598 Complies with the provisions of the Directive “Machinery” 2006/42/EC and national laws transposing it: Also complies with the following European directives:... -
Page 26: Warranty
15. WARRANTY The manufacturer guarantees the product against defects in material and workmanship for a period of 2 years from the date of the original purchase. The warranty only applies if the product is for household use. The warranty does not cover breakdowns due to normal wear and tear. The manufacturer agrees to replace parts identified as defective by the designated distributor. -
Page 27: Product Failure
16. PRODUCT FAILURE WHAT TO DO IF MY MACHINE BREAKS DOWN? If you bought your product in a store: a) Empty the fuel tank if your product has one. b) Make sure that your machine is complete with all accessories supplied, and clean! If this is not the case, the repairer will refuse the machine. -
Page 28: Warranty Exclusions
17. WARRANTY EXCLUSIONS THE WARRANTY DOES NOT COVER: • Start-up and setting up of the product. • Damage resulting from normal wear and tear of the product. • Damage resulting from improper use of the product. • Damage resulting from assembly or start-up not in accordance with the user manual. •... - Page 29 BUILDER SAS 32, rue Aristide Bergès - ZI 31270 Cugnaux – France Made in PRC 2021...
Need help?
Do you have a question about the FSOR17210 and is the answer not in the manual?
Questions and answers