Table of Contents
Advertisement
Quick Links
Advertisement
Table of Contents

Related Manuals for XYZ Printing PartPro300 xT


Summary of Contents for XYZ Printing PartPro300 xT
- Page 1 ENGLISH PartPro300 xT USER MANUAL PartPro300 xT...
- Page 2 Filament storage box. This box can mount up to 2 filament spool (3Kg) at the same time and also print dual color 3D object simultaneously. Trademark All trademarks and register trademarks are the property of their respective owners. Copyright © 2019 XYZprinting, Inc. All Rights Reserved. Introduction PartPro300 xT...
-
Page 3: Table Of Contents
9.2 Post-sales maintenance and services - - - - - - - - - - - - - - - - - - - - - - - - - - - - - - - - - - - - - - - - - - - - - - - - - - - - - - 32 Index PartPro300 xT... -
Page 4: Introduction
• For best printing quality, filament should preferably be stored at temperatures between 10 ~ 40 °C / 50 ~ 104 °F. If a different storage temperature is printed on the label on the filament package, please adhere to the recommended conditions on the label. • Please always refer to the updated version of PartPro300 xT user manual: https://pro.xyzprinting.com/support/en-US/Help PartPro300 xT... -
Page 5: Important Safety Precautions
“High temperature at print bed, Do not touch when printer is running”. This symbol indicates to not put hands under moving parts. “Keep hands clear of moving parts. Turn power off before servicing”. This symbol indicates that print nozzle is at high temperature. PartPro300 xT... -
Page 6: Product Overview
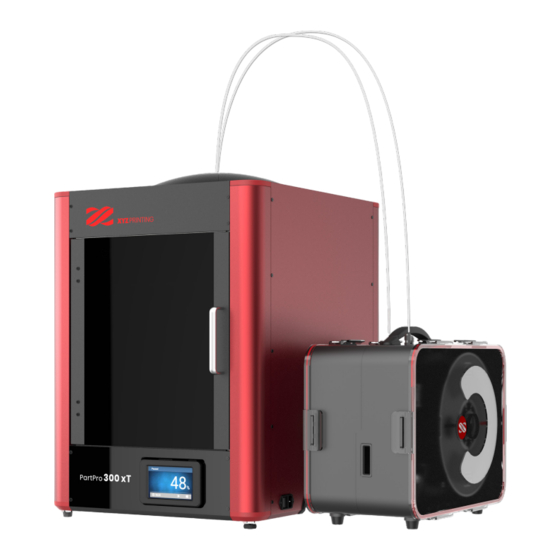
2. PRODUCT OVERVIEW 2.1 Appearance Nozzle extruder Printed monitor camera Print bed Heated chamber Power switch 5” color touch panel D-SUB port USB socket Power inlet USB port RJ45 internet port PartPro300 xT... -
Page 7: Features
Support 3rd Party Filament Filament Diameter 1.75 mm ABS / PLA / TPEE / Water Solube / Tough PLA / PETG / Nylon / Printing Material *XYZ Carbon Fiber/ *Metallic PLA (*Need to use with Harden Steel Nozzle) PartPro300 xT... - Page 8 Printer Weight 41.6 kg Net Filament Box Weight 4.4 kg Printer Shipping Dimension (WxDxH) 700 x 710 x 906 mm Printer Shipping Weight 58.6 kg Box Shipping Dimensions 607 x 335 x 475 mm Box Shipping Weight 8 kg PartPro300 xT...
-
Page 9: Accessories Checklist
Gear cleaning brush D-SUB cable Y coupling Composite cleaning FFC connector lubricant (40g/1.41oz) Dual print nozzle Hydrocarbon lubricant (Copper nozzle) (40g/1.41oz) Single print nozzle (Hardened steel Dust free cloth nozzle) Print Bed Gauge Top cover Print Bed Sheet Quick guide PartPro300 xT... -
Page 10: Hardware Installation
③ After taking out the accessories, then remove the outer carton box. ④ Then, take out the print head carton box and filament carton box. Caution: DO NOT remove side box first to avoid filament carton falling and becoming damaged. PartPro300 xT... - Page 11 ⑥ Remove the tape, cable tie, inner packaging, all protective mask on the glass. ⑦ Check that the printer sits on the table stably. If the printer shakes, adjust the leg knob height until the printer is balanced (only front right leg has knob). PartPro300 xT...
-
Page 12: Print Nozzle And Filament Installation
Insert the filament to the guide tube, until filament contact the sensor nozzle. It will automatically feed to the printer through the guide tube. Note: Use 600g & 1kg filament reel in filament box may have risk of tangle. Please proceed with caution. PartPro300 xT... -
Page 13: Y Coupling Using
(e.g. spool 2), if spool 1 is done. • Spool 1 and spool 2 must use the same material. • Straight the filament before loading. • For single print nozzle, the filament head must cut in “flat head” as following. PartPro300 xT... -
Page 14: Print Bed Sheet Using
① Use the enclosed cable to connect both printer and filament storage box. ② Connect the USB cable between USB socket and USB port of notebook. ③ Plug in the power cord and turn on the power to display the screen. The installation is done. ① ② ③ PartPro300 xT... -
Page 15: Frist Use
The user can use the Wi-Fi dongle for network settings. If you skip the network setting, you can directly go to the next stage and the system won’t remind you again. ① Press “START” to start the network setting. ② Select your Netwok and press “YES” for connection. ③ Key in the password for connection and press “OK” once Wi-Fi connected. PartPro300 xT... -
Page 16: Loading Filament
② To skip the quick tour, press "PROCEED" to view the printer heating status. Heated chamber Print bed Nozzle ③ Start Printing & Printing finish, press “OK”. Remaining time Print progress percentage File image Stop Filament length Pause ④ After printing is complete, remove the object from the print bed. PartPro300 xT... -
Page 17: Function Operation
Settings 5.1 USB Menu ① Check if the USB drive is plugged to the machine. ② Click USB printing menu in the main screen & select the file (.3cp) to print. 5.2 Filament Installation A. Single nozzle “Filament”>”Load” PartPro300 xT... -
Page 18: Print Bed
Once the measurement is completed, the motor under the print bed will automatically adjust the print bed level. After the calibration is successfully completed, press “OK”. Note: Print bed calibration is required each time the nozzle is replaced. PartPro300 xT... - Page 19 Press different arrow key to move the print head. Return to the home point. Always return to the home point prior to any movement in any direction. Move in the X axle direct. Move in the Y axle direction. Move in the Z axle direction PartPro300 xT...
-
Page 20: Print Head
⑦ Press and hold the latch on two sides to unload the filament, and gently press the spring surrounding the feed port to remove the guide tube. • Installing the module ⑧ Please refers 3.2 Print Nozzle and Filament Installation ① ~ ③ . PartPro300 xT... -
Page 21: Other Settings
③ Look for the aligned dual material X and Y lines on the calibration. ④ Press buttons to select the matching number on the display. • Manual Calibration Select “Manual” for subtle calibration of X/Y axis. 5.5 Other Settings PartPro300 xT... - Page 22 E. Language The PP300xT provides eight display languages, including traditional and simplified Chinese, English, Japanese, German, Italian, Spanish and French. F.Reset Reset to factory default settings. G. Model version Please make sure you are using the latest model version. PartPro300 xT...
-
Page 23: Control Unit Installation (Software)
Once the installation is finished, the program will start the program as following. Make sure the computer has connected with the printer. These functions introduce as below: New File Import File Save File Clone Object Delete Setting About XYZpirnting Print History ① Press the arrow key to search PartPro300xT and click on it. PartPro300 xT... - Page 24 Move Rotate Scale Snap Landing ④ When you’re done adjusting the print parameters you need, click “PREPARE”. ⑤ After preparing, please check if the object is a complete model. After the confirmation, you can click “PRINT” or “SAVE”. PartPro300 xT...
-
Page 25: Dual Color/Filament Model Print
6.3 Dual color/filament model print To print a dual color/filament model from Partpro300 xT, it is necessary to import 2 separated .stl objects that made up a com plete model. By default, all .stl files will be printed from extruder 1. You may assign one object to be printed from extruder 2. -
Page 26: Camera Function
③ Click “Open Image” icon to display the current printing object image. Note: The image will update every 5 sec. For more detailed XYZprint operation information, please refer to XYZprintinig official website to download XYZprint User Manual: https://www.xyzprinting.com/support/ PartPro300 xT... -
Page 27: Laser Engraver(Optional)
A. Installing the laser engraver module. ① Connect the bus (make sure it clicks into place). ② Align the opposing angles for two sides of the laser engraver module, push forward to form a snap-fit into the slot to complete proper installation. PartPro300 xT... -
Page 28: Laser Engraver Software Function
RESUME: After pausing, the user may select RESUME to continue the laser engraving job. CANCEL: Select CANCEL to cancel the laser engraving project. Confirm the cancellation to cancel the laser engraving job. For more detailed XYZengraver operation information, please refer to XYZprintinig official website to download XYZengraver User Manual: https://www.xyzprinting.com/support/ PartPro300 xT... -
Page 29: Maintenance
Feed Hole Cleaning Wire Wire Brush Gear Cleaning Brush ① Select Print Head, and press clean nozzle icon. ② Use the brush to wipe the print nozzle thoroughly. ③ Use gear cleaning brush to clean the quick coupling. PartPro300 xT... -
Page 30: For Serious Dirt Cleaning
⑦ Lower the temperature to 90 degrees (for PLA), and once the temperature has been reached, pull the filament out quickly. ⑧ Check the color and shape of the tip of the filament, and repeat step ③ and ④ until the filament comes out without any residue and has a cone-like shape. PartPro300 xT... -
Page 31: Clean Out Filament Feeding Gear
Also, debris can be carried to the print head, where it will burn. To avoid this, clear out debris from the filament guide tube by removing both ends from the printer, putting a small piece of paper towel in the tube, and pushing the paper towel through, by hand, with a piece of filament. Alternatively, the filament guide tube can be replaced. PartPro300 xT... -
Page 32: Clean Up Glass Plate
Internal communication error -- 0 0 5 0 Reboot the printer. memory error Replace the print head. 0 0 5 2 Print head memory error Print head not match Replace the print head. (Jr.Pro 40W, other 35W) 0 0 5 4 PartPro300 xT... -
Page 33: Post-Sales Maintenance And Services
20 cm from all persons and must not be co-located or operating in conjunction with any other antenna or transmitter. End-users and installers must be provided with antenna installation instructions and consider removing the no-collocation statement. PartPro300 xT...
Need help?
Do you have a question about the PartPro300 xT and is the answer not in the manual?
Questions and answers