Table of Contents
Advertisement
Quick Links
Advertisement
Table of Contents

Subscribe to Our Youtube Channel
Related Manuals for XYZ Printing PartPro120 xP


Summary of Contents for XYZ Printing PartPro120 xP
- Page 1 PartPro120 xP 3D Printer (Model No. ) Operation Manual Version 2.0...
- Page 2 Version 1.0 PartPro120 xP Operation Manual Please always refer to the updated version of PartPro120 xP operation manual https://pro.xyzprinting.com/ For safe and correct use, be sure to read the Safety Precautions before using the machine.
- Page 3 Version 1.0 PartPro120 xP Operation Manual Document History Date Description Version Editor 2019-12 Initial Release Andy Yan...
-
Page 4: Introduction
DISCLAIMER This manual is designed for users to understand how to use the PartPro120 xP printer in a safe manner. Please read through all sections especially the safety guide carefully before unpacking, operating, replacing, and removing any part of this product. -
Page 5: Table Of Contents
Version 1.0 PartPro120 xP Operation Manual TABLE OF CONTENTS INTRODUCTION ............................... 2 DISCLAIMER ..............................2 INTENDED USE ................................2 LIMITATION OF WARRANTY AND LIABILITY......................2 TRADEMARK ................................2 SAFETY AND COMPLIANCE ..........................1 IMPORTANT SAFETY PRECAUTIONS ......................... 1 SAFETY AND REGULATION ............................2 HANDLING AND OPERATING PRECAUTIONS ...................... - Page 6 Version 1.0 PartPro120 xP Operation Manual Start printing from the history..........................14 Managing the printing history ..........................14 RESIN MENU ................................15 Structure of the RESIN menu ..........................15 Switching on/off auto-refilling ..........................15 SETTINGS MENU ..............................16 Structure of the SETTINGS menu ........................16 Platform ................................
- Page 7 Version 1.0 PartPro120 xP Operation Manual Adding supports automatically ........................... 32 Editing supports manually ..........................33 Cone supports ..............................34 Tree Supports ..............................35 CONVERTING TO THE PRODUCTION FILES ......................37 Exporting the files ............................... 37 Starting a printing task............................38 SAVING MODELS ON THE WORKSPACE ........................
-
Page 8: Safety And Compliance
Version 1.0 PartPro120 xP Operation Manual SAFETY AND COMPLIANCE IMPORTANT SAFETY PRECAUTIONS Please read through all sections especially the safety guide carefully before unpacking, assembling, operating, replacing, and removing any part of this product. Please also comply with the instructions of relevant safety precautions. -
Page 9: Safety And Regulation
Please carefully read this notice, all safety precautions, and comply with safety rules when using, operating, unboxing this product, replacing or removing any components, or maintaining this product. For more information related to the PartPro120 xP 3D Printer or XYZprinting, visit the official website (https://pro.xyzprinting.com/) or contact a sales representative. -
Page 10: Resin Care
Version 1.0 PartPro120 xP Operation Manual RESIN CARE • Wear proper protective equipment, avoid raw material contact and vapor inhalation. • Chemical-resistant gloves should be worn when you make contact with resin. • Resin should preferably be stored at temperatures between 10-32°C (50-89.6°F), localized heat sources (i.e., drum or band heaters), oxidizing conditions, freezing conditions, direct sunlight,... -
Page 11: Unpacking And Installations
Version 1.0 PartPro120 xP Operation Manual 1. UNPACKING AND INSTALLATIONS UNPACKING Unpack the product follow instructions closely. Damage to parts may result if the procedure is not followed. Keep original packaging material in the event of sending the unit for service or repair. -
Page 12: Hardware Installation
Version 1.0 PartPro120 xP Operation Manual Cleaning Box HARDWARE INSTALLATION 1. Install resin tank to the printer chamber. Push the resin tank to fix position, then fasten the left and right screw Resin Tank Fasten left and right screw Following open the quick release lever, install the platform. - Page 13 Version 1.0 PartPro120 xP Operation Manual 5. Then, lock the quick release lever. To install the Resin Bottle Shake the resin bottle well to ensure even color. For the material with dense pigment, you may need to shake the bottle for about 10 seconds.
-
Page 14: Software Installation
Version 1.0 PartPro120 xP Operation Manual SOFTWARE INSTALLATION “XYZprint AM ” should be installed on the service PC for preparing the files for production. To install the software: 1. Double-click on the installer 2. Click [Next >] to initial the 3. -
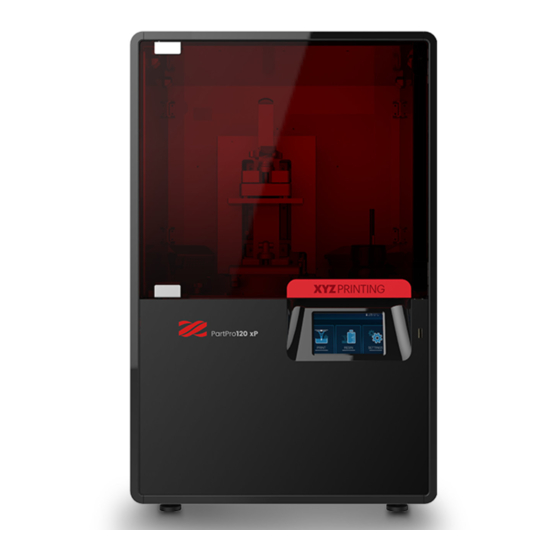
Page 15: Product Overview
Version 1.0 PartPro120 xP Operation Manual 2. PRODUCT OVERVIEW APPEARANCE 1. Front View - Exterior Component Description Open this cover to take out printed model or perform regular maintenance. Front Cover Keep the front cover securely closed during printing. Contains a screen and keys for machine Touch Panel control. -
Page 16: Accessories List
Version 1.0 PartPro120 xP Operation Manual ACCESSORIES LIST Item Name Image Quantity Description Resin gets cured on the platform when exposed to LED Platform light. Scraper For removing printed parts from the platform. Gloves should be worn to avoid direct contacting with Gloves the printing materials. -
Page 17: Specifications
Version 1.0 PartPro120 xP Operation Manual SPECIFICATIONS General Technology DLP Technology Maximum Build Size (WxDxH) 114 x 64 x 100mm Light Source UV LED, 405nm XY-axis Resolution 60 um Z-axis Resolution 25um / 50um / 100 um Supports Generation Auto/Manually Generated... -
Page 18: User Interface
Version 1.0 PartPro120 xP Operation Manual USER INTERFACE The printing system is operated using the touch panel on the printer and the software “XYZprint AM ”. You will need to switch between the different interfaces based on your operation. Refer to below table for the functions available on each user interface:... -
Page 19: Xyzprint Am Uv
Version 1.0 PartPro120 xP Operation Manual An icon will be shown here when the wireless or Ethernet connection is enabled. The icon also indicates the status of the connection. The icon is also the shortcut to connectivity settings. Tap the icon to jump to the B Network Connectivity setup page. -
Page 20: Operating The Printer
Version 1.0 PartPro120 xP Operation Manual 3. OPERATING THE PRINTER This chapter introduces all options on the printer screen. PRINT MENU To print a new file, the file should be transmitted from the software “XYZprint AM ”. Using the touch screen on the printer, you can initial the production with the last 10 print jobs from the print history. -
Page 21: Start Printing From The History
Version 1.0 PartPro120 xP Operation Manual Start printing from the history 1. From the main menu, go to [PRINT], tap a history entry from the list view or thumbnail view. [List View] [Thumbnail View] Tap to enlarge the thumbview. Model_01 2. -
Page 22: Resin Menu
Version 1.0 PartPro120 xP Operation Manual RESIN MENU Resin menu provides detailed information on the resin cartridge, including the material type and resin model and the switch of auto-filling function. When the material level is running low, a warning sign will be shown on the RESIN icon. -
Page 23: Settings Menu
Version 1.0 PartPro120 xP Operation Manual SETTINGS MENU The menu provides the control of platform movement, brightness and timeout of the screen, sound volume, display language, connectivity settings, and show the system information. Tap on [SETTINGS] in the top menu to go to system settings. -
Page 24: General
Version 1.0 PartPro120 xP Operation Manual Wait while the platform is moving., and press to exit the function. General Adjusting the display brightness and timeout Screen backlight enhances the readability of the content of the display. You may adjust the brightness and screen timeout based on your preferences. -
Page 25: Changing The Display Language
Version 1.0 PartPro120 xP Operation Manual Changing the display language The display language is selected during initial setup. The setting can be changed anytime with the following procedure. From the main menu, go to [SETTINGS] > [General], and select [Language]. -
Page 26: Connecting To A Hidden Wi-Fi Network
Version 1.0 PartPro120 xP Operation Manual 2. Tap a WiFi SSID from the list of available Wi-Fi networks. To rescan available network, tap . Enter the password for the secure Wi-Fi network, and tap to join the network. Wait while the system is connecting to the selected Wi-Fi network. -
Page 27: Structure Of The Ethernet Icon
Version 1.0 PartPro120 xP Operation Manual 4. Enter the network password in the [Password] field, and tap to join the network. ***| XYZ-0001 XYZ-0001 WPA/WPA2 PSK WPA/WPA2 PSK ********* 5. Connection is set up when the hidden network is added to the list with a tick appears at the left side. Tap to exit the function. -
Page 28: Manually Configuring Ethernet Network
Version 1.0 PartPro120 xP Operation Manual 3. The printer will obtain an IP address automatically. Tap [Ethernet] to view the IP settings. When IP settings are available in this page, the network is ready. Manually configuring Ethernet network The printer is set to obtain an IP address automatically by default. However, if you are using the printer on a network without DHCP, or want to prevent the printer's IP address from changing, you may specify IP address for the printer. -
Page 29: Viewing The Ip Address
Version 1.0 PartPro120 xP Operation Manual Viewing the IP address In the network configuration with several printers, you may identify the printer with its serial number and IP address. The printer is assigned an IP address when connected to the wireless and Ethernet network. -
Page 30: Pausing The Printing
Version 1.0 PartPro120 xP Operation Manual Item Description Printing progress The printing progress is displayed in percentage with a progress bar. The elapsed time is the amount of time that passes from the beginning of the Elapsed time printing. Slicing settings are the options selected during exporting the file with XYZprint... -
Page 31: Switching Off Auto-Refilling
Version 1.0 PartPro120 xP Operation Manual 2. Tap [CONFIRM] again when the system has finished the process. Clean up the model on the platform and tap [CONFIRM] to close the message. Switching off auto-refilling The setting of auto-refilling can be changed during printing. -
Page 32: Operating Xyzprint Am
Version 1.0 PartPro120 xP Operation Manual 4. OPERATING XYZprint AM Launch XYZprint AM by double-clicking on the desktop icon on the Windows desktop or select XYZprint from the list of program on your computer. SOFTWARE INTERFACE The software illustrates the printing environment on the printer. An empty workspace is presented with grids for showing the display unit in centimeter or inch. -
Page 33: Keyboard Shortcuts And Mouse Controls
Version 1.0 PartPro120 xP Operation Manual Function Description When Enabled Top Bar Import models in .stl/.3ws/.3wn format to the workspace. Import Slice the models on the workspace and export to .3wn Export format. Save the models on the workspace as .stl or .3ws file. -
Page 34: Connecting To The Printer
Version 1.0 PartPro120 xP Operation Manual CONNECTING TO THE PRINTER After plugging in the USB cable between the printer and the computer or completing the configuration of wireless or Ethernet network on the printer, initial the connection with the following procedures: 1. -
Page 35: Color Display Of Objects
Version 1.0 PartPro120 xP Operation Manual COLOR DISPLAY OF OBJECTS The color of the printed parts is depending on the material installed, and is not related to the display color in the software. Layout Will Be Changed Function Remain The Same The color displayed in the software allows for easy distinguish of the status of objects on the workspace. - Page 36 To prepare files for this printer, select [PartPro120 xP] from the drop- down list in the [Printer] tab. Models on the workspace will be removed after the printer type is changed.
-
Page 37: Preparing The Files
Version 1.0 PartPro120 xP Operation Manual PREPARING THE FILES Importing Models to the Workspace Models to be printed should be loaded on the workspace for preparation. To load .stl, .3ws, or .3wn file to the workspace for printing: 1. Click [Import] icon. -
Page 38: Rotating The Models
Version 1.0 PartPro120 xP Operation Manual Rotating the models The orientation of models may impact the printing quality, successful rate and printing time. To ensure a successful print, you may need to rotate the models and add supports to overhangs based on the features of each model. -
Page 39: Adding Supports Automatically
Version 1.0 PartPro120 xP Operation Manual Adding supports automatically Support structure is required under overhangs. It prevents the falling for gravity and the deforming due to the peeling force during printing, and increases adhesion of the model to the platform. -
Page 40: Editing Supports Manually
Version 1.0 PartPro120 xP Operation Manual Editing supports manually You can build the supports from scratch with the manual mode, or use it to adjust the supports generated in the Auto mode. In Auto Mode, all supports are in the same size at the contact points. However, the size of the contact can be set to different based on the features of the object. -
Page 41: Cone Supports
Version 1.0 PartPro120 xP Operation Manual Cone supports Cone support is thicker than the original support. It is ideal for adding sprues at the base of castable prints. When using cone support as the sprues, simply leave them on the prints for casting. -
Page 42: Tree Supports
Version 1.0 PartPro120 xP Operation Manual 4. Adjust the contact area of the cone support if necessary. To adjust the contact area of the cone support, go back to the function menu “Support” > “Cone”, and select the button “Contact Area”. - Page 43 Version 1.0 PartPro120 xP Operation Manual To add tree supports 1. Select one or more object on the workspace and click 2. Select [Cone]. [Support] icon. Layout Will Be Changed Function Remain The Same 3. Set up the trunk. Click on the desired location on the platform to add a trunk. To move a trunk, click and drag on the trunk. To delete a trunk, click on it directly.
-
Page 44: Converting To The Production Files
Version 1.0 PartPro120 xP Operation Manual 5. Click “Generate” after setting up all marks. 6. Adjust the contact area of the branches if necessary. To adjust the contact area of the branches, go back to the function menu “Support” > “Tree”, and select the button “Contact Area”. -
Page 45: Starting A Printing Task
It is advised to include color setting in filename for instant To Printer: Printing parameters vary from printer models. distinction in the future. Select [PartPro120 xP] for using this printer. Please note that printing will be stopped if the selected ... -
Page 46: Switching The View Of The Workspace
Version 1.0 PartPro120 xP Operation Manual To save models on the workspace: 3. Click [Save] icon. 4. Select your target folder, input a file name in the field for [File name], choose the type of format you want to save as from the drop-down list, and click [Save]. -
Page 47: Viewing The Information Of The Models
Version 1.0 PartPro120 xP Operation Manual VIEWING THE INFORMATION OF THE MODELS You may want to check the information of the models imported to the workspace. The software provides the information on file name, file format and the position and dimensions of each selected model. - Page 48 Version 1.0 PartPro120 xP Operation Manual This equipment has been tested and found to comply with the limits for a Class B digital device, pursuant to part 15 of the FCC rules. These limits are designed to provide reasonable protection against harmful interference in a residential installation.
Need help?
Do you have a question about the PartPro120 xP and is the answer not in the manual?
Questions and answers