Table of Contents
Advertisement
Available languages
Available languages
Quick Links
Quick guide
THANK YOU FOR BUYING A HOTPOINT
ARISTON PRODUCT
In order to receive a more complete
assistance, please register your product on
www . hotpoint . eu/register
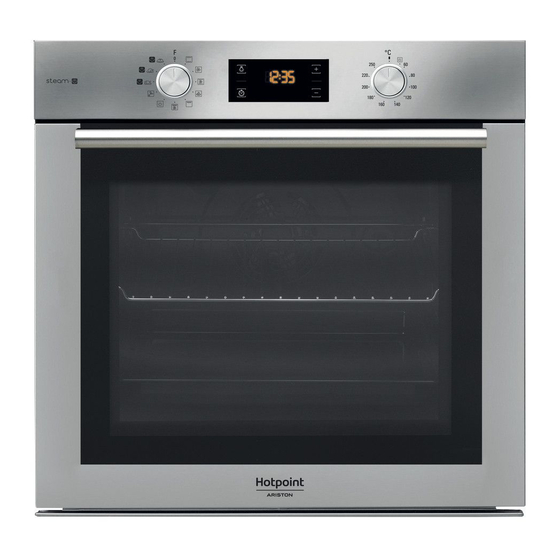
CONTROL PANEL DESCRIPTION
1
1. SELECTION KNOB
For switching the oven on by selecting
a function. Turn to the
switch the oven off.
2. LIGHT
With the oven switched on, press
to turn the oven compartment lamp on
or off.
SLIDING SHELVES AND SHELF GUIDES
Before using the oven remove the protective tape [a] and then
remove the protective foil [b] from the sliding runners.
REMOVING THE SLIDING RUNNERS [c]
Pull the lower part of the sliding runner to uncouple the lower
hooks (1) and pull the the sliding runners upwards, removing
them from the upper hooks (2).
REFITTING THE SLIDING RUNNERS [d]
Hook the upper hooks on the shelf guides (1) then press the
lower part of the sliding runners against the shelf guides, until
the lower hooks are clicking (2).
FIRST TIME USE
1. SETTING THE TIME
You will need to set the time when you switch on the
appliance for the first time: Press
two digits for the hour start flashing on the display.
Use
or
to set the hour and press
two digits for the minutes will start flashing. Use
set the minutes and press
2
3
3. SETTING THE TIME
For accessing the cooking time settings,
position to
delayed start and timer.
For displaying the time when the oven
is off.
4. DISPLAY
until the
icon and the
to confirm. The
to confirm.
Before using the appliance carefully read the Safety
Instruction.
4
2
1
REMOVING AND REFITTING THE SHELF GUIDES
1. To remove the shelf guides, firmly grip the external part of
the guide, and pull it towards you to extract the support and
the two internal pins from the lodging.
2. To reposition the shelf guides, position them near the cavity
and initially insert the two pins into their lodgings. Next,
position the external part near its lodging, insert the support,
and firmly press towards the wall of the cavity to make sure
the shelf guide is properly secured.
Please note: When the
lengthy power outages, you will need to reset the time.
2. SET THE POWER CONSUMPTION
By default the oven is programmed to work at a power
higher than 3 kW (Hi): To operate the oven at a power that is
compatible with a domestic power supply less than 2,9 kW
(Lo), you will need to change the settings.
To go to the change menu, turn the selection knob to
then turn it back to
or
to
5
5. ADJUSTMENT BUTTONS
For changing the cooking time settings.
6. THERMOSTAT KNOB
Turn to select the temperature you
require when activating manual
functions.
[c]
icon is flashing, for example following
.
EN
6
1
2
[d]
,
Advertisement
Table of Contents

Subscribe to Our Youtube Channel
Related Manuals for Hotpoint Ariston FA4S 844 P IX HA


Summary of Contents for Hotpoint Ariston FA4S 844 P IX HA
- Page 1 Quick guide THANK YOU FOR BUYING A HOTPOINT ARISTON PRODUCT Before using the appliance carefully read the Safety In order to receive a more complete Instruction. assistance, please register your product on www . hotpoint . eu/register CONTROL PANEL DESCRIPTION 1.
-
Page 2: Functions & Daily Use
3. HEAT THE OVEN Press and hold for five seconds immediately afterwards. A new oven may release odours that have been left behind during manufacturing: this is completely normal. Before starting to cook food, we therefore recommend heating the oven with it empty in order to remove any possible odours. - Page 3 END OF COOKING After cooking and with the function deactivated, the icon may continue to remain visible on the display even after the An audible signal will sound and the display will indicate that cooling fan has switched off to indicate that there is residual the function has finished.
-
Page 4: Cooking Table
COOKING TABLE DURATION LEVEL AND RECIPE FUNCTION PREHEAT TEMPERATURE (°C) (MIN) ACCESSORIES 30 - 50 Leavened cakes 30 - 50 40 - 60 25 - 35 Biscuits / tartlets 25 - 35 35 - 45 1 / 2 190 - 250 15 - 50 Pizza / Focaccia 190 - 250... -
Page 5: Troubleshooting
TROUBLESHOOTING PROBLEM POSSIBLE CAUSE SOLUTION Check for the presence of mains electrical power and Power cut. whether the oven is connected to the electricity supply. The oven is not working. Disconnection from the mains. Turn off the oven and restart it to see if the fault persists. The display shows the letter “F”... -
Page 6: Description Du Panneau De Commande
Guide rapide MERCI D'AVOIR ACHETÉ UN PRODUIT HOTPOINT ARISTON Lisez attentivement les consignes de sécurité avant Afin de profiter d'une assistance complète, d’utiliser l’appareil. veuillez enregistrer votre appareil sur www . hotpoint . eu/register DESCRIPTION DU PANNEAU DE COMMANDE 1. BOUTON DE SÉLECTION 3. - Page 7 3. CHAUFFER LE FOUR Appuyez sur pour cinq secondes immédiatement après. Un nouveau four peut dégager des odeurs provenant de la fabrication : ceci est parfaitement normale. Avant de cuire des aliments, nous vous conseillons de chauffer le four à vide pour éliminer les odeurs. Enlevez le carton de protection ou le film transparent du four et enlevez les accessoires de l’intérieur.
- Page 8 À la fin de cette phase, un signal sonore et un voyant stable FIN DE CUISSON indique que le four a atteint la température désirée : vous Un signal sonore se fait entendre et l'écran s'illumine pour pouvez maintenant placer les aliments à l’intérieur et débuter indiquer que la fonction est terminée.
- Page 9 TABLEAU DE CUISSON NIVEAU ET RECETTE FONCTION PRÉCHAUFFAGE TEMPÉRATURE (°C) DURÉE (MIN) ACCESSOIRES 30 - 50 Gâteaux à pâte levée 30 - 50 40 - 60 25 - 35 Biscuits/Tartelettes 25 - 35 35 - 45 190 - 250 15 - 50 Pizza/Focaccia 190 - 250 20 - 50...
-
Page 10: Guide De Dépannage
GUIDE DE DÉPANNAGE PROBLÈME CAUSE POSSIBLE SOLUTION Assurez-vous qu’il n’y a pas de panne de courant et que le Coupure de courant. four est bien branché. Le four ne fonctionne pas. Débranchez de l’alimentation Éteignez puis rallumez le four pour voir si le problème principale. -
Page 11: Descrizione Del Pannello Comandi
Guida rapida GRAZIE PER AVERE ACQUISTATO UN Prima di utilizzare l'apparecchio leggere attentamente le PRODOTTO HOTPOINT ARISTON istruzioni di sicurezza. Per ricevere un'assistenza più completa, registrare il prodotto su www . hotpoint . eu/register DESCRIZIONE DEL PANNELLO COMANDI 1. MANOPOLA DI SELEZIONE 3. - Page 12 3. RISCALDAMENTO DEL FORNO di selezione su , quindi riportarla su Un nuovo forno può rilasciare degli odori dovuti alla Subito dopo, premere per cinque secondi. lavorazione di fabbrica: questo è normale. Prima di cucinare gli alimenti è dunque raccomandato di riscaldare a vuoto il forno per rimuovere ogni odore.
- Page 13 procedere alla cottura. FINE COTTURA Un segnale acustico e il display avvisano del termine della Nota: introdurre gli alimenti nel forno prima della fine del funzione. preriscaldamento può avere effetti negativi sui risultati della cottura. Ruotare la manopola di selezione per selezionare una funzione Al termine della cottura e con la funzione disattivata, è...
- Page 14 TABELLA DI COTTURA RICETTA FUNZIONE PRERISCALDAMENTO TEMPERATURA (°C) DURATA (MIN) LIVELLO E ACCESSORI Sì 30 - 50 Torte lievitate Sì 30 - 50 Sì 40 - 60 Sì 25 - 35 Biscotti / Tortine Sì 25 - 35 Sì 35 - 45 1 / 2 Sì...
-
Page 15: Risoluzione Dei Problemi
RISOLUZIONE DEI PROBLEMI PROBLEMA POSSIBILE CAUSA SOLUZIONE Interruzione di corrente Verificare che ci sia tensione in rete e che il forno sia elettrica. collegato all’alimentazione elettrica. Il forno non funziona. Disconnessione dalla rete Spegnere e riaccendere il forno per verificare se il problema principale.
Need help?
Do you have a question about the FA4S 844 P IX HA and is the answer not in the manual?
Questions and answers