Table of Contents
Advertisement
Available languages
Available languages
Quick Links
Quick guide
THANK YOU FOR BUYING A HOTPOINT-
ARISTON PRODUCT
In order to receive a more complete
assistance, please register your product on
www . hotpoint . eu/register
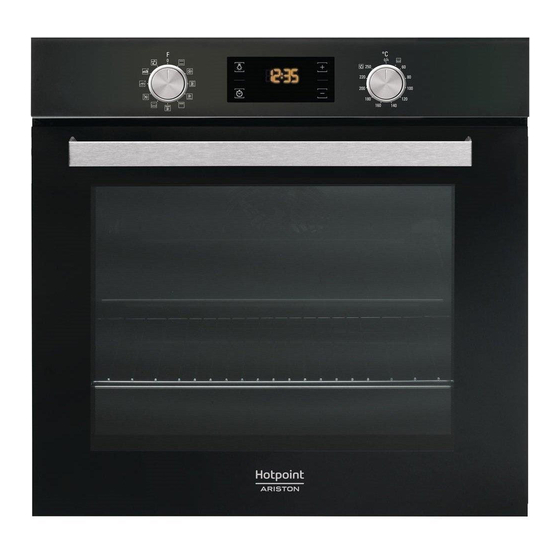
CONTROL PANEL DESCRIPTION
1
1. SELECTION KNOB
For switching the oven on by selecting a
function.
Turn to the
position to switch the oven
off.
2. LIGHT
With the oven switched on, press to turn
the oven compartment lamp on or off.
SLIDING RUNNERS AND SHELF GUIDES
Before using the oven remove the protective tape [a] and then
remove the protective foil [b] from the sliding runners.
REMOVING THE SLIDING RUNNERS [c]
Pull the lower part of the sliding runner to uncouple the lower
hooks (1) and pull the the sliding runners upwards, removing
them from the upper hooks (2).
REFITTING THE SLIDING RUNNERS [d]
Hook the upper hooks on the shelf guides (1) then press the
lower part of the sliding runners against the shelf guides, until
FIRST TIME USE
1. SETTING THE TIME
You will need to set the time when you switch on the appliance
for the first time: Press
for the hour start flashing on the display.
Use
or
to set the hour and press
digits for the minutes will start flashing. Use
minutes and press
to confirm.
2
3
3. SETTING THE TIME
For accessing the cooking time settings,
delayed start and timer.
For displaying the time when the oven is
off.
4. DISPLAY
until the
icon and the two digits
to confirm. The two
o
to set the
Before using the appliance carefully read the Safety
Instruction.
4
5
5. ADJUSTMENT BUTTONS
For changing the cooking time settings
6. THERMOSTAT KNOB
Turn to select the temperature you
require when activating manual
functions.
For automatic functions keep on
the lower hooks are clicking (2).
2
1
REMOVING AND REFITTING THE SHELF GUIDES
1. To remove the shelf guides, firmly grip the external part of the
guide, and pull it towards you to extract the support and the
two internal pins from the lodging.
2. To reposition the shelf guides, position them near the cavity
and initially insert the two pins into their lodgings. Next,
position the external part near its lodging, insert the support,
and firmly press towards the wall of the cavity to make sure the
shelf guide is properly secured.
Please note: When the
lengthy power outages, you will need to reset the time.
2. SET THE POWER CONSUMPTION
By default the oven is programmed to work at a power higher
than 3 kW (Hi): To operate the oven at a power that is compatible
with a domestic power supply less than 2,9 kW (Lo), you will
need to change the settings.
To go to the change menu, turn the selection knob to
turn it back to
.
Press and hold
and
afterwards.
1
[c]
icon is flashing, for example following
for five seconds immediately
EN
6
/A
.
2
[d]
, then
Advertisement
Table of Contents

Related Manuals for Hotpoint Ariston FA5 841 P IX HA


Summary of Contents for Hotpoint Ariston FA5 841 P IX HA
- Page 1 Quick guide THANK YOU FOR BUYING A HOTPOINT- ARISTON PRODUCT Before using the appliance carefully read the Safety In order to receive a more complete Instruction. assistance, please register your product on www . hotpoint . eu/register CONTROL PANEL DESCRIPTION 1.
-
Page 2: Functions & Daily Use
3. HEAT THE OVEN A new oven may release odors that have been left behind during manufacturing: this is completely normal. Before starting to cook food, we therefore recommend heating the oven with it empty in order to remove any possible odors. Remove any protective cardboard or transparent film from the to change the setting, then press and hold for at... -
Page 3: Cooking Table
Turn the selection knob to select a different function or to position “ ” to switch the oven off. Please note: If the timer is active, the display will show “END” alternately with the remaining time. 5. SETTING THE TIMER to set the cooking time you require, then press to confirm. -
Page 4: Troubleshooting
Lamb / veal / beef /pork 1 kg 190 - 200 80 - 110 Chicken/rabbit/duck 1 kg 200 - 230 50 - 100 Baked fish/en papillote 0,5 kg 170 - 190 30 - 45 (fillets, whole) Toasted bread 5’ 2 - 6 Roast potatoes 200 - 210 35 - 55 **... -
Page 5: Description Du Panneau De Commande
Guide rapide MERCI D'AVOIR ACHETÉ UN PRODUIT HOTPOINT‑ARISTON Lisez attentivement les consignes de sécurité avant Afin de profiter d'une assistance complète, d’utiliser l’appareil. veuillez enregistrer votre appareil sur www . hotpoint . eu/register DESCRIPTION DU PANNEAU DE COMMANDE 1. BOUTON DE SÉLECTION 3. - Page 6 3. CHAUFFER LE FOUR Un nouveau four peut dégager des odeurs provenant de la fabrication : ceci est parfaitement normal. Avant de cuire des aliments, nous vous conseillons de chauffer le four à vide pour éliminer les éventuelles odeurs. Enlevez le carton de protection ou le film transparent du four et Utilisez pour changer les réglages, appuyez ensuite sur enlevez les accessoires de l’intérieur.
- Page 7 Tournez le bouton de sélection pour sélectionner une différente DURÉE fonction ou le placer à la position « » pour éteindre le four. Appuyez sur la touche jusqu'à ce que le voyant et « 00:00 » clignotent à l'écran. Remarque : Si la minuterie est activée, l’écran affiche « END » en alternance avec le temps restant.
-
Page 8: Dépannage
Lasagnes/pâtes au four/cannellonis/ 190 - 200 45 - 65 tartes Agneau/veau/bœuf/porc 1 kg 190 - 200 80 - 110 Poulet / lapin / canard, 1 kg 200 - 230 50 - 100 Poisson au four/en papillote 0,5 kg 170 - 190 30 - 45 (filet, entier) Pain grillé... -
Page 9: Descrizione Del Pannello Comandi
Guida rapida GRAZIE PER AVERE ACQUISTATO UN PRODOTTO HOTPOINT‑ARISTON Prima di utilizzare l'apparecchio leggere attentamente le Per ricevere un'assistenza più completa, registrare istruzioni di sicurezza. il prodotto su www . hotpoint . eu/register DESCRIZIONE DEL PANNELLO COMANDI 1. MANOPOLA DI SELEZIONE 3. - Page 10 3. RISCALDAMENTO DEL FORNO Un nuovo forno può rilasciare degli odori dovuti alla lavorazione di fabbrica: questo è normale. Prima di cucinare gli alimenti è dunque raccomandato di riscaldare a vuoto il forno per rimuovere ogni odore. Rimuovere protezioni di cartone o pellicole trasparenti e togliere Utilizzare per cambiare l'impostazione, quindi premere gli accessori dal forno.
- Page 11 4. PROGRAMMARE LA COTTURA Per programmare la cottura è necessario aver selezionato precedentemente una funzione. DURATA Premere tante volte fino a che sul display lampeggiano Ruotare la manopola di selezione per selezionare una funzione l’icona e “00:00”. differente o sulla posizione “ ”...
-
Page 12: Risoluzione Dei Problemi
Sì 190 - 250 15 - 50 Pizza / Focaccia Sì 190 - 250 20 - 50 Lasagne / Pasta al forno / Cannelloni / Sì 190 - 200 45 - 65 Sformati Agnello / Vitello / Manzo / Maiale 1 kg Sì... -
Page 13: Descripción Del Panel De Control
Guía rápida GRACIAS POR COMPRAR UN PRODUCTO HOTPOINT‑ARISTON Antes de usar el aparato, lea atentamente las Instrucciones Para recibir una asistencia más completa, registre de seguridad. su producto en www . hotpoint . eu/register DESCRIPCIÓN DEL PANEL DE CONTROL 1. SELECTOR 3. - Page 14 3. CALENTAR EL HORNO Un horno nuevo puede liberar olores que se han quedado impregnados durante la fabricación: es completamente normal. Antes de empezar a cocinar, le recomendamos calentar el horno en vacío para eliminar cualquier olor. Quite todos los cartones de protección o el film transparente del Utilice para cambiar las configuraciones, luego pulse y horno y saque todos los accesorios de su interior.
- Page 15 Gire el selector para seleccionar una función diferente o póngalo en la posición « » para apagar el horno. Nota: Si el temporizador está activo, la pantalla mostrará alternativamente “END” y el tiempo restante. 5. AJUSTE DEL TEMPORIZADOR Utilice para configurar el tiempo de cocción deseado y Esta opción no interrumpe ni programa la cocción, pero le permite después pulse para confirmar.
-
Page 16: Resolución De Problemas
Cordero, ternera, buey, cerdo 1 kg Sí 190 - 200 80-110 Pollo/conejo/pato 1kg Sí 200-230 50-100 Pescado al horno / en papillote 0,5 kg Sí 170 - 190 30 - 45 (filetes, entero) Pan tostado 5’ Patatas al horno Sí 200 - 210 35 - 55 ** ** Darle la vuelta al alimento en el segundo tercio de la cocción (si fuera Descargue la Guía de uso y cuidado completa en... - Page 17 Guia rápido OBRIGADO POR TER ADQUIRIDO UM PRODUTO HOTPOINT‑ARISTON Leia as instruções de segurança com atenção antes de usar Para beneficiar de uma assistência mais completa, o aparelho. registe o seu produto em www . hotpoint . eu/register DESCRIÇÃO DO PAINEL DE CONTROLO 1.
- Page 18 3. AQUECER O FORNO Um forno novo pode libertar odores residuais, resultantes do processo de fabrico: isto é perfeitamente normal. Assim, antes de começar a cozinhar alimentos, recomendamos que aqueça o forno vazio para eliminar eventuais odores. Remova do forno qualquer elemento de proteção em cartão ou Prima para alterar as definições e, em seguida, prima e película transparente e retire quaisquer acessórios do respetivo...
-
Page 19: Tabela De Cozedura
Rode o botão seletor para selecionar uma outra função ou para a depende de uma série de fatores, como a temperatura ambiente e a função utilizada. Em qualquer caso, deverá considerar que o posição " " para desligar o forno. aparelho está... -
Page 20: Resolução De Problemas
25 - 35 Biscoitos/queques 25 - 35 35 - 45 190 - 250 15 - 50 Pizza/Focaccia 190 - 250 20 - 50 Lasanha/massa ao forno/canelones/flans 190 - 200 45 - 65 Borrego/vitela/vaca/porco 1 kg 190 - 200 80 - 110 Frango / coelho / pato 1 kg 200 - 230 50 - 100... - Page 21 الدليل السريع نشكرك على شرائك أحد منتجات HOTPOINT - ARISTON .اقرأ جميع تعليمات السالمة بعناية قبل استخدام الجهاز للحصول على مزيد من المساعدة الشاملة، ي ُرجى تسجيل منتجك على www . hotpoint . eu/register الموقع وصف لوحة التحكم أزرار الضبط تعيين...
- Page 22 .الملحقات من الداخل 3. تسخين الفرن قد ينبعث من الفرن الجديد روائح غير مستحبة ناتجة عن عملية التصنيع: وهذا أمر قم بتسخين الفرن لتصل درجة حرارته إلى 052°م لمدة ساعة. يجب أن يكون الفرن طبيعي تماما. قبل البدء في طهي الطعام، ننصحك بإحماء الفرن وهو خال وذلك .فارغا...
- Page 23 وظيفة التنظيف األوتوماتيكي – التحلل الحراري مفتاح االختيار .” إلطفاء الفرن “ الختيار وظيفة أخرى أو إلى الوضع أدر "" "انتهاءEND" يرجى مالحظة: عند تفعيل الميقاتي،يظهر بوحدة العرض البيان .ال تلمس الفرن أثناء دورة التحلل الحراري .بالتبادل مع الوقت المتبقي أبعد...
- Page 24 دليل تحري األعطال الحل السبب المحتمل المشكلة تحقق من وجود طاقة كهربائية بالشبكة الكهربائية ومن توصيل الفرن بمصدر .انقطاع التيار الكهربائي .الفرن ال يعمل .الكهرباء .الفصل من الشبكة الكهربائية .أوقف الفرن، ثم أعد تشغيله للتحقق مما إذا كان العطل ال يزال قائما .”F“...
Need help?
Do you have a question about the FA5 841 P IX HA and is the answer not in the manual?
Questions and answers