Rockwell Automation Allen-Bradley Guardmaster MSR57P User Manual
Speed monitoring safety relay
Hide thumbs
Also See for Allen-Bradley Guardmaster MSR57P:
- Release note (8 pages) ,
- User manual (20 pages) ,
- User manual (182 pages)

Related Manuals for Rockwell Automation Allen-Bradley Guardmaster MSR57P


Summary of Contents for Rockwell Automation Allen-Bradley Guardmaster MSR57P
- Page 1 User Manual MSR57P Guardmaster Speed Monitoring Safety Relay Catalog Numbers 440R-S845AER-NNL...
- Page 2 Identifies information that is critical for successful application and understanding of the product. Allen-Bradley, Rockwell Automation, Guardmaster, Kinetix, Ultra 3000, PowerFlex, PowerFlex 70, PowerFlex 700, PowerFlex 700S, PowerFlex 40, SCANport, RSLinx, DriveExplorer, DriveExecutive, Rockwell Software, and TechConnect are trademarks of Rockwell Automation, Inc.
- Page 3 Summary of Changes The information below summarizes the changes to this manual since the last publication. To help you find new and updated information in this release of the manual, we have included change bars as shown to the right of this paragraph.
- Page 4 Summary of Changes Notes: Publication 440R-UM004B-EN-P - March 2010...
-
Page 5: Table Of Contents
Table of Contents Preface About This Publication ......11 Who Should Use This Manual ..... . . 11 Conventions . - Page 6 Table of Contents Circuit Diagram........35 Terminal Connections ......36 Compatible Encoders .
- Page 7 Table of Contents Single Encoder....... . 84 Dual Encoders ....... . 84 Feedback Voltage Monitor Range .
- Page 8 Table of Contents Safe Stop Reset (SS Reset) and Safe Limited Speed Reset (SLS Reset) ....... . . 120 SLS with Door Monitoring and Enabling Switch Monitoring Parameter List .
- Page 9 Table of Contents Configure the Speed Monitoring Relay ... . . 160 Project Verification Test ......161 Confirm the Project .
- Page 10 Table of Contents Appendix A Specifications Introduction ........199 General Specifications .
-
Page 11: Preface
Preface About This Publication This manual explains how the Guardmaster MSR57P Speed Monitoring Safety Relay can be used in Safety Integrity Level (SIL) 3, Performance Level (PLe), or Category (CAT) 4 applications. It describes the safety requirements, including PFD and PFH values and application verification information, and provides information on installing, configuring, and troubleshooting the relay. - Page 12 Preface Terminology Abbreviation Full Term Definition Hardware Fault Tolerance The HFT equals n, where n+1 faults could cause the loss of the safety function. An HFT of 1 means that 2 faults are required before safety is lost. Human Interface Module A module used to configure a device.
-
Page 13: Additional Resources
Describes important differences between solid state control and Maintenance of Solid State Control, publication SGI-1.1 hard-wired electromechanical devices. You can view or download publications at: http://literature.rockwellautomation.com. To order paper copies of technical documentation, contact your local Rockwell Automation distributor or sales representative. Publication 440R-UM004B-EN-P - March 2010... - Page 14 Preface Notes: Publication 440R-UM004B-EN-P - March 2010...
-
Page 15: Chapter 1 Introduction
Chapter Safety Concept Introduction This chapter describes the safety performance level concept and how the MSR57P Speed Monitoring Safety Relay can meet the requirements for SIL CL3, PLe, or CAT 4 applications. Topic Page Safety Certification Functional Proof Tests PFD and PFH Definitions PFD and PFH Data Safe State Safety Reaction Time... -
Page 16: Important Safety Considerations
Chapter 1 Safety Concept Important Safety Considerations The system user is responsible for: • the set-up, safety rating, and validation of any sensors or actuators connected to the system. • completing a system-level risk assessment and reassessing the system any time a change is made. •... -
Page 17: Safety Category 4 Performance Definition
Chapter 1 Safety Concept Safety Category 4 Performance Definition To achieve Safety Category 4 according to ISO 13849-1:2006, the safety-related parts have to be designed such that: • the safety-related parts of machine control systems and/or their protective equipment, as well as their components, shall be designed, constructed, selected, assembled, and combined in accordance with relevant standards so that they can withstand expected conditions. -
Page 18: Performance Level And Safety Integrity Level (Sil) 3
Chapter 1 Safety Concept Performance Level and Safety Integrity Level (SIL) 3 For safety-related control systems, Performance Level (PL), according to ISO 13849-1, and SIL levels, according to IEC 61508 and EN 62061, include a rating of the system’s ability to perform its safety functions. All of the safety-related components of the control system must be included in both a risk assessment and the determination of the achieved levels. -
Page 19: Pfd And Pfh Data
Chapter 1 Safety Concept PFD and PFH Data These PFD and PFH calculations are based on the equations from Part6 of EN 61508 and show worst-case values. This table provides data for a 20-year proof test interval and demonstrates the worst-case effect of various configuration changes on the data. -
Page 20: Safety Reaction Time
Chapter 1 Safety Concept Safety Reaction Time The safety reaction time is the amount of time from a safety-related event as input to the system until the system is in the Safe State. The safety reaction time from an input signal condition that triggers a safe stop, to the initiation of the configured Safe Stop Type, is 20 ms (maximum). -
Page 21: Output Pulse Test Considerations
Chapter 1 Safety Concept Output Pulse Test Considerations If the pulse testing of any safety output is disabled, the maximum safety rating will be up to and including SIL CL2, PL(d), and CAT 3 for any safety chain incorporating any input or output of the MSR57P relay. Setting any of the P71 [MP_Out Mode], P72 [SS_Out Mode], IMPORTANT P73 [SLS_Out Mode], or P74 [DC_Out Mode] parameters to 1 =... - Page 22 Chapter 1 Safety Concept • The encoder is of the Sin/Cos type and is suitable for the desired safety rating of the application. An encoder that is suitable for SIL CL3 applications must: – use independent Sine/Cosine signals. – be incapable of producing simulated signals when under an error condition.
- Page 23 Chapter 1 Safety Concept For example, to properly configure a PowerFlex 700S drive to meet the single-encoder application requirements listed on page 21, make these parameter settings. Parameter Parameter Required Drive Addresses Single-encoder Number Name Parameter Setting Requirement P485 Motor Ctrl Mode 2 = Pmag Motor The motor controller must be configured as a closed-loop application with field-oriented...
-
Page 24: Contact Information If Device Failure Occurs
Rockwell Automation distributor. With this contact, you Device Failure Occurs can: • return the device to Rockwell Automation so the failure is appropriately logged for the catalog number affected and a record is made of the failure. •... -
Page 25: Introduction
Chapter About the MSR57P Speed Monitoring Safety Relay Introduction This chapter describes the features of the MSR57P Speed Monitoring Safety Relay. Topic Page Safety Functions Hardware Features Configuration Safety Functions The MSR57P Speed Monitoring Safety Relay features five inputs, three sets of safety outputs, and one bipolar safety output. -
Page 26: Safety Modes
Chapter 2 About the MSR57P Speed Monitoring Safety Relay Safety Modes The relay can be configured to operate in one of 11 user-selectable safety modes, based on combinations of the safety functions listed on the previous page. The relay monitors motion for Safe Stop in every mode except Disabled. -
Page 27: Lock Monitoring
Chapter 2 About the MSR57P Speed Monitoring Safety Relay Lock Monitoring Lock monitoring helps prevent access to the hazard during motion. In many applications, it is not sufficient for the machine to initiate a stop command once the door has been opened because a high inertia machine may take a long time to stop. -
Page 28: Hardware Features
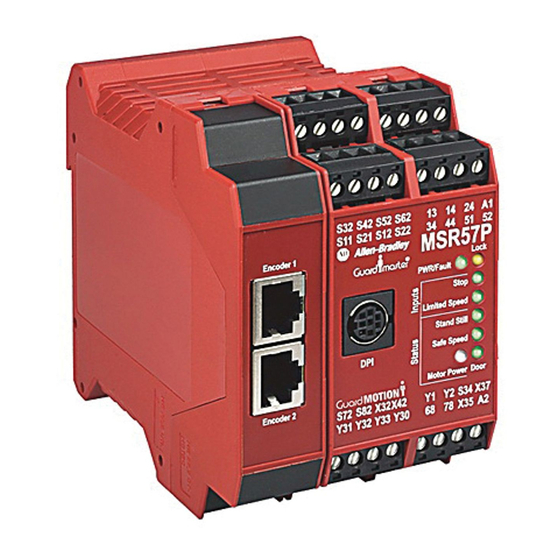
Chapter 2 About the MSR57P Speed Monitoring Safety Relay Hardware Features The MSR57P relay features five dual-channel inputs, three sets of sourcing safety outputs, and one bipolar safety output. You can configure dual-channel inputs to accept contact devices with two normally closed contacts, or one normally closed and one normally open contact. -
Page 29: Configuration
Chapter 2 About the MSR57P Speed Monitoring Safety Relay Configuration Configure the MSR57P relay by setting the configuration parameters using a HIM module (catalog number 20-HIM-A3). You can also use DriveExplorer software, version 5.02 or later, or DriveExecutive software , version 4.01 or later. All of these configuration tools let you save the configuration and download it to another MSR57P relay. - Page 30 Chapter 2 About the MSR57P Speed Monitoring Safety Relay Notes: Publication 440R-UM004B-EN-P - March 2010...
-
Page 31: Introduction
Chapter Installation and Wiring Introduction This chapter provides details on connecting devices and wiring the MSR57P relay. Topic Page Environment and Enclosure General Safety Information Dimensions Spacing Requirements Mount the MSR57P Relay Power Supply Requirements Removable Terminal Blocks Circuit Diagram Terminal Connections Compatible Encoders Connect an Encoder... -
Page 32: General Safety Information
Chapter 3 Installation and Wiring General Safety Information Use this product for its intended applications. WARNING This equipment must not be used for unintended applications, nor in ways that do not conform to appropriate safety standards and good practices. The safety functions may not operate properly, or at all, if this equipment is not used for the intended purposes. -
Page 33: Environment And Enclosure
Chapter 3 Installation and Wiring Environment and Enclosure This product must be installed inside protected control panels IMPORTANT or cabinets appropriate for the environmental conditions of the industrial location. The protection class of the panel or cabinet should be IP54 or higher. See the specifications in Appendix Considerations for... -
Page 34: Spacing Requirements
Chapter 3 Installation and Wiring Spacing Requirements Adequate air space must be provided around the system (module cluster). Minimum recommended clearances: • 15 mm (0.6 in.) above • 15 mm (0.6 in.) below • 2…3 mm (0.08…0.12 in.) between modules at ambient temperatures higher than 40 °C (104 °F). -
Page 35: Removable Terminal Blocks
Chapter 3 Installation and Wiring Such a power supply meets the electrical safety requirements and maintains minimum power of 19.2V DC during 20 ms even in the event of voltage dips. For planning information, refer to the guidelines in Industrial Automation Wiring and Grounding Guidelines, Allen-Bradley publication 1770-4.1. -
Page 36: Terminal Connections
Chapter 3 Installation and Wiring Terminal Connections Tighten all terminal screws firmly and recheck them after all connections have been made. Recommended terminal screw torque is 0.6…0.8 Nm (5…7 lb-in). Terminal Function +24V DC, user supply Common, user supply S11, S21 Test_Out_0, Test_Out_1, pulse test output for Safe Stop (SS), Safe Limited Speed (SLS), Enabling Switch Monitor (ESM), Door Monitor (DM), and Lock Monitor (LM) S12, S22... -
Page 37: Compatible Encoders
Chapter 3 Installation and Wiring Compatible Encoders These feedback devices are supported. Supported Feedback Devices Cat. No. and Description Additional Resources 842HR-xJxxx15FWYx Refer to the Bulletin 842HR Sin/Cosine Encoders product profile, publication 842HR-PP001, for more information on Sin/Cos Encoders these encoders. Incremental 845T-xx12xxx-x and 845T-xx13xxx-x Refer to the Sensors Reference Catalog, publication C116,... -
Page 38: Connect An Encoder
Chapter 3 Installation and Wiring Connect an Encoder Use twisted-pair, individually-shielded cable to connect encoders and drives. Refer to your encoder or drive manual for proper cable type and maximum length. The drive or encoder and the MSR57P power supply reference IMPORTANT must be the same. - Page 39 Chapter 3 Installation and Wiring Two Encoders without a Drive Encoder 1 Encoder Power Supply Sin/Cos or Incremental Terminal Blocks Encoder 2 Sin/Cos or Incremental Encoder Cables Encoder Power Supply 1585J-M8RB-2M5 Terminal Blocks (1) Refer to your encoder specifications to determine power supply requirements (5V, 9V, 12V, or 24V). Single Encoder with PowerFlex Drive PowerFlex Drive Encoder 1...
- Page 40 Chapter 3 Installation and Wiring Two Encoders with PowerFlex Drive PowerFlex Drive Encoder 1 Incremental Encoder 2 Incremental Encoder Power Supply Encoder Cables 1585J-M8RB-2M5 Terminal Blocks (1) Refer to your encoder specifications to determine power supply requirements (5V, 9V, 12V, or 24V). (2) Terminate shield to functional earth at drive end.
- Page 41 Chapter 3 Installation and Wiring Single Encoder with a Kinetix 6000 or Kinetix 7000 Drive Kinetix 6000 or Kinetix 7000 Drive Motor Feedback Logix Platform Connector Kit (ControlLogix Controller Shown) 2090-K6CK-D15M Motor with Embedded Encoder 1 Sin/Cos Encoder Cable 1585J-M8RB-2M5 Customer-provided I/O cable for standard I/O connections such as Start, Stop, SLS Request.
- Page 42 Chapter 3 Installation and Wiring Two Encoders with a Kinetix 6000 or Kinetix 7000 Drive Kinetix 6000 or Kinetix 7000 Drive Motor Feedback Connector Kit 2090-K6CK-D15M Encoder 2 Sin/Cos or Incremental Motor with Embedded Encoder 1 Encoder Power Supply Sin/Cos Logix Platform (ControlLogix Controller Shown) Encoder Cables...
- Page 43 Chapter 3 Installation and Wiring Monitoring Feedback from Two Encoders with a Kinetix 6000 or Kinetix 7000 Drive Kinetix 6000 or Kinetix 7000 Drive Auxiliary Feedback Motor Feedback Connector Kit Connector Kit 2090-K6CK-D15F 2090-K6CK-D15M Encoder 2 Encoder Cables 1585J-M8RB-2M5 Sin/Cos or Incremental Motor with Embedded Encoder 1 Sin/Cos...
-
Page 44: Encoder Cable Specifications
Chapter 3 Installation and Wiring Encoder Cable To connect the MSR57P, use the 1585J-M8RB-2M5 cable available from Rockwell Automation. Specifications 1585J-M8RB-2M5 Cable 2.5 m Cable Connection to Connection to Connection to Drive Cat. No. MSR57P Relay Encoder or Power Supply... - Page 45 Chapter 3 Installation and Wiring Motor Feedback Cables for Specific Motor/Feedback Combinations Compatible Drives Flying-Lead Motor Series Feedback Type Pinout Feedback Cable Ultra3000 Kinetix 2000 Kinetix 6000 Kinetix 7000 2093-AC05-MPx 2094-ACxx-Mxx-S MPL-Axxxx-M/S 2098-DSD-xxx — 2093-AMxx 2094-AMxx-S 2094-BCxx-Mxx-S MPL-Bxxxx-M/S Multi-turn 2098-DSD-HVxxx —...
-
Page 46: Flying-Lead Feedback Cable Pin-Outs
Chapter 3 Installation and Wiring Flying-lead Feedback Cable Pin-outs Motors Using 2090-XXxFMP-Sxx Feedback Cable MPL-Bxxx-M/-S, MPL-A5xxx-M/-S, and 1326AB-Bxxx-M2L/-S2L Motors Drive Side MSR57P Relay Side 1585J-M8RB-2M5 Cable Motor Connector Drive MF Signal Connector Pin Wire Color Signal Black Sine+ —> Blue A1+/SIN1+ White/Black Sine-... - Page 47 Chapter 3 Installation and Wiring MPL-A3xxx-M/-S, MPL-A4xxx-M/-S, and MPL-A45xxx-M/-S Motors Drive Side MSR57P Relay Side 1585J-M8RB-2M5 Cable Motor Connector Drive MF Signal Connector Pin Wire Color Signal Black Sine+ —> Blue A1+/SIN1+ White/Black Sine- —> White/Blue A1-/SIN1-REF Cos+ —> Brown B1+/COS1+ White/Red Cos-...
- Page 48 Chapter 3 Installation and Wiring MPL-A3xxx-H, MPL-A4xxx-H, and MPL-A45xxx-H Motors Drive Side MSR57P Relay Side 1585J-M8RB-2M5 Cable Motor Connector Drive MF Signal Connector Pin Wire Color Signal Black —> Blue A1+/SIN1+ White/Black —> White/Blue A1-/SIN1-REF —> Brown B1+/COS1+ White/Red —> White/Brown B1-/COS1-REF Green...
- Page 49 Chapter 3 Installation and Wiring Motors Using 2090-XXNFMF-Sxx or 2090-CFBM4DF-CDAFxx Feedback Cable MPL-B15xxx-V/-E, MPL-B2xxx-V/-E, MPF/MPS-Bxxx-M/-S, MPF-A5xx-M/-S Motors and MPAS-Bxxxx-VxxSxA Linear Stages Drive Side MSR57P Relay Side 1585J-M8RB-2M5 Cable Motor Connector Drive MF Signal Connector Pin Pin Wire Color Signal Black Sine+ —>...
- Page 50 Chapter 3 Installation and Wiring MPL-A15xxx-V/-E, MPL-A2xxx-V/-E, MPF/MPS-A3xx-M/-S, MPF/MPS-A4xx-M/-S, MPF/MPS-A45xx-M/-S, MPS-A5xx-M/-S Motors and MPAS-Axxxx-VxxSxA Linear Stages Drive Side MSR57P Relay Side 1585J-M8RB-2M5 Cable Motor Connector Pin Drive MF Signal (DIN Connector) Connector Pin Wire Color Signal Black Sine+ —> Blue A1+/SIN1+ White/Black Sine-...
- Page 51 Chapter 3 Installation and Wiring MPL-A15xxx-H, MPL-A2xxx-H, MPL-B15xxx-H, MPL-B2xxx-H Motors and MPAS-A/Bxxxx-ALMx2C Linear Stages Drive Side MSR57P Relay Side Motor Connector 1585J-M8RB-2M5 Cable Drive MF Pin (DIN Signal Connector Pin Wire Color Signal Connector) Black —> Blue A1+/SIN1+ White/Black —> White/Blue A1-/SIN1-REF —>...
- Page 52 Chapter 3 Installation and Wiring Motors Using 2090-CFBM6DF-CBAAxx Cables TLY-Axxxx-H Motors Drive Side MSR57P Relay Side Drive CN2 1585J-M8RB-2M5 Cable Motor Connector Signal Connector Wire Color Signal Black —> Blue A1+/SIN1+ White/Black —> White/Blue A1-/SIN1-REF —> Brown B1+/COS1+ White/Red —> White/Brown B1-/COS1-REF Green...
-
Page 53: Wiring Low-Profile Connector Kits
Chapter 3 Installation and Wiring Wiring Low-profile Connector Kits Low-profile connector kits (2090-K6CK-Dxxx) are suitable for motor feedback (MF), auxiliary feedback (AF), and I/O (IOD) connections on any Kinetix 6000 IAM or AM module or on a Kinetix 7000 Drive when used with an MSR57P relay. -
Page 54: Feedback Connections For Powerflex 70 Drives
Chapter 3 Installation and Wiring Wiring (15-Pin) Flying-lead Feedback Cable Connections 15-pin (male) Motor Feedback 15-pin (female) Auxiliary Feedback Bare Wires Low-profile Connector Low-profile Connector Wire Insulation Pin 10 Pin 6 Pin 5 Pin 15 Foil Shield Pin 1 Pin 11 Mounting Screws Braided Shield... -
Page 55: Safe Off Board Terminal Block (Enhanced Control Only)
Chapter 3 Installation and Wiring Safe Off Board Terminal Block (Enhanced Control Only) No. Signal Description Monitor - N.C. Normally closed contacts for monitoring relay status. Maximum Resistive Load: 250V AC / 30V DC / 50 VA / 60 W Common - N.C. - Page 56 Chapter 3 Installation and Wiring Jumper Settings Receive Voltage = 12V = 5V = 12V = 5V Send Voltage Set the jumper according to your encoder specifications. Encoder Wiring Examples These illustrations show examples of how to connect encoder power and encoder signals.
-
Page 57: Feedback Connections For Powerflex 700S Drives
Chapter 3 Installation and Wiring Feedback Connections for Use the terminal connection information in the table to connect your MSR57P relay to a PowerFlex 700S drive. PowerFlex 700S Drives PowerFlex 700S Side MSR57P Relay Side Terminal Signal Color Signal Power Common —>... - Page 58 Chapter 3 Installation and Wiring Notes: Publication 440R-UM004B-EN-P - March 2010...
-
Page 59: Speed Monitoring I/O Signals
Chapter Speed Monitoring I/O Signals Introduction This chapter describes the input and output signals of the speed monitoring relay. Topic Page Inputs Outputs Inputs The MSR57P relay has five inputs capable of safety-certified dual-channel support. Each dual-channel input supports a specific safety function of the MSR57P relay: Safe Stop, Safe Limited Speed, Door Monitoring, Enabling Switch Monitoring, and Lock Monitoring. - Page 60 Chapter 4 Speed Monitoring I/O Signals When both channels are active, if one channel’s input terminal transitions from active to inactive and back to active, while the other channel’s input terminal remains active, both channel must go inactive at the same time before the evaluated status may return to ON. This condition is called ‘cycle inputs required’.
- Page 61 Chapter 4 Speed Monitoring I/O Signals When using a dual-channel complementary (1NC + 1NO) device, the normally-open input must be connected to the second input, as shown in the illustration. For example, if the door is open when the input is ON, the normally-open contact must be the second input (Input 1).
-
Page 62: Safe Stop Input (Ss_In)
Chapter 4 Speed Monitoring I/O Signals Safe Stop Input (SS_In) The SS_In input is intended for connection to an E-Stop device. The SS_In input must be active to initiate Safe Stop monitoring. If the SS_In input is being monitored, a transition from ON to OFF (closed to open) is used to request the configured Safe Stop Type. -
Page 63: Enabling Switch Monitor Input (Esm_In)
Chapter 4 Speed Monitoring I/O Signals Enabling Switch Monitor Input (ESM_In) The ESM_In input is intended to be connected to an enabling switch. The speed monitoring relay uses the ESM_In input as a safety enable only, not for control. The ESM_In inputs function and monitoring is performed by the first unit in multi-axis systems. -
Page 64: Reset Input (Reset_In)
Chapter 4 Speed Monitoring I/O Signals Reset Input (Reset_In) The Reset input is for reset and monitoring of the safety circuit. The reset input can be configured for automatic, manual, or manual monitored reset types. Wire the S34 reset input terminal to the 24V DC output terminal, Y1, depending on the configured reset type, as shown. -
Page 65: Reset Loop Input (Rl_In)
Chapter 4 Speed Monitoring I/O Signals Reset Loop Input (RL_In) The RL_In input is used to monitor the normally-closed contacts of the contactors that are used to remove power or to the feedback contacts from a drive Safe-off circuit. The signal level of the RL_In may be used to qualify a successful reset of the speed monitoring relay. - Page 66 Chapter 4 Speed Monitoring I/O Signals SS_Out to SS_In Connections for Multi-axis Applications MSR57P Master SS_Out_Ch0 SS_Out_Ch1 S12 and S22 are configured as 2 OSSD inputs. SS_In_Ch0 SS_In_Ch1 MSR57P Slave For more information on multi-axis configurations, see Cascaded Configurations starting on page 127. Alternately, the first SS_Out output may be used to signal a programmable logic controller (PLC) or a drive that a Safe Stop has been requested.
- Page 67 Chapter 4 Speed Monitoring I/O Signals Safe Limited Speed Output (SLS_Out) The safe state for this signal in all cases is OFF. The SLS_Out output functionality is determined by the configured Safety Mode. If the SLS_In is ON and a successful Safe Stop or Safe Limited Speed reset is performed, the SLS_Out turns ON in all Safe Limited Speed modes except Safe Limited Speed Status Only.
- Page 68 Chapter 4 Speed Monitoring I/O Signals For more information on multi-axis configurations, see Cascaded Configurations starting on page 127. For Safe Limited Speed Status Only modes, the SLS_Out output is used as an indication that the Safe Limited Speed monitoring is active and the monitored speed is less than the configured Safe Speed Limit.
- Page 69 Chapter 4 Speed Monitoring I/O Signals Door Control, Door Monitoring, and Lock Monitoring Test_Out_Ch0 Test_Out_Ch1 Test_Out_Ch0 Test_Out_Ch1 DC_Out_Ch0 DC_Out_Ch1 DM_In_Ch0 DM_In_Ch1 LM_In_Ch0 LM_In_Ch1 Door Status Locking Mechanism Status Check your interlock switch for internal jumpers before installation. If an error is detected on either channel of the dual-channel output, a fault occurs.
- Page 70 Chapter 4 Speed Monitoring I/O Signals Door Control Cascading Outputs MSR57P Master DC_Out_Ch0 DC_Out_Ch1 DM_In_Ch0 DM_In_Ch1 MSR57P Slave Only these wiring configurations, shown below, are supported for the Door Control output. Door Control Output Wiring Bi-polar Single-ended 2 Channel Load Load Load Source...
- Page 71 Chapter 4 Speed Monitoring I/O Signals Motion Power Output (MP_Out) The MP_Out output is used to remove power from the drive power circuits. It is compatible with Safe-off enabled drives or applications that use standard drives with external contactors. The safe state for this signal in all cases is OFF. The MP_Out output is turned OFF during the Safe State and in Disabled mode.
-
Page 72: Diagnostic Outputs
Chapter 4 Speed Monitoring I/O Signals For applications using standard drives with external contactors, wire the output as shown. Power Supply for MP_Out_Ch0 MP_Out_Ch1 Outputs 14 and 24 +24V dc If an error is detected on either channel of the dual-channel output, a Motion Power Out Fault (MP Out Flt) occurs. - Page 73 Chapter 4 Speed Monitoring I/O Signals The Stop_Command output is typically connected to the drive or standard PLC input card to request motion to stop. The Stop_Command output may also be used to signal a PLC or drive that the configured Stop Delay [Max Stop Time] has begun. SLS_Command Output The SLS_Command output is used to signal that Safe Limited Speed monitoring operation has been requested.
- Page 74 Chapter 4 Speed Monitoring I/O Signals Notes: Publication 440R-UM004B-EN-P - March 2010...
-
Page 75: General Relay And Feedback Monitoring Configuration
Chapter General Relay and Feedback Monitoring Configuration Introduction This chapter describes the general and feedback configuration settings that must be configured to operate the speed monitoring relay. Topic Page Cascaded Configuration Safety Mode Reset Type Reset Qualification Overspeed Response Time Language Code Max Display Speed General Parameter List... -
Page 76: Safety Mode
Chapter 5 General Relay and Feedback Monitoring Configuration Safety Mode The relay can be configured to operate in one of 11 user-selectable Safety Modes, based on combinations of the safety functions the relay supports. The modes, except for Disabled, are described in detail in subsequent chapters of this manual. -
Page 77: Reset Qualification
Chapter 5 General Relay and Feedback Monitoring Configuration Reset Qualification Reset qualification can be configured for Safe Stop Resets. If reset qualification is configured, the MSR57P relay checks the feedback path to make sure it is a closed circuit before the reset can occur. The P23 [Reset Loop] parameter indicates whether the Reset Loop input (RL_In) is used to qualify a successful Safe Stop Reset. -
Page 78: Speed Resolution Accuracy For Rotary Systems
Chapter 5 General Relay and Feedback Monitoring Configuration Speed Resolution Accuracy for Rotary Systems Encoder Resolution 16 lines/rev Speed Resolution Accuracy (RPM) OverSpeed Response Time (OverSpd Response) Speed (RPM) Setting 1000 10,000 100,000 156.253 156.283 156.583 159.583 189.583 489.583 78.127 78.142 78.292 79.792... - Page 79 Chapter 5 General Relay and Feedback Monitoring Configuration Encoder Resolution 1024 lines/rev Speed Resolution Accuracy (RPM) OverSpeed Response Time (OverSpd Response) Speed (RPM) Setting 1000 10,000 11,718.75 2.445 2.475 2.775 5.775 35.775 41.504 1.222 1.237 1.387 2.887 17.887 20.752 0.611 0.619 0.694 1.444...
-
Page 80: Speed Resolution Accuracy For Linear Systems
Chapter 5 General Relay and Feedback Monitoring Configuration Speed Resolution Accuracy for Linear Systems Encoder Resolution 500 lines/mm Speed Resolution Accuracy (lines/mm) OverSpeed Response Time (OverSpd Speed (mm/s) Response) Setting 0.01 0.083 0.084 0.087 0.117 0.417 1.417 0.042 0.042 0.043 0.058 0.208 0.708... -
Page 81: Language Code
Chapter 5 General Relay and Feedback Monitoring Configuration Encoder Resolution 20,000 lines/mm Speed Resolution Accuracy (lines/mm) OverSpeed Response Time (OverSpd Speed (mm/s) Response) Setting 0.01 0.002117 0.002417 0.005417 0.035417 0.001058 0.011208 0.002708 0.017708 0.000529 0.000604 0.001354 0.008854 0.000265 0.000302 0.000677 0.004427 0.000132 0.000151... -
Page 82: Max Display Speed
Chapter 5 General Relay and Feedback Monitoring Configuration Max Display Speed The configuration tool, HIM or software, can display a speed value based on the output speed of encoder 1 [Fbk 1 Speed]. Use the P26 [Max Display Spd] parameter to determine the scaling for the display. General Parameter List Set these parameters to configure general relay operation. -
Page 83: Feedback Monitoring
Chapter 5 General Relay and Feedback Monitoring Configuration Parameter Description Setting OverSpd Configuration for the feedback interface sampling Default: 0 = 42 ms Response rate. Options: 0 = 42 ms 1 = 48 ms 2 = 60 ms 3 = 84 ms 4 = 132 ms 5 = 228 ms 6 = 420 ms... -
Page 84: Feedback Polarity
Chapter 5 General Relay and Feedback Monitoring Configuration For dual encoder configurations, the resolution of the first encoder may be different than the resolution of the second encoder. After discrepancy testing has passed, the speed, relative position, and direction used by the speed monitoring relay are based on encoder 1. The resolution of encoder 1 should always be equal to or higher IMPORTANT than the resolution of encoder 2. - Page 85 Chapter 5 General Relay and Feedback Monitoring Configuration Speed and direction checks are affected by these parameters: • Dual Feedback Speed Ratio, P39 [Fbk Speed Ratio] • Dual Feedback Position Tolerance, P41 [Fbk Pos Tol] • Dual Feedback Speed Discrepancy Tolerance, P40 [Fbk Speed Tol] Dual Feedback Speed Ratio The Dual Feedback Speed Ratio, P39 [Fbk Speed Ratio], parameter...
- Page 86 Chapter 5 General Relay and Feedback Monitoring Configuration This table defines the legal values for each Feedback Mode value. Feedback Mode, P27 [Fbk Mode] Dual Feedback Position Discrepancy Values Tolerance, P41 [Fbk Pos Tol] Legal Values One encoder Dual encoder with speed and 1…65,535 in degrees (rotary encoders) or mm position discrepancy (linear encoders) relative to the resolution of...
-
Page 87: Feedback Voltage Monitor Range
Chapter 5 General Relay and Feedback Monitoring Configuration For rotary systems, the value is specified in revolutions per minute. For linear systems, the value is specified in mm per second. Feedback Mode, P27 [Fbk Mode] Dual Feedback Speed Discrepancy Values Tolerance, P40 [Fbk Speed Tol] One encoder Dual encoder with speed and... -
Page 88: Feedback Fault
Chapter 5 General Relay and Feedback Monitoring Configuration Feedback Fault The allowable frequency of feedback input signals is limited. The speed monitoring relay monitors feedback signals whenever the relay configuration is valid and the Safety Mode is not configured as Disabled. - Page 89 Chapter 5 General Relay and Feedback Monitoring Configuration Feedback Parameters Parameter Description Setting 32 Fbk 1 Volt Mon Encoder 1 voltage to be monitored. Default: 0 = Voltage not monitored Options: 0 = Voltage not monitored 5 = 5V ±10% 9 = 7 …...
- Page 90 Chapter 5 General Relay and Feedback Monitoring Configuration Notes: Publication 440R-UM004B-EN-P - March 2010...
-
Page 91: Introduction
Chapter Safe Stop and Safe Stop with Door Monitoring Modes Introduction This chapter describes the Safe Stop modes of safety operation and provides a list of configuration parameters as well as wiring examples for each Safe Stop mode. Topic Page Safe Stop Mode Safe Stop Parameter List Safe Stop Wiring Example... -
Page 92: Safe Stop Types
Chapter 6 Safe Stop and Safe Stop with Door Monitoring Modes Safe Stop Types Use the P45 [Safe Stop Type] parameter to configure the type of stop that the system executes when a Safe Stop is initiated. A Safe Stop can be initiated by a transition of the SS_In input from ON to OFF or by the occurrence of a Stop Category Fault. - Page 93 Chapter 6 Safe Stop and Safe Stop with Door Monitoring Modes Safe Stop 1 and Safe Stop 2 When Safe Stop 1 or 2 is initiated by a transition of the SS_In input from ON to OFF, the relay does not initiate the configured Stop Delay [Max Stop Time] until after the optional Stop Monitoring Delay [Stop Mon Delay] expires, unless a Stop Category Fault occurs during the Stop Monitoring Delay.
- Page 94 Chapter 6 Safe Stop and Safe Stop with Door Monitoring Modes Timing Diagram for Safe Stop 1 Stop Request Stop Monitoring Deceleration Stop Delay Tolerance Delay Safe Torque-off Active Standstill Speed Time SS_In Signal SS_Out Signal MP_Out Signal Stop_Command Signal DC_Out Output (1) DC_Out Output shown configured as Power to Release.
-
Page 95: Standstill Speed And Position Tolerance
Chapter 6 Safe Stop and Safe Stop with Door Monitoring Modes Timing Diagram for Safe Torque Off without Standstill Checking Door Control Stop Output Unlock Request Safe Torque-off Stop Delay Active Time SS_In Input SS_Out Output MP_Out Output Stop_Command Output DC_Out Output (1) DC_Out output shown configured as Power to Release. -
Page 96: Deceleration Monitoring
Chapter 6 Safe Stop and Safe Stop with Door Monitoring Modes The P49 [Standstill Pos] parameter defines the position limit in encoder 1 units that is tolerated after standstill has been reached. If the position changes by more than the amount specified by the Standstill Position Tolerance, after standstill has been reached and the door is unlocked, a Motion After Stopped Fault occurs. -
Page 97: Safe Stop Reset
Chapter 6 Safe Stop and Safe Stop with Door Monitoring Modes Deceleration Monitoring Stop Request (∆v) = Deceleration Tolerance% x Deceleration Reference Speed Actual speed measured at the start of the Stop Delay [Max Stop Time]. Standstill Speed Time To account for system overshoot and drive delay, choose ∆v and set P50 [Decel Ref Speed] to the highest normal operating speed to calculate the Deceleration Tolerance. - Page 98 Chapter 6 Safe Stop and Safe Stop with Door Monitoring Modes When an SS Reset is requested, all diagnostic tests that can be performed prior to outputs being energized are performed prior to a successful SS Reset. If a diagnostic test can be performed only when outputs are energized, the test is performed immediately following the SS Reset.
-
Page 99: Door Control
Chapter 6 Safe Stop and Safe Stop with Door Monitoring Modes Faults If a fault occurs, other than an Invalid Configuration Fault or an ESM Monitoring Fault, the SS_In input must turn OFF and ON again to reset the Wait SS Cyc bit before a successful SS Reset can occur. Door Control The status of door control logic (Lock or Unlock) and the Door Monitor Input (DM_In), along with the relay’s location in the system... - Page 100 Chapter 6 Safe Stop and Safe Stop with Door Monitoring Modes A single relay or last relay in a cascaded system can be configured for any Door Output Type setting. For example, choose 2 Ch Sourcing to connect to a safety programmable controller input. First or middle relays in a cascaded system must be configured as 2 Ch Sourcing.
-
Page 101: Lock Monitoring
Chapter 6 Safe Stop and Safe Stop with Door Monitoring Modes Lock Monitoring If Lock Monitoring is enabled, the Lock Monitoring input (LM_In) must be in the ON state any time the Door Control output (DC_Out) is in the Lock state, except for the 5 seconds following the DC_Out output’s transition from the Unlocked state to the Locked state. - Page 102 Chapter 6 Safe Stop and Safe Stop with Door Monitoring Modes Safe Stop Parameters Parameter Description Setting Max Stop Time Stop Delay Default: 0 Range: 0 6553.5 s … Defines the maximum stop delay time that is used when the Safe Stop function is initiated by a stop type condition.
- Page 103 Chapter 6 Safe Stop and Safe Stop with Door Monitoring Modes Safe Stop Parameters Parameter Description Setting Lock Mon Input Configuration for the Lock Monitor input Default: 0 = Not used (LM_In). Options: 0 = Not used 1 = Dual-channel equivalent (2NC) 2 = Dual-channel equivalent 3 s (2NC 3s) 3 = Dual-channel complementary (1NC + 1NO) 4 = Dual-channel complementary 3 s...
-
Page 104: Safe Stop Wiring Example
Chapter 6 Safe Stop and Safe Stop with Door Monitoring Modes Safe Stop Wiring Example This example illustrates safe stop wiring. Master, Safe Stop (First or Single Unit) +24V DC Request E-Stop 800FM-MT44 800F-MX02V L1 L2 L3 PowerFlex 70 9 24V DC Door Lock Pulse Test Lock... -
Page 105: Lock Monitoring
Chapter 6 Safe Stop and Safe Stop with Door Monitoring Modes Door Monitoring Fault occurs and the speed monitoring relay initiates the configured Safe Stop Type. You can monitor the door’s status with or without using the Door Control (lock/unlock) function. When door control logic is set to Lock, the MSR57P relay puts the solenoid into the locked state when the machine is not at a safe speed or at Standstill Speed. -
Page 106: Safe Stop With Door Monitoring Wiring Example
Chapter 6 Safe Stop and Safe Stop with Door Monitoring Modes Safe Stop with Door This example illustrates wiring for safe stop with door monitoring. Monitoring Wiring Example Master, Safe Stop with Door Monitoring (First or Single Unit) +24V DC Power to Release Request... -
Page 107: Safe Limited Speed (Sls) Modes
Chapter Safe Limited Speed (SLS) Modes Introduction This chapter describes the Safe Limited Speed (SLS) modes of safety operation and provides a list of configuration parameters along with wiring examples for each mode. Topic Page Safe Limited Speed (SLS) Mode Safe Limited Speed Parameter List Safe Limited Speed Wiring Example Safe Limited Speed with Door Monitoring Mode... - Page 108 Chapter 7 Safe Limited Speed (SLS) Modes If the feedback velocity is below the Safe Speed Limit during Safe Limited Speed monitoring, the Door Control output (DC_Out) is unlocked after the Safe Limited Speed Monitoring Delay [Lim Spd Mon Delay], if configured, has expired. Make sure that an unlocked door does not result in a hazardous ATTENTION situation.
-
Page 109: Safe Limited Speed Reset
Chapter 7 Safe Limited Speed (SLS) Modes Safe Limited Speed Reset A Safe Limited Speed (SLS) Reset is a transition out of actively monitoring safe limited speed. It can also occur during a Safe Limited Speed Monitoring Delay [Lim Spd Mon Delay], if one is configured. When an SLS Reset occurs, the relay no longer monitors for safe limited speed and the door is locked. -
Page 110: Safe Limited Speed Parameter List
Chapter 7 Safe Limited Speed (SLS) Modes Safe Limited Speed To configure the relay for Safe Limited Speed monitoring, set these parameters in addition to the Safe Stop parameters listed beginning on Parameter List page 101. Parameter Description Setting Safety Mode Defines the primary operating mode of the Setting: 3 = Master, Safe Limited Speed (Lim Speed) speed monitoring safety functions. -
Page 111: Safe Limited Speed Wiring Example
Chapter 7 Safe Limited Speed (SLS) Modes Safe Limited Speed Wiring This example illustrates safe limited speed wiring. Example Master, Safe Limited Speed (First or Single Unit) +24V DC SLS Request 800FM-KM23 Request 800F-MX02V E-Stop 800FM-MT44 800F-MX02V L1 L2 L3 PowerFlex 70 9 24V DC Door Lock... -
Page 112: Safe Limited Speed With Door Monitoring Mode
Chapter 7 Safe Limited Speed (SLS) Modes Safe Limited Speed with When properly configured for Safe Limited Speed with Door Monitoring, the relay performs Safe Limited Speed (SLS) monitoring Door Monitoring Mode functions as described in Safe Limited Speed (SLS) Mode on page in addition to the Safe Stop functions as described in Safe Stop Mode... -
Page 113: Safe Limited Speed Reset
Chapter 7 Safe Limited Speed (SLS) Modes Safe Limited Speed Reset When properly configured for Safe Limited Speed with Door Monitoring, the relay must be monitoring motion (SLS_In input is OFF) if the door is open (DM_In is OFF). Make sure the door is closed before requesting an SLS Reset. -
Page 114: Sls With Door Monitoring Wiring Example
Chapter 7 Safe Limited Speed (SLS) Modes SLS with Door Monitoring This example illustrates wiring for SLS with door monitoring. Wiring Example Master, Safe Limited Speed with Door Monitoring (First or Single Unit) +24V DC SLS Request Power to 800FM-KM23 Release Request 800F-MX02V... -
Page 115: Safe Stop Reset (Ss Reset) And Safe Limited Speed Reset (Sls Reset)
Chapter 7 Safe Limited Speed (SLS) Modes In addition, the relay monitors the Enabling Switch Monitor input (ESM_In) after the Safe Limited Speed Monitoring Delay [LimSpd Mon Delay] times out. The ESM_In input must be ON when the delay times out and Safe Limited Speed monitoring begins, or an ESM Monitoring Fault occurs. -
Page 116: Sls With Enabling Switch Monitoring Parameter List
Chapter 7 Safe Limited Speed (SLS) Modes SLS with Enabling Switch To configure the relay for Safe Limited Speed with Enabling Switch Monitoring, set the P54 [Enable SW Input] parameter in addition to the Monitoring Parameter List Safe Stop parameters listed on page and the Safe Limited Speed parameters listed on page 110. -
Page 117: Sls With Enabling Switch Monitoring Wiring Example
Chapter 7 Safe Limited Speed (SLS) Modes SLS with Enabling Switch This example illustrates wiring for SLS with enabling switch monitoring. Monitoring Wiring Example Master, Safe Limited Speed with Enabling Switch Monitoring (First or Single Unit) +24V DC SLS Request Power to 800FM-KM23 Release... - Page 118 Chapter 7 Safe Limited Speed (SLS) Modes This mode lets you access the hazardous area when the machine is under a Safe Limited Speed condition. The following is a typical procedure for accessing the hazardous area by using this mode. 1.
-
Page 119: Behavior During Sls Monitoring
Chapter 7 Safe Limited Speed (SLS) Modes Behavior During SLS Monitoring When Safe Limited Speed monitoring is active, door control logic is set to Unlock if the ESM_In input is ON and the speed is detected at below the Safe Speed Limit. If the ESM_In input is ON, the door can be opened (DM_In transitions from ON to OFF). -
Page 120: Safe Stop Reset (Ss Reset) And Safe Limited Speed Reset (Sls Reset)
Chapter 7 Safe Limited Speed (SLS) Modes Safe Stop Reset (SS Reset) and Safe Limited Speed Reset (SLS Reset) The door must be closed when an SS Reset or SLS Reset is requested. An SS Reset results in a Door Monitoring Fault if the door is open when the reset is requested by a transition of the SS_In input from OFF to ON. -
Page 121: Sls With Door Monitoring And Enabling Switch Monitoring Wiring Example
Chapter 7 Safe Limited Speed (SLS) Modes SLS with Door Monitoring This example illustrates wiring for SLS with door monitoring and enabling switch monitoring. and Enabling Switch Monitoring Wiring Example Master, Safe Limited Speed with Door Monitoring and Enabling Switch Monitoring (First or Single Unit) +24V DC SLS Request... -
Page 122: Speed Hysteresis
Chapter 7 Safe Limited Speed (SLS) Modes takes place. Instead the system status is made available as a safe output intended for a safety programmable logic controller (PLC). You can program an optional Safe Limited Speed Monitoring Delay [Lim Spd Mon Delay] to delay the start of Safe Limited Speed monitoring. In this mode, Door Monitoring and Enabling Switch Monitoring are not available. -
Page 123: Sls Status Only Parameter List
Chapter 7 Safe Limited Speed (SLS) Modes when the speed is greater than or equal to the configured Safe Speed Limit. The SLS_Out output remains OFF if Safe Limited Speed monitoring begins when the detected speed is less than the configured Safe Speed Limit but greater than or equal to the Low Threshold {(Speed Hysteresis/100) x Safe Speed Limit}. -
Page 124: Sls Status Only Wiring Examples
Chapter 7 Safe Limited Speed (SLS) Modes SLS Status Only Wiring These examples illustrate wiring for SLS Status Only operation. Examples Master, Safe Limited Speed Status Only (Single Unit) +24V DC SLS Request 800FM-KM23 Request 800F-MX02V Out 0 Out 1 E-Stop 800FM-MT44 Out 2... - Page 125 Chapter 7 Safe Limited Speed (SLS) Modes Master, Safe Limited Speed Status Only (First Unit) +24V DC SLS Request 800FM-KM23 Request 800F-MX02V Out 0 Out 1 E-Stop 800FM-MT44 Out 2 800F-MX02V Out 3 Out 4 Out 5 Out 6 S62 S72 Pulse Test Door Lock Lock...
- Page 126 Chapter 7 Safe Limited Speed (SLS) Modes This example assumes that a programmable safety controller is monitoring all MSR57P relay functions and controlling the relay. The SS_In and SLS_In inputs are connected to the I/O module; however, standard safety component inputs could also be used. These functions are not performed by the MSR57P in the this scenario.
-
Page 127: Chapter 8 Introduction
Chapter Slave Modes for Multi-axis Cascaded Systems Introduction Topic Page Cascaded Configurations Slave, Safe Stop Mode Slave, Safe Stop Parameter List Slave, Safe Stop Wiring Examples Slave, Safe Limited Speed Mode Slave, Safe Limited Speed Parameters Slave, Safe Limited Speed Wiring Examples Slave, Safe Limited Speed Status Only Mode Slave, Safe Limited Speed Status Only Parameter List Slave, Safe Limited Speed Status Only Wiring Examples... - Page 128 Chapter 8 Slave Modes for Multi-axis Cascaded Systems Cascaded Connections First Unit (Multi-First) Middle Unit (Multi-Mid) Last Unit (Multi-Last) Master Slave Slave Axis 1 Axis 2 Axis 3 Safe Stop Input S12 SS_In_0 SS_Out_0 34 S12 SS_In_0 SS_Out_0 34 S12 SS_In_0 SS_Out_0 34 S22 SS_In_1 SS_Out_1 44...
-
Page 129: Slave, Safe Stop Mode
Chapter 8 Slave Modes for Multi-axis Cascaded Systems Slave, Safe Stop Mode When properly configured for Slave, Safe Stop mode, the speed monitoring safety relay performs the same functions as Safe Stop except that the relay regards the Door Monitor input as a Door Control output from an upstream axis, and performs a logical AND with its internal Door Control signal to form the cascaded Door Control output. - Page 130 Chapter 8 Slave Modes for Multi-axis Cascaded Systems Slave, Safe Stop Parameters Parameter Description Setting 49 Standstill Pos Standstill Position Window. Default: 10 Range: 0 65,535 degrees (360° = 1 revolution) or mm … Defines the position limit in encoder 1 degrees or based on rotary or linear configuration defined by mm that will be tolerated after a Safe Stop P29 [Fbk 1 Units] parameter...
-
Page 131: Slave, Safe Stop Wiring Examples
Chapter 8 Slave Modes for Multi-axis Cascaded Systems Slave, Safe Stop Wiring The examples on the following pages show two different Slave, Safe Stop configurations. Examples The first example shows an MSR57P configured as a cascaded middle unit via the P20 [Cascaded Config] parameter (Multi Mid). It has SS_In and DM_In input connections from the previous upstream MSR57P relay, as well as SS_Out and DC_Out output connections to the next downstream MSR57P relay. - Page 132 Chapter 8 Slave Modes for Multi-axis Cascaded Systems This example shows the last cascaded slave relay in the system. It has SS_In and DM_In inputs from the previous upstream MSR57P relay, but its DC_Out output is connected to a guardlocking interlock switch.
- Page 133 Chapter 8 Slave Modes for Multi-axis Cascaded Systems This example shows three relays connected together in a cascaded system. All relays must have a shared common ground. First, Middle, and Last Relays in a Cascaded System with Door Control and Lock Monitoring +24V dc TLS3 GD2 440G-T27260 Power to...
-
Page 134: Slave, Safe Limited Speed Mode
Chapter 8 Slave Modes for Multi-axis Cascaded Systems Slave, Safe Limited Speed When properly configured for Slave, Safe Limited Speed mode, the speed monitoring safety relay performs the same functions as Safe Mode Limited Speed mode as described on page 107. However, the relay regards the Door Monitor input as a Door Control output from an upstream axis, and performs a logical AND with its internal Door Control signal to form the cascaded Door Control... -
Page 135: Slave, Safe Limited Speed Wiring Examples
Chapter 8 Slave Modes for Multi-axis Cascaded Systems Slave, Safe Limited Speed These examples shows two different Slave, Safe Limited Speed configurations. Wiring Examples The first example is configured as a cascaded middle unit via the P20 [Cascaded Config] parameter (Multi Mid). It has SS_In, SLS_In, and DM_In input connections from the previous upstream MSR57P relay, as well as SS_Out, SLS_Out, and DC_Out output connections to the next downstream MSR57P relay. - Page 136 Chapter 8 Slave Modes for Multi-axis Cascaded Systems This second example is configured as a cascaded last unit via the P20 [Cascaded Config] parameter (Multi Last). It has SS_In, SLS_In, and DM_In input connections from the previous upstream MSR57P relay, but its DC_Out output is connected to a guardlocking interlock switch.
-
Page 137: Slave, Safe Limited Speed Status Only Mode
Chapter 8 Slave Modes for Multi-axis Cascaded Systems Slave, Safe Limited Speed When properly configured for Slave, Safe Limited Speed Status Only mode, the speed monitoring safety relay performs the same functions Status Only Mode as Safe Limited Speed Status Only mode as described on page 121. However, the relay regards the Door Monitor input as a Door Control output from an upstream axis, and performs a logical AND with its internal Door Control signal to form the cascaded Door Control... - Page 138 Chapter 8 Slave Modes for Multi-axis Cascaded Systems next downstream MSR57P relay. SLS Command and Stop Command outputs are connected to a 1791DS module. The SLS_Out signals change state immediately based on the IMPORTANT speed relative to the Safe Speed Limit if the Safe Limited Speed Monitoring Delay [Lim Spd Mon Delay] is set to zero.
-
Page 139: Multi-Axis Connections
Chapter 8 Slave Modes for Multi-axis Cascaded Systems This second example is configured as a cascaded last unit via the P20 [Cascaded Config] parameter (Multi Last). It has SS_In, SLS_In, and DM_In input connections from the previous upstream MSR57P relay, but its SS_Out, SLS_Out, and Door Lock Control outputs are connected to a 1791DS module. - Page 140 Chapter 8 Slave Modes for Multi-axis Cascaded Systems Middle and last relays in the cascaded chain may be configured for Automatic reset. A single reset by the first unit also resets all following units in the chain. If a fault occurs after the first axis in the cascaded chain, only the subsequent axis enters the safe state.
-
Page 141: Cascaded System Examples
Chapter 8 Slave Modes for Multi-axis Cascaded Systems The table shows the supported Safety Modes for slave relays (n+1) cascaded from slaves (n). Safety Mode Combinations for Cascaded (Middle and Last) Slave Relays Supported Safety Mode Combinations Cascaded Connections Allowed Slave Relay (n) Slave Relay (n+1) SS_Out to... - Page 142 Chapter 8 Slave Modes for Multi-axis Cascaded Systems Safe Stop and Safe Limited Speed (5-wire) Connections First Unit (Multi-First) Middle Unit (Multi-Mid) Last Unit (Multi-Last) Master Slave Slave Axis 1 Axis 2 Axis 3 S12 SS_In_0 SS_Out_0 34 S12 SS_In_0 SS_Out_0 34 S12 SS_In_0 Safe Stop Input...
- Page 143 Chapter 8 Slave Modes for Multi-axis Cascaded Systems Safe Stop and Safe Limited Speed with Door Monitoring (5-wire) Connections First Unit (Multi-First) Middle Unit (Multi-Mid) Last Unit (Multi-Last) Master Slave Slave Axis 1 Axis 2 Axis 3 Safe Stop Input S12 SS_In_0 SS_Out_0 34 S12 SS_In_0...
- Page 144 Chapter 8 Slave Modes for Multi-axis Cascaded Systems Safe Stop with Door Monitoring and Door Control (5 + 2-wire) Connections First Unit (Multi-First) Middle Unit (Multi-Mid) Last Unit (Multi-Last) Master Slave Slave Axis 1 Axis 2 Axis 3 Safe Stop Input S12 SS_In_0 SS_Out_0 34 S12 SS_In_0...
- Page 145 Chapter 8 Slave Modes for Multi-axis Cascaded Systems Safe Stop and Safe Limited Speed with Door Monitoring, Door Control, and Lock Monitoring (7 + 2-wire) Connections First Unit (Multi-First) Middle Unit (Multi-Mid) Last Unit (Multi-Last) Master Slave Slave Axis 1 Axis 2 Axis 3 S12 SS_In_0...
- Page 146 Chapter 8 Slave Modes for Multi-axis Cascaded Systems Safe Stop with Door Monitoring, Safe Limited Speed, Lock Monitoring, and Enabling Switch (7 + 2-wire) Connections 24V DC Reset First Unit (Multi-First) Middle Unit (Multi-Mid) Last Unit (Multi-Last) Master Slave Slave 2 OSSD Axis 1 Axis 2...
-
Page 147: Introduction
Chapter Safe Maximum Speed and Direction Monitoring Introduction Topic Page Safe Maximum Speed (SMS) Monitoring Safe Maximum Acceleration (SMA) Monitoring Safe Direction Monitoring (SDM) Max Speed, Max Accel, and Direction Monitoring Parameter List Safe Maximum Speed Configure Safe Maximum Speed monitoring by setting the P61 [Max Speed Enable] parameter to Enable. - Page 148 Chapter 9 Safe Maximum Speed and Direction Monitoring You define the Safe Stop Type initiated by the relay in the event of an SMS Speed Fault by using the P63 [Max Spd Stop Typ] parameter. Safe Maximum Speed Monitoring Stop Behavior P63 [Max Spd Stop Typ] Description Parameter...
- Page 149 Chapter 9 Safe Maximum Speed and Direction Monitoring SMS Speed Fault When P63 [Max Spd Stop Typ] Set to ’Use Configured Stop Type (Safe Stp Typ)’ Stop Request SMS Speed Fault Stop Monitoring Stop Delay Delay Safe Max Speed Limit Deceleration Tolerance Standstill Speed...
-
Page 150: Safe Maximum Acceleration (Sma) Monitoring
Chapter 9 Safe Maximum Speed and Direction Monitoring Safe Maximum Configure Safe Maximum Acceleration monitoring by setting the P64 [Max Accel Enable] parameter to Enable. When configured, Safe Acceleration (SMA) Maximum Acceleration Monitoring is active any time the relay Monitoring configuration is valid and Safety Mode is not set to Disabled. - Page 151 Chapter 9 Safe Maximum Speed and Direction Monitoring If an Acceleration Fault is detected during a Stop Monitoring Delay [Stop Mon Delay] and the P66 [Max Acc Stop Typ] parameter is configured as Use Safe Torque Off with Check for Standstill (Torque Off), the Stop Monitoring Delay [Stop Mon Delay] ends immediately and Stop Delay [Max Stop Time] begins.
-
Page 152: Safe Direction Monitoring (Sdm)
Chapter 9 Safe Maximum Speed and Direction Monitoring Acceleration Fault When P66 [Max Acc Stop Typ] Set to ’Use Safe Torque Off with Check for Standstill (Torque OFF)’. Stop Acceleration Request Fault Stop Delay Standstill Speed Time SS_In SS_Out MP_Out DC_Out For more information about faults, see Fault Reactions on page... -
Page 153: Max Speed, Max Accel, And Direction Monitoring
Chapter 9 Safe Maximum Speed and Direction Monitoring Positive Safe Direction Monitoring Diagram Speed Safe Direction Time Safe Direction Fault Negative Safe Direction Monitoring Diagram Safe Direction Fault Speed Time -300 Safe Direction If motion is detected in the incorrect direction while Safe Direction Monitoring is active, a Direction Fault occurs. - Page 154 Chapter 9 Safe Maximum Speed and Direction Monitoring Parameter Description Setting Direction Mon Defines the allowable direction if Safe Default: 0 = Disabled Direction Monitoring is enabled. Options: 0 = Disabled 1 = Positive always (Pos Always) 2 = Negative always (Neg Always) 3 = Positive during safe limited speed monitoring (Pos in SLS) 4 = Negative during safe limited speed monitoring...
-
Page 155: Introduction
Chapter Safety Configuration and Verification Introduction Topic Page Safety Configuration Basics of Application Development and Testing Commissioning the System Editing the Configuration Safety Configuration When you configure a speed monitoring safety system, you must record and verify the configuration signature, and set the safety-lock status of the system configuration. -
Page 156: Set A Password
Chapter 10 Safety Configuration and Verification The Config Lock status indicator on the relay illuminates solid yellow when the configuration is locked. The Config Lock status indicator flashes yellow when the configuration is unlocked. Config Lock PWR/Fault Stop Limited Speed Standstill Safe Speed Motion Power Door... -
Page 157: Reset The Password
A technical support representative will use the security code to calculate a Vendor Password value. 3. Enter the value provided by your Rockwell Automation Technical Support representative into the P19 [Vendor Password] parameter. 4. Set the P17 [Password Command] parameter to 2, which equals Reset Password. -
Page 158: Basics Of Application Development And Testing
Chapter 10 Safety Configuration and Verification Basics of Application Configuration for the intended SIL CL3, PLe, or Cat 4 system should be carried out by the system integrator or a user trained and experienced Development and Testing in safety applications. The developer must follow good design practices. -
Page 159: Specify The Safety Configuration
Chapter 10 Safety Configuration and Verification Specify the Safety Configuration You must create a specification for the system configuration that addresses the safety requirements identified by a risk assessment of your application. Use the specification to verify that the configuration is selected correctly and that it fully addresses your application’s functional and safety control requirements. -
Page 160: Configure The Speed Monitoring Relay
Chapter 10 Safety Configuration and Verification Configure the Speed Monitoring Relay You configure the relay using a HIM (catalog number 20-HIM-A3) to set the configuration parameters. You can also use DriveExplorer software, version 5.02 or later, or DriveExecutive software, version 4.01 or later. -
Page 161: Project Verification Test
Chapter 10 Safety Configuration and Verification Project Verification Test To check that the speed monitoring relay’s configuration adheres to the application specification, you must generate a suitable set of test cases covering the application. The set of test cases must be filed and retained as the test specification. -
Page 162: Editing The Configuration
Chapter 10 Safety Configuration and Verification Editing the Configuration Only authorized, specially-trained personnel can make edits to the configuration. These personnel should use all supervisory methods available, for example, using the software password protections. When authorized, specially-trained personnel make edits, they assume the central safety responsibility while the changes are in progress. -
Page 163: Configuration Examples
Chapter Configuration Examples Introduction These examples guide you through the basic steps required to program an application that uses some of the safety functions of the MSR57P Relay. The remaining chapters of this manual provide detailed information on the operation of each safety function. Topic Page Example Application 1... -
Page 164: Example 1: Initial Security Group Settings
Chapter 11 Configuration Examples Example 1: Initial Security Group Settings Security Group Parameters HIM Screen Software Screen Auto Configuring FG :Parameter Password Lock State Operating Mode Follow these steps to put the relay into Program mode for configuration. 1. From the Security group, choose the P5 [Lock State] parameter. The default value of the Lock State parameter is 0 or unlocked. -
Page 165: Example 1: General Group Settings
Chapter 11 Configuration Examples 9. Choose the P17 [Password Command] parameter. 10 . Set the P17 [Password Command] parameter value to 1, which equals Change Password (Change PW). 11 . Go to the next section to set the parameters found in the General parameters group. -
Page 166: Example 1: Feedback Group Settings
Chapter 11 Configuration Examples 6. Set the P22 [Reset Type] parameter value to 2 (default), which equals Manual Monitored (Monitored). The Manual Monitored setting requires a closing and opening of the reset circuit for a reset. 7. Choose the P23 [Reset Loop] parameter. 8. - Page 167 Chapter 11 Configuration Examples Follow these steps to configure the type of feedback used by the relay. 1. From the Feedback group, choose the P27 [Fbk Mode] parameter. 2. Set the P27 [Fbk Mode] parameter value to 0 (default) for redundant processing and cross-checking of the single encoder input in a 1oo2 architecture.
-
Page 168: Example 1: Stop Group Settings
Chapter 11 Configuration Examples 14. Set the P42 [Direction Mon] parameter value to 0 (default), which equals Disabled. You may disable Safe Direction Monitoring if only one direction of rotation is possible or there is no safety-related restriction on the direction of rotation. 15. - Page 169 Chapter 11 Configuration Examples 5. Choose the P47 [Max Stop Time] parameter. The default value is 10 s, but you can enter a value from 0…6553.5 s. 6. Type the value of the expected coast-to-stop time plus a reasonable tolerance after the Safe Stop command is initiated. If the machine’s speed is not below the Standstill Speed within the Stop Delay [Max Stop Time] you entered, a Stop Speed Fault occurs and door control remains set to Lock until the Standstill...
-
Page 170: Example 1: Limited Speed Group Settings
Chapter 11 Configuration Examples Example 1: Limited Speed Group Settings Limited Speed Group Parameters HIM Screen Software Screen Auto Configuring FG :Parameter Lim Speed Input LimSpd Mon Delay Enable SW Input Follow these steps to configure the Safe Limited Speed operation. 1. -
Page 171: Example 1: Door Control Group Settings
Chapter 11 Configuration Examples Example 1: Door Control Group Settings Door Control Group Parameters HIM Screen Software Screen Auto Configuring FG :Parameter Door Out Type DM Input Lock Mon Enable Follow these steps to configure Door Control operation for the relay. 1. -
Page 172: Example 1: Max Speed Group
Chapter 11 Configuration Examples 7. Choose the P60 [Lock Mon Input] parameter. The default value is 0 (Not Used) for applications that do not use an interlock switch. 8. Set the P60 [Lock Mon Input] parameter value to 1 for 2NC (dual-channel equivalent) operation. -
Page 173: Example 1: Final Security Group Settings
Chapter 11 Configuration Examples 3. Choose the P62 [Safe Max Speed] parameter. The default value is 0 rpm or mm/s. Enter a value from 0…6553.5. 4. Type the maximum allowable rpm value for velocity. The speed is calculated in rpm, based on the P29 [Fbk 1 Units] parameter setting (0 = Rotary feedback) entered previously. -
Page 174: Example Application 2
Chapter 11 Configuration Examples 2. Set the P6 [Operating Mode] parameter value to 1, which equals Run mode. A configuration signature is generated. 3. Choose the P10 [Signature ID] parameter and record the configuration signature value stored in this parameter. 4. -
Page 175: Example 2: Initial Security Group Settings
Chapter 11 Configuration Examples Example 2: Initial Security Group Settings Security Group Parameters HIM Screen Software Screen Auto Configuring FG :Parameter Password Lock State Operating Mode Follow these steps to put the relay into Program mode for configuration. 1. From the Security group, choose the P5 [Lock State] parameter. The default value of the Lock State parameter is 0 or unlocked. -
Page 176: Example 2: General Group Settings
Chapter 11 Configuration Examples 9. Choose the P17 [Password Command] parameter. 10. Set the P17 [Password Command] parameter value to 1, which equals Change Password (Change PW). 11. Go to the next section to set the parameters found in the General parameters group. -
Page 177: Example 2: Feedback Group Settings
Chapter 11 Configuration Examples 5. Choose the P22 [Reset Type] parameter. 6. Set the P22 [Reset Type] parameter value to 2 (default), which equals Manual Monitored (Monitored). The Manual Monitored setting requires an closing and opening of the reset circuit for a reset. 7. - Page 178 Chapter 11 Configuration Examples Follow these steps to configure the type of feedback used by the relay. 1. From the Feedback group, choose the P27 [Fbk Mode] parameter. 2. Set the P27 [Fbk Mode] parameter value to 0 (default) for redundant processing and cross-checking of the single encoder input in a 1oo2 architecture.
-
Page 179: Example 2: Stop Group Settings
Chapter 11 Configuration Examples 15 . Choose the P43 [Direction Tol] parameter. 16 . Enter value between 0…65,535 degrees based on the encoder’s specifications. The default value is 10 degrees. This sets the position limit tolerated in the wrong direction when Safe Direction Monitoring is enabled. - Page 180 Chapter 11 Configuration Examples 4. Set the P45 [Safe Stop Type] parameter value to 1, which equals Safe Stop 1. Safe Stop 1 monitors deceleration profiles. When Standstill Speed is detected within the Stop Delay [Max Stop Time], the relay switches off Motion Power and sets door control logic to Unlock.
-
Page 181: Example 2: Limited Speed Group Settings
Chapter 11 Configuration Examples 13 . Choose the P51 [Stop Decel Tol] parameter. The Stop Decel Tol parameter determines the total percentage of the Decel Ref Speed that is used as the upper limit of deceleration speed. 14 . Enter 100% for this example. 15 . - Page 182 Chapter 11 Configuration Examples 3. Choose the P53 [LimSpd Mon Delay] parameter. The default value is 0 s. The valid range is from 0…6553.5 s. Type a value to define the desired delay between the SLS_In input ON to OFF transition and the start of Safe Limited Speed monitoring.
-
Page 183: Example 2: Door Control Group Settings
Chapter 11 Configuration Examples Example 2: Door Control Group Settings Door Control Group Parameters HIM Screen Software Screen Auto Configuring FG :Parameter Door Out Type DM Input Lock Mon Enable Follow these steps to configure Door Control operation for the relay. 1. -
Page 184: Example 2: Max Speed Group
Chapter 11 Configuration Examples 7. Choose the P60 [Lock Mon Input] parameter. The default value is 0 (Not Used) for applications that do not use an interlock switch. 8. Set the P60 [Lock Mon Input] parameter value to 1 for 2NC (dual-channel equivalent) operation. -
Page 185: Example 2: Final Security Group Settings
Chapter 11 Configuration Examples 3. Choose the P62 [Safe Max Speed] parameter. The default value is 0 rpm or mm/s. Enter a value from 0…6553.5. 4. Type the maximum allowable rpm value for velocity. The speed is calculated in rpm, based on the Fbk 1 Units parameter setting (0 = Rotary feedback) entered previously. - Page 186 Chapter 11 Configuration Examples 3. Choose the P10 [Signature ID] parameter and record the configuration signature value stored in this parameter. 4. If you configured a password, choose the P1 [Password] parameter and type the password. 5. Choose the P5 [Lock State] parameter. 6.
-
Page 187: Troubleshoot The Msr57P Relay
Chapter Troubleshoot the MSR57P Relay Introduction Topic Page Status Indicators Nonrecoverable Faults Fault Recovery Input and Output Faults Fault Codes and Descriptions Fault Reactions Status Attributes Status Indicators The MSR57P relay features eight indicators to provide status information. Indicator Status Description Config Green/On... -
Page 188: Nonrecoverable Faults
Chapter 12 Troubleshoot the MSR57P Relay Indicator Status Description Motion Green/On The Motion Power (MP) output is ON. Power The MP output is OFF. Red/Flashing The MP output has a fault. Green/On The door is closed. Door Red/On The door is open. Red/Flashing Door Monitor or Lock Monitor input switch has a fault. -
Page 189: Fault Recovery
Chapter 12 Troubleshoot the MSR57P Relay Fault Recovery If the fault is no longer present, the fault condition may be cleared by a successful SS Reset, except in the case of an Invalid Configuration Fault, MP Out Fault, or Reset On At PwrUp Fault. An Invalid Configuration Fault is cleared by a successful reconfiguration. - Page 190 Chapter 12 Troubleshoot the MSR57P Relay Safe State Faults Code Display Text Description Combined Flt A combined fault is indicated if any error has occurred. Core Error A nonrecoverable microprocessor error has occurred. Invalid Cfg An Invalid Configuration fault occurs if a configuration parameter is set to an illegal value or combination of values.
- Page 191 Chapter 12 Troubleshoot the MSR57P Relay Fault While Stopping Faults Code Display Text Description Decel Flt A Deceleration Fault occurs if the speed is detected at greater than the limit specified for the configured Stop Delay [Max Stop Time] when the configured Safe Stop Type is Safe Stop 1 or 2. Stop Spd Flt A Stop Speed Fault occurs when the relay is configured for a Safe Stop Type that includes Standstill Speed checking (Safe Stop 1 or 2, and Safe Torque Off with Standstill Speed Checking) and the detected speed is...
-
Page 192: Fault Reactions
Chapter 12 Troubleshoot the MSR57P Relay Stop Category Fault Descriptions Code Display Text Description Door Mon Flt If the relay is configured for Safe Limited Speed (SLS), but SLS monitoring is not active, the DM_In input must be ON (door closed) or a Door Monitoring Fault occurs. A Door Monitoring Fault occurs if the door is open (DM_In input is OFF) when an SS Reset or SLS Reset is requested (SLS_In transitions to ON). -
Page 193: Stop Category Faults And Fault While Stopping Faults
Chapter 12 Troubleshoot the MSR57P Relay Stop Category Faults and Fault While Stopping Faults If a Stop Category Fault or Fault While Stopping Fault occurs while the relay is monitoring motion, the relay initiates the configured Safe Stop Type. The type of fault detected determines the relay’s response when the fault occurs while the relay is executing the configured Safe Stop Type. -
Page 194: Status Attributes
Chapter 12 Troubleshoot the MSR57P Relay If a Stop Category Fault or Fault While Stopping Fault occurs after Standstill Speed has been reached and the relay has set door control logic to Unlock, the relay goes to the Safe State. If a fault occurs after Standstill Speed has been reached, door ATTENTION control logic may remain unlocked. - Page 195 Chapter 12 Troubleshoot the MSR57P Relay Guard Status Display Text Description SS Decel This bit is set to 1 if the configured Stop Delay [Max Stop Time] is active for a Safe Stop 1 or Safe Stop 2 while the relay is executing the Safe Stop. This bit is not set during a Category 0 Safe Torque Off Safe Stop.
- Page 196 Chapter 12 Troubleshoot the MSR57P Relay Guard Status Display Text Description DM In Prog The status of this bit is dependent on the relay’s speed monitoring configuration. The bit is 1 when: • the relay is configured for Safe Stop with Door Monitoring and is monitoring motion, or is executing a Safe Stop.
-
Page 197: I/O Diagnostic Status Attributes
Chapter 12 Troubleshoot the MSR57P Relay I/O Diagnostic Status Attributes These attributes are stored in the P69 [I/O Diagnostic Status] parameter. Each bit reflects the present state of I/O signal and is used for diagnostics: 0 = open; 1 = closed. I/O Diag Status Display Text SS In Ch 0... -
Page 198: Configuration Fault Codes
Chapter 12 Troubleshoot the MSR57P Relay Configuration Fault Codes Use these fault codes, stored in P70 [Config Flt Code], to identify the reason for an Invalid Configuration Fault. Value Description Display No Fault. No Fault Password Required. Password Req Safety Mode (P21) value not legal based on Cascaded Config (P20) value. P21 (P20) Door Out Type (P57) value not legal based on Cascaded Config (P20) value. -
Page 199: Introduction
Appendix Specifications Introduction Topic Page General Specifications Environmental Specifications Certifications Encoder Specifications General Specifications Attribute Value Standards IEC/EN60204-1, ISO12100, IEC 61508, IEC 61800-5-2 Safety category Cat. 4 and PLe per EN ISO 13849-1; SIL CL3 per IEC 61508 and EN 62061 Power supply 24V DC, 0.8…1.1 x rated voltage PELV or SELV... -
Page 200: Environmental Specifications
Appendix A Specifications Attribute Value Input-to-output response 20 ms time (SS_In, SLS_In, DM_In, ESM_In, LM_In) Overspeed Response User-configurable Time Power-on delay, max Pollution degree Enclosure protection IP40 Terminal protection IP20 Wire Type Use copper that will withstand 60/75 °C (140/167 °F) Conductor size 0.2…2.5 mm (12…24 AWG) -
Page 201: Certifications
Appendix A Specifications Certifications Value Certification c-UL-us UL Listed, certified for US and Canada. European Union 2004/108/EC EMC Directive, compliant with: • EN 61000-6-4; Industrial Emissions. • EN 61131-2 Programmable Controllers (Clause 8, Zone A & B). • EN 61326-3-1; Meas./Control/Lab., Industrial Requirements. •... - Page 202 Appendix A Specifications Notes: Publication 440R-UM004B-EN-P - March 2010...
-
Page 203: Parameter Groups
Appendix Parameter Data Parameters are organized into both a linear list by parameter number, and into device-specific files and groups. Parameter Groups Parameters for the speed monitoring safety relay appear in the groups Security, General, Feedback, Stop, Limited Speed, Door Control, Max Speed, and Faults. -
Page 204: Parameters And Settings In A Linear List
Appendix B Parameter Data Parameters and Settings in The table lists the configurable parameters and their valid settings in numerical order. If any values other than those listed in the table are a Linear List configured for any of the parameters, an Invalid Configuration Fault occurs. - Page 205 Appendix B Parameter Data List of Parameters Name Description Values Safety Defines the primary operating mode of the speed Default: 1 = Master, Safe Stop (Safe Stop) Mode monitoring safety functions. Options: 0 = Disabled 1 = Master, Safe Stop (Safe Stop) 2 = Master, Safe Stop with Door Monitoring (Safe Stop DM) 3 = Master, Safe Limited Speed (Lim Speed) 4 = Master, Safe Limited Speed with Door Monitoring...
- Page 206 Appendix B Parameter Data List of Parameters Name Description Values Fbk 1 Counts/Revolution. Default: 1024 Resolution Range: 1 65,535 pulses/revolution or pulses/mm … based on rotary or linear configuration defined by P29 [Fbk 1 Units] parameter Fbk 1 Volt Encoder 1 voltage to be monitored. Default: 0 = Voltage not monitored Options: 0 = Voltage not monitored 5 = 5V ±10%...
- Page 207 Appendix B Parameter Data List of Parameters Name Description Values Safe Stop Configuration for Safe Stop input (SS_In). Default: 1 = Dual-channel equivalent (2NC) Input Options: 0 = Not used 1 = Dual-channel equivalent (2NC) 2 = Dual-channel equivalent 3 s (2NC 3s) 3 = Dual-channel complementary (1NC + 1NO) 4 = Dual-channel complementary 3 s (1NC + 1NO 3s) 5 = Dual-channel SS equivalent 3 s (2 OSSD 3s)
- Page 208 Appendix B Parameter Data List of Parameters Name Description Values Safe Speed Defines the speed limit that will be monitored in Safe Default: 0 Limit Limited Speed (SLS) mode. Range: 0 6553.5 rpm or mm/s … based on rotary or linear configuration defined by P29 [Fbk 1 Units] parameter Speed Provides hysteresis for SLS_Out output when Safe Limited...
- Page 209 Appendix B Parameter Data List of Parameters Name Description Values Max Acc Safe Maximum Acceleration Monitoring Stop Behavior. Default: 0 = Use Safe Torque Off with Check for Standstill (Torque Off) Stop Typ Defines the safe stop type that will be initiated in the event Range: 0 = Use Safe Torque Off with Check for Standstill (Torque Off) of an Acceleration Fault.
- Page 210 Appendix B Parameter Data List of Parameters Name Description Values Guard Bit 0: StatusOK 0 = Fault; 1 = OK Status Bit 1: Configuration_Lock (Config Lock) 0 = Unlock; 1 = Lock Bit 2: MP_Out_Value (MP Out) 0 = Off; 1 = On Bit 3: SS_In_Value (SS In) 0 = Off;...
- Page 211 Appendix B Parameter Data List of Parameters Name Description Values IO Diag Indicates present state of I/O used for diagnostics. 0 = Open; 1 = Closed Status Bit 0: SS_in_ch_0 status (SS In Ch 0) IMPORTANT: When the MSR57P relay is not in the Run mode, the P69 [IO Diag Status] parameter is not updated.
- Page 212 Appendix B Parameter Data List of Parameters Name Description Values Config Flt Configuration Fault Code. Options: 0 = No Fault Code 1 = Password Required (Password Req) 2 = P21 [Safety Mode] value not legal based on P20 [Cascaded Config] value. 3 = P57 [Door Out Type] value not legal based on P20 [Cascaded Config] value.
- Page 213 Appendix B Parameter Data List of Parameters Name Description Values MP Out Default: 0 = Pulse Test Defines whether the MP_Out output is pulse-tested. Mode Options: 0 = Pulse test 1 = No pulse test SS Out Default: 0 = Pulse Test Defines whether the SS_Out output is pulse-tested.
- Page 214 Appendix B Parameter Data Notes: Publication 440R-UM004B-EN-P - March 2010...
-
Page 215: Introduction
Appendix Using a HIM Introduction Topic Page Connect a HIM Module Setting Parameters with a HIM Module Accessing the Fault History Queue Connect a HIM Module You can set the MSR57P parameters by using a HIM module or a personal computer running DriveExplorer or DriveExecutive software. Connect the 20-HIM-A3 module to the relay by using a 20-HIM-H10 cable. -
Page 216: Setting Parameters With A Him Module
Appendix C Using a HIM Setting Parameters with a A HIM module displays only one parameter at a time. The keypad lets you scroll through the HIM menu structure to find the parameters you HIM Module need to set. Once the HIM module is connected to the safety relay, follow these steps to set parameters. -
Page 217: Accessing The Fault History Queue
Appendix C Using a HIM 5. Scroll to the desired parameter and press to display the parameter value screen. Auto Configuring FGP: Safety Mode Safe Stop 6. Press to edit the parameter. 7. Press to change the value. 8. If desired, press to move from digit to digit, letter to letter, or bit to bit. - Page 218 Appendix C Using a HIM Notes: Publication 440R-UM004B-EN-P - March 2010...
-
Page 219: Appendix D Introduction
Appendix Use DriveExplorer or DriveExecutive Software Introduction Topic Page Connect a Personal Computer Using DriveExplorer Software Using DriveExecutive Software Connect a Personal You must have either DriveExplorer or DriveExecutive software installed on your personal computer and an serial or USB converter. Computer Description Cat. -
Page 220: Using Driveexplorer Software
Appendix D Use DriveExplorer or DriveExecutive Software 2. Connect the appropriate cable between the serial or USB converter and the DPI connector on the relay. Using USB Converter Using Serial Converter 20-HIM-H10 Cable 1202-C10 Cable Power Status Indicator Power Status Indicator 1203-SFC Cable Type A to Type B USB... -
Page 221: Edit Parameters In Driveexplorer Software
Appendix D Use DriveExplorer or DriveExecutive Software 2. From the Explore menu, choose Connect and Configure Communication. 3. On the Configure Communication dialog box, choose the serial port to which you are connected and type the baud rate. If you are using the USB converter, the communication port must match the port that was mapped when you installed the USB drivers and the communication rate must be set to 115,200 bps. -
Page 222: Access The Fault History Queue
Appendix D Use DriveExplorer or DriveExecutive Software Follow these steps to edit a parameter. 1. Expand the MSR57P relay. 2. Choose either Parameter List or expand the Parameter file to display the parameter groups. The configuration can be edited only when the MSR57P relay is unlocked and in Program mode. -
Page 223: Using Driveexecutive Software
Appendix D Use DriveExplorer or DriveExecutive Software Using DriveExecutive You need to configure communication between DriveExecutive software and the DPI port on the relay before you can use the Software software to edit the relay’s parameters. Configure Serial Communication Follow these steps to configure communication between DriveExecutive software on your personal computer, the AnaCANda or USB communication converter, and the DPI port on the relay. - Page 224 Appendix D Use DriveExplorer or DriveExecutive Software 3. Configure the RS232 DF1 device as shown. a. Choose the Comm Port to which you are connected. If you are using the USB converter, the comm port must be the port that was mapped when you installed the USB drivers. b.
- Page 225 Appendix D Use DriveExplorer or DriveExecutive Software 6. Open RSWho in RSLinx software to verify that the new driver is recognized. 7. Close RSLinx software. 8. Open DriveExecutive software. 9. Advance to Drive Selection and choose Connect to Drive. 10 . Choose your workstation (01 in the preceding diagram) and click OK.
-
Page 226: Edit Parameters
Appendix D Use DriveExplorer or DriveExecutive Software Edit Parameters In DriveExecutive software, you can choose parameters from the linear list or by using the file and group. The left pane of the DriveExecutive software dialog shows the connected devices and the right pane lists the parameters available. DriveExecutive Parameter Information Column Description of Contents... - Page 227 Appendix D Use DriveExplorer or DriveExecutive Software Follow these steps to edit a parameter. 1. Expand the MSR57P relay. 2. Choose either Parameter List or expand the Parameter file under the MSR57P relay to display the parameter groups. 3. Edit a parameter by double-clicking it and typing the new value. 4.
- Page 228 Appendix D Use DriveExplorer or DriveExecutive Software Notes: Publication 440R-UM004B-EN-P - March 2010...
-
Page 229: Introduction
Appendix Application Examples Introduction Topic Page PowerFlex 70 Drive with Safe-Off Application Example PowerFlex 700 Drive without Safe-Off Kinetix 6000 or Kinetix 7000 Drives with Safe-off Example Kinetix 2000 Drive without Safe-off Example This application appendix provides examples of relay and drive combinations. -
Page 230: Powerflex 70 Drive With Safe-Off Application Example
Appendix E Application Examples PowerFlex 70 Drive with Safe-Off Application Example E-Stop Reset Run Maintenance Stopped Mode Safe Speed Running This example is configured for Safe Stop 1. The control cabinet contains an MSR57P relay, a PowerFlex 70 AC Drive with Safe-Off function, as well as a PanelView terminal. - Page 231 Appendix E Application Examples PowerFlex 70 Drive System Layout Safe PowerFlex 70 Stop Drive with Configuration Tools Safe-Off SLS Request Encoder Cable 1585J-M8RB-2M5 20-HIM-A3 20-HIM-H10 S52 S62 24 A1 S12 S22 51 52 Encoder 1 Config Lock PWR/Fault -OR- Encoder 1 Stop Limited Speed Standstill...
- Page 232 Appendix E Application Examples PowerFlex 70 Drive Example Wiring Diagram +24V DC Power to Release Request 11 21 33 SLS Request E-Stop 800FM-KM23 12 22 34 800FM-MT44 800F-MX02V 800F-MX02V Remove two internal jumpers TLS3-GD2 440G-T27260 L1 L2 L3 PowerFlex 70 9 24V DC Door Lock Pulse Test...
-
Page 233: Powerflex 700 Drive Without Safe-Off
Appendix E Application Examples PowerFlex 700 Drive PowerFlex 700 Drive System Layout without Safe-Off PowerFlex 700 Drive Enabling Switch Safe Stop Configuration Tools SLS Request Cable 20-HIM-A3 1585J-M8RB-2M5 20-HIM-H10 Encoder 1 Motor Power Input -OR- Cable 1203-USB AnaCANda MSR57P Relay Encoder 2 Input MP Outputs... - Page 234 Appendix E Application Examples PowerFlex 700 Drive Wiring Diagram +24V DC SLS Request Power to 800FM-KM23 Release 800F-MX02V Request 11 21 33 E-Stop 12 22 34 800FM-MT44 800F-MX02V Remove two internal 440J-N21TNPM Enabling Switch jumpers TLS3-GD2 440G-T27260 L1 L2 L3 Door Lock Pulse Test Lock...
-
Page 235: Kinetix 6000 Or Kinetix 7000 Drives With Safe-Off Example
Appendix E Application Examples Kinetix 6000 or Kinetix 7000 Drives with Safe-off Example E-Stop Reset Run Maintenance Stopped Mode Safe Speed Running Kinetix drives define the positive direction for encoders as B leading A. Therefore if drive polarity for the Kinetix drive is configured as positive, then the P30 [Fbk 1 Polarity] for the MSR57P should be configured as negative. - Page 236 Appendix E Application Examples Kinetix 6000 or Kinetix 7000 Drive System Layout Kinetix 6000 or Motion Power Outputs and Enabling Switch Safe Kinetix 7000 Drive Feedback Monitoring From the Stop with Safe-off SLS Request MSR57P Relay to Kinetix Safe-off Interface Low Profile Encoder Cable Connector...
-
Page 237: Kinetix 2000 Drive Without Safe-Off Example
Appendix E Application Examples Kinetix 2000 Drive without Kinetix 2000 Drive System Layout Safe-off Example Kinetix 2000 Drive without Enabling Switch Safe-off (No Safety Header) Safe Stop SLS Request Low Profile 20-HIM-A3 Connector Encoder Cable 2090-K2CK-D15M 1585J-M8RB-2M5 20-HIM-H10 -OR- 1203-USB or Encoder 1 1203-SSS(B) Input... - Page 238 Appendix E Application Examples Notes: Publication 440R-UM004B-EN-P - March 2010...
- Page 239 Index Symbols (PL)e 18 DC_Out output 68 wiring 69 deceleration monitoring 93 Numerics dimensions 33 1203-SSS 219 DIN rail 34 1203-USB 219 Disabled mode 26 1203-USB converter discrepancy checking configure communication 220 encoders 84 1585J-M8RB-2M5 cable 44 DM_In input 62 2 Channel Sourcing 99 Door Control 99 20-HIM-A3 module 29...
- Page 240 Index encoder connecting 38 keypad 217 resolution 77 specifications 201 ESM_In input 63 European norm. language definition 11 display options 81 LED Indicators 187 LM_In input 63 Lock Monitoring 27 failure wiring 69 contact information 24 lock status 155 fault low profile connector kits Door Monitoring 120 wiring 53...
- Page 241 Index Safe Limited Speed Status Only 123 Reset Loop input Safe Stop 101 wiring 65 Safe Stop with Door Monitoring 105 reset qualification 77 Slave, Safe Limited Speed 134 reset type 76 Slave, Safe Limited Speed Status Only Reset_In input 109 risk assessment 31 Slave, Safe Stop 129 RSLinx software 219...
- Page 242 Index Safe Stop with Door Monitoring mode specifications encoder 201 environmental 200 Safe Torque Off with Standstill Checking general 199 Speed Hysteresis 122 Safe Torque Off without Standstill speed resolution 77 Checking 94 speed value display 82 safety certification SS Reset 76 TÜV Rheinland 15 SLS with Door Monitoring and Enabling safety functions overview 25...
- Page 243 Index reset_In input 64 RL_In input 65 validation wiring example third-party 161 Safe Limited Speed mode 111 verify Safe Limited Speed Status Only mode configuration 161 lock status 161 Safe Stop mode 104 Signature ID 161 Safe Stop with Door Monitoring mode Slave, Safe Limited Speed 135 Slave, Safe Limited Speed Status Only wiring...
- Page 244 Index Publication 440R-UM004B-EN-P - March 2010...
- Page 246 Rockwell Automation representative. New Product Satisfaction Return Rockwell Automation tests all of its products to ensure that they are fully operational when shipped from the manufacturing facility. However, if your product is not functioning and needs to be returned, follow these procedures.
Need help?
Do you have a question about the Allen-Bradley Guardmaster MSR57P and is the answer not in the manual?
Questions and answers