Advertisement
Quick Links
E09ME22003
Product Name:
Product Application:
4 Camera's Front/Back/Left/Right (Automatic Front, Right, Left and Rear Camera) For Blind
Spot detection
1 Reverse Camera with dynamic guidelines (for cars without OE Camera)
1 Front Camera with automatic trigger (for cars with OE Camera)
3 Camera's Front/Right/Left with automatic trigger (for cars with OE Camera) For Blind Spot
detection
Car Types:
Mercedes NTG5.0/5.1 systems, A, B, C, E, GLE, GLC, ML models after 2015.
E09ME22003
Installation Manual
V20160705
Manual Version:
Advertisement

Related Manuals for Setma E09ME22003


Summary of Contents for Setma E09ME22003
- Page 1 V20160705 Manual Version: E09ME22003 Installation Manual E09ME22003 Product Name: Product Application: 4 Camera's Front/Back/Left/Right (Automatic Front, Right, Left and Rear Camera) For Blind Spot detection 1 Reverse Camera with dynamic guidelines (for cars without OE Camera) 1 Front Camera with automatic trigger (for cars with OE Camera) ...
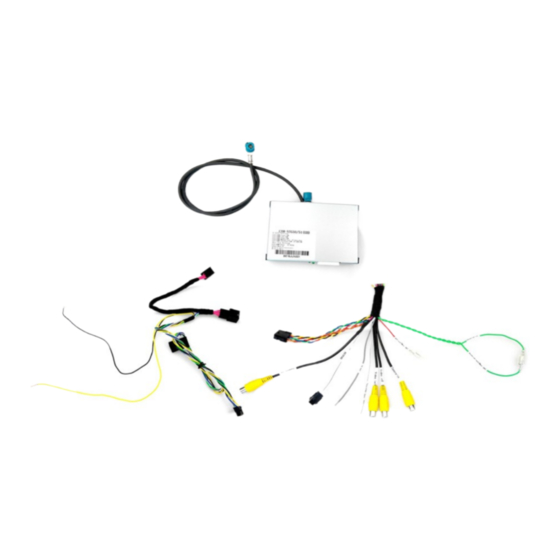
- Page 2 What's in the box: Item Description Part No. 4CAM Camera Interface Camera RCA Harness Power CAN Harness Optional Camera's available 1. Description: It will enable user to install Front Camera, Reverse Camera, Right Side Camera and Left Side Camera. This will enable the driver to eliminate blind spots while driving and parking.
- Page 3 Reverse Camera and Guidelines shown on Mercedes C-Class. Move according to data from steering wheel position. Only reverse camera can be chosen by selecting the desired Dips if other camera's not needed. Parking Sensor will be displayed with the reverse guidelines and reverse camera. Front Camera shown on Mercedes C-Class.
- Page 4 2. Camera Interface Functions: The Reverse Camera is automatically triggered when engaging the reverse gear of the car. The display is also equipped with dynamic reverse guidelines which help guide the driver while reversing the car. If car is equipped with parking sensors, They will be displayed with the reversing image.
-
Page 5: Installation
3. Installation: Installation of this interface is very easy as it is completely plug and play. There is no need to open the radio to insert any PCB etc. Each Mercedes car model has a different process to open the dashboard panel. - Page 6 In order to install the interface you will need to open the center console to gain access to the HU/CD unit. Once gaining access you will need to remove the main harness and insert our harness in it and insert the OE harness into our plug in order to complete the T-...
-
Page 7: Connection Diagram
4. Connection Diagram: Connect LVDS Cable Behind CD's Yellow Port and connect OE Cable here Connect Power harness behind CD Power for all for camera's Front Cam Port Connect Power and Right, Left Ground here Touch Pad for and Back Cam forced switch Port Not used... - Page 8 5. Camera Connection: All camera's will be connected with the green wire. It can provide 12V/3A which is sufficient to supply power for the 3 or 4 camera's. Connect RCA accordingly Power OEM Style and Blind spot camera's with sensors are also available.
- Page 9 6. Interface DIP Settings: DIP Down= ON DIP UP= OFF Default Front camera installed Front camera not installed DOWN(ON) Left camera installed (AV1) Left camera not installed DOWN(ON) Right camera installed (AV2) Right camera not installed DOWN(ON) Reverse triggered by Green Reverse triggered by Green UP(OFF) wire...
- Page 10 8. Other Uses of Interface and their DIP settings: In case interface is used only for adding only Reverse Camera or external 360 Surround View System: Interface Dip 1, 2, 3,4 set to= UP (OFF) Interface Dip 5 set to= DOWN (ON) ...
- Page 11 9. Parameters: Name Parameter Front Cam Video , Reverse Cam 0.7Vpp with 75 ohm impedance video NTSC/PAL/SECAM automatic switch Reverse Control wire >5V will force into camera mode. these wires can tolerate 12V for <10 seconds. Normal Power consumption 4.8W Standby current <...
Need help?
Do you have a question about the E09ME22003 and is the answer not in the manual?
Questions and answers