
Related Manuals for Project EV EVA-07S-S


Summary of Contents for Project EV EVA-07S-S
- Page 1 User Manual A Complete Guide From Installation To Operation EVA-07S-S / EVA-07S-SE EVA-07S-SE-RFID / EVA-07S-PE-RFID Single Phase AC Charger User Manual...
-
Page 2: Disclaimer
Disclaimer Disclaimer This user manual is copyrighted by Project EV. (Hereinafter referred to as “ATESS Power Technology”). No company or person may extract or copy part or all of this user manual without the written permission of ATESS Power Technology. Content must not be transmitted in any form, including materials and publications. -
Page 3: Product Features
TIME SHIFTING LOAD MANAGEMENT Project EV are proud to be one of the most competitively priced electric vehicle charge point manufacturers on the market, with a highly versatile range, we are positive Project EV can solve all your charging needs. -
Page 4: Table Of Contents
Solar Configuration Load Management Configuring a laptop for commissioning 17-18 Laptop Commissioning settings explained 19-21 Choosing your app Project EV Standard App 23-39 Using the App Creating a new account Commissioning Process EV Smart Charge Point Regulations App Status Charger Control Methods... -
Page 5: Product Description
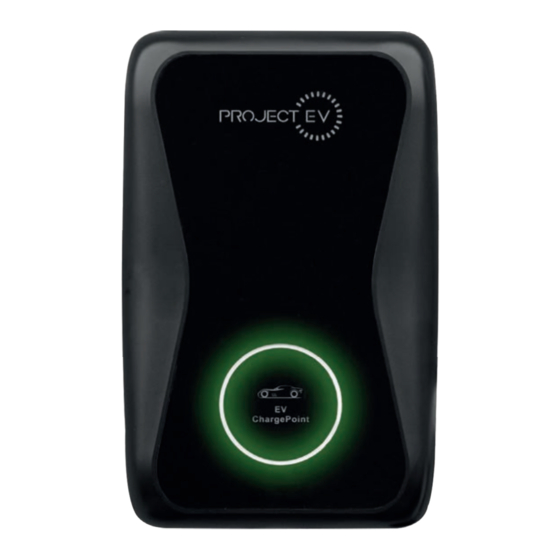
Product Description 1. Charger ID Plate 2. Mounting Bracket 3. RCBO 4. Comms Gland Entry 5. Power Input Gland Entry 6. Charger Status Indicator 7. Project EV Power Indicator 8. Emergency Stop / Force Charge Button 9. Type 2 Charging Socket... -
Page 6: Specification
Specification EVA-07S-S Input & Output Mechanical Input Amps 32a Single Phase Dimension (W/H/D) 240/380/145mm Input voltage 230V AC <5KG Weight Input frequency 50/60HZ Mounting & Accessories Output voltage 230V AC Max. output power 7.3KW Wall-mounting Standard Max. output current Floor-pole Opt. -
Page 7: Eva-07S-Se
Specification EVA-07S-SE Mechanical Input & Output Dimension (W/H/D) 240/380/145mm Input Amps 32a Single Phase <5KG Weight Input voltage 230V AC Input frequency 50/60HZ Mounting & Accessories Output voltage 230V AC Wall-mounting Standard Max. output power 7.3KW Floor-pole Opt. EV-FLRSTAND Max. output current Ground-mounting Opt. -
Page 8: Eva-07S-Se Rfid
Specification EVA-07S-SE-RFID Mechanical Input & Output Dimension (W/H/D) 240/380/145mm Input Amps 32a Single Phase <5KG Weight Input voltage 230V AC Input frequency 50/60HZ Mounting & Accessories Output voltage 230V AC Wall-mounting Standard Max. output power 7.3KW Floor-pole Opt. EV-FLRSTAND Max. output current Ground-mounting Opt. -
Page 9: Eva-07S-Pe-Rfid
Specification EVA-07S-PE-RFID Input & Output Mechanical Input Amps 32a Single Phase Dimension (W/H/D) 220/375/145mm <5KG Input voltage 230V AC Weight Input frequency 50/60HZ Mounting & Accessories Output voltage 230V AC Max. output power 7.3KW Wall-mounting Standard Max. output current Floor-pole Opt. -
Page 10: Packaging List 9 - Installation
Packaging List II. Packaging List Name Remark Other II. Packaging List Number Name Quantity Comments Charger Charger User manual Name Remark Quality Certificate Mounting Bracket Charger Attached to Quality certi cate charger User manual Mounting bracket ST6.3X40 Stainless Steel Hex Head Self Drilling Screws Quality certi cate 12X46 Plastic Expansion Plugs... -
Page 11: Wall Mounted
Installation Wall Mounted III. Installation and wiring 3.1 Mount on a wall 3.1.1 Open the packaging, you’ll see a charge point, a mounting bracket, a user manual Mount on a Wall III. Installation and wiring and a bag of mounting accessories. There is also an RFID card if the charge point is RFID version. - Page 12 Installation Wall Mounted 3.1.3 Put the charge point onto the bracket, and x it with the 2 screws at the botto the charge point. The installation is done. 3.1.3 Put the charge point onto the bracket, and x it with the 2 screws at the the charge point.
-
Page 13: Pole Mounted
Installation Pole Mounted 3.2 Mount on a pole 3.2.1 Open the packaging of the pole, take out the pole and mounting accessories. 3.2 Mount on a pole 3.2.1 Open the packaging of the pole, take out the pole and mounting accessories. 3.2 Mount on a pole 3.2 Mount on a pole Mount on a Pole... - Page 14 Installation Pole Mounted 4. Position the charge point bracket and secure it on the pole with the 4 screws provided 3.2.4 Fix the mounting bracket onto the pole. with pole. Once the bracket is secure, mount the charger onto the bracket and fix it with the 2 screws at the bottom of the charge point.
-
Page 15: Ct Clamp
Installation CT Clamp To monitor the real-time power import and export, a CT clamp is needed for this function IV. Parameter setting to work properly. The CT Clamp is needed to operate and use, both solar and dynamic load balancing only. wiring is done, connect the Charger to a computer and Note: CT Clamp wiring can be extended up to 50m using Cat5e cable. - Page 16 Solar Configuration For solar features to work, the CT clamp must be installed correctly and the following settings must be set prior to switching Solar Modes: - Enable Power Allocation Charge - Enabled - External current sampling wiring method- CT2000 The charge point can work with grid-tied solar system, to detect and use the residual solar power to charge your car that would.
- Page 17 Load Management Dynamic Load Management d. Some routers have 2 WiFi signals, one is 2.4GHz, the other is 5GHz. use the 5GHz WiFi as their default WiFi but the charger can only conne WiFi. So if the charger can connect to your mobile phone hotspot, but c For dynamic load management to work the CT clamp must be installed correctly and the to the home WiFi please check the router to see if you are using the 5G following setting must be set:...
- Page 18 Configuring a laptop for commissioning Setting the laptop for a static IP. 7.4 Cannot access parameter setting page 4GHz nect a. Check if you have connected the charger to your computer, e the The Charger’s default IP address is 192.168.1.5. To access the parameter setting interface, b.
- Page 19 Configuring a laptop for commissioning c. Chec Chrom d. Chec addres e. You f. If you can res 4. Select Internet Protocol Version 4 (TCP/IPV4) and click on properties. (4). Select Internet Protocol Version 4 (TCP/IPv4) and click on Properties. Then y 5.
-
Page 20: Laptop Commissioning Settings Explained
Laptop commissioning settings explained eb browser is being used, it’s suggested you use Firefox or IE. e used to update rmware. ve input the complete path, which is http://192.168.1.5:8080, in the not leave out the http:// or the“:8080”. o restart the charger to access its parameter setting page. ged the charger’s IP to another value but cannot remember it, you harger to factory setting by pressing and holding the reset button. - Page 21 2. Charger ID: this is the unique identification of the Charger. If the charger is to be connected to Project EV back-office server, this ID must be set as the serial number on the nameplate of the Charger. Otherwise the Charger cannot be registered on the server.
- Page 22 40. Plug + charge allowed charge window 41. Heartbeat signal sent to the server (time in seconds) 42. Password required by some sim cards that are not Project EV. 43. Time out (in seconds) for starting charge without plugging in a vehicle 44.
- Page 23 (via app, plug and go, RFID swipe card) DOWNLOAD THE ELECTRIC MILES INSTALLER APP DOWNLOAD THE ELECTRIC MILES INSTALLER APP Configuring a Project EV charging site has never been easier. All you need is a phone with the Installer Miles app to set up existing and new...
-
Page 24: Project Ev Standard App
DOWNLOAD THE FREE APP TODAY FREE APP TODAY The Project EV Free App allows for full remote control, from anywhere. With our bespoke app, you can remotely set your charger or chargers to only provide power during off-peak hours, allowing for charging at a much lower energy tariff, saving you money. -
Page 25: Using The App
Introduction to the Project EV Standard App Description The Project EV Standard App is an app for controlling your charger. It can help you quickly and easily charge your vehicle with your charger. Main Functions Of Project EV Standard App (1) The user can add a charger by entering the chargepoint serial number and scanning the QR code. -
Page 26: Creating A New Account
field. Once all the fields have been completed, read and tick the user agreement before pressing register. Installer details are used by Project EV to give assistance to installers, and to contact them should an issue be raised. This could be installation based and not charger hardware issues. -
Page 27: Commissioning Process
APP Commission 1. Download Project EV App. 2. Create user account 3. Add charger to serial number on the account. 4. Power charger up from the fuseboard – (This will emit hotspot for 1-2 minutes from when unit is powered on to allow user to get back to charger) 5. -
Page 28: Ev Smart Charge Point Regulations
• People at their place of work including fleet drivers at most depots At Project EV, we would like to highlight and put your mind at ease that all of our charge points comply with these new standards and have been designed to protect both the stability of the electricity grid and our consumers. - Page 29 EV Smart Charge Points Regulations How to opt out of the peak charging hours To opt out, there are two ways to do this. The first way is to plug into the unit with a laptop and change setting 22 + 47 to 0. This will disable the pause in charging in peak hours. The second way is once the unit is available on the app, go into the settings, into EV smart regulations and select the slider to the left.
- Page 30 EV Smart Charge Points Regulations How to opt out / adjust time delay You can opt out/adjust the time delay on setting 28 when configuring with a laptop. However, similar to the peak hours settings, this can also be done via the app. Firstly, select delay charging on the home screen to access the settings.
-
Page 31: App Status
Project EV Standard App App Status Car Fully Schedule Charger Charged Charge Set Faulted Charger Car Charging Plugged In Offline... -
Page 32: Charger Control Methods
App for reservation and payment provided that the back office server supports such functions. If you are using the Project EV App, charging can be stopped by pressing the on/off button on the App. Always ensure you plug charger in vehicle, then charger before using App or RFID. - Page 33 Project EV Standard App Charger Control Methods RFID Mode: Always plug in vehicle then charger- then tap RFID Charging can only be initiated or ceased by swiping RFID card. Plug & Charge: Charging will start automatically after EV plugged in. If you want to stop the charging , just...
-
Page 34: Scheduling A Charge
Project EV Standard App Scheduling a charge When the chargepoint status is preparing, the user can use the preset charging scheme and the reserved charging function by selecting Pre-Set charging. When charging, the preset charging scheme, the amount of charge, the amount of consumption, the duration of charging, the charging rate, and the current voltage are displayed. - Page 35 Project EV Standard App Scheduling a charge You can also schedule a charge start time and set whether it will take effect every day. For example, if you want to start charging at 00:30 every day, if the vehicle is connected to the chargepoint, charging will start automatically.
-
Page 36: Making Your Unit Bespoke
Project EV Standard App Making your unit bespoke On the setting page, the user can view the charging station ID, and the version number (not modifiable) in charger information: Parameter settings You can set the charger parameters by parameter setting. - Page 37 Project EV Standard App Making your unit bespoke Charging Record Press 'Records' found in charger settings to view past charge records, this will include charger ID, Gun A or B, Time, Energy, Cost and many other great details to help you keep...
-
Page 38: Account Management
Account Management Add charger When you use Project EV for the first time, you need to add the charger in the APP to set up and control it. The process of adding a charger is as follows: Click ‘Add’ to add a charger by scanning the code or entering the charger ID. - Page 39 Project EV Standard App Account Management Authorisation management To manage authorised users, you can view the authorisation time, account name, and delete user in the authorisation management interface. Users can authorise other users to use a charging station through authorisation management. Enter the user name to authorise other users to use the chargepoint.
- Page 40 Project EV Standard App Account Management Forgotten Password For a forgotten password, go to the login page, click “forgot password” button, and follow the instructions.
- Page 41 User Manual Project EV Charger Installation companion app Project EV are working with Electric Miles to provide installers with an easy-to-use installation and commissioning companion app. Save time and hassle with our easy-to-use app to finish your next installation efficiently and intuitively.
-
Page 42: Installer Miles
Installer Miles ‘We’re continuously innovating and improving this app. Please scan the QR Code for an up to date version of this document.’... - Page 43 Installer Miles Setting up the app Installing the CT clamp Install the CT clamp following the instructions in the Project EV manual supplied with your charger. The charger will go into pairing mode once plugged into the electrical circuit. Please Note: It is important to ensure the ethernet cable is unplugged if the charger is connected via a LAN cable.
- Page 44 Installer Miles Network Setup To set up the charger with a Wi-Fi network: Enable location permissions on your mobile phone to search for Wi-Fi networks near you. Enter the name and password for the network the charger will be connected to and connect.
- Page 45 Installer Miles Load Management Setup Key Points to remember for the Load Management Setup - Make sure the charger output is correct. - Make sure load management is set to CT clamp when a CT clamp is installed. - Turn off load management if no CT clamp or meter is present. Note: the charger output will be six amps if the setting is set to CT clamp and no CT clamp is installed.
- Page 46 Installer Miles Commissioning using the IM App Commissioning the charger and completing the installation - Tap the ‘Next’ button to connect to the charger once the charger is set up. - Make sure the charger is in pairing mode. - Accept to join the charger hotspot when the pop-up appears. - Wait for the connection to the charger to be established and all the parameters sent to the charger.
- Page 47 Installer Miles Completing the Installation Before completing the installation, please perform all electrical tests using your Kewtech testing adaptor. This equipment recreates charger states. Confirm that all electrical tests have been completed by touching the ‘Complete’ button. We will then send a welcome email on behalf of Electric Miles to your customer.
- Page 48 Installer Miles For further support contact Electric Miles using the email address or visit the FAQ pages on our website. support@electricmiles.co.uk www.electricmiles.com...
- Page 49 User Manual Save money and reduce your carbon footprint Project EV are working with Electric Miles to provide drivers with an easy-to-use and market leading smart charging experience. With minimal set-up, the Electric Miles app will automatically and reliably charge your car during off peak hours saving you money and reducing your carbon footprint.
-
Page 50: Electric Miles
Electric Miles Smart Charging App ‘We’re continuously innovating and improving this app. Please scan the QR Code for an up to date version of this document.’... - Page 51 When you first use the Electric Miles app, you must create an account and register. Adding your Project EV charger Select Project EV from the charger make drop-down menu and select your charger model. Once prompted, enter your serial number which can be found on the side of your charger.
- Page 52 Electric Miles Smart Charging App Setting up an account Adding your car Add your car details, to ensure we charge your car with the correct amount. Adding your supplier Add your electricity supplier, by choosing your supplier and tariff name from the drop down boxes.
- Page 53 Electric Miles Smart Charging App How to charge your car Manual Charging You can choose to start your charging immediately or set a time delay. You can also choose to charge based on a fixed time duration, amount of energy or spending cap. Eco Charge From the 1st of July 2022 the UK is introducing new ‘The Electric Vehicles (Smart Charge Points) Regulations 2021’.
- Page 54 Electric Miles Smart Charging App Smart Charging Smart Charging To optimise your costs and utilise the greenest energy possible, we recommend setting up smart charging. Set the ‘car ready by time’ and choose to charge based on off-peak or spending cap. Electric Miles will automatically charge your car with the cheapest energy available based on your parameters.
- Page 55 Electric Miles Smart Charging App Features coming soon Solar Based Charging Rewards Partnering with sustainability Match charging needs to the output of your solar panels retailers to offer exciting rewards to you Charge Multiple Cars Flex Charging Charge more than one car Earn Benefits by helping the from the app environment and the grid...
- Page 56 Electric Miles Smart Charging App For support contact Electric Miles via email below, or visit our FAQ pages. support@electricmiles.co.uk www.electricmiles.com...
-
Page 57: Troubleshooting
Troubleshooting Troubleshoot by LED behaviour or LCD display If fault occurs, users can check the fault information on the LCD or by the number of blinks of the LED indicator light. Each fault is indicated with a sequence of different numbers of LCD blinking. - Page 58 Troubleshooting No Connection: App shows unavailable On the Wi-Fi module (blue band), is there 1 or 2 blue lights? 1 Light: Check Wi-Fi details entered correctly and Wi-Fi is available at charge point location. 2 Lights- Check charger is not still connected to phone + check firewall problems.
- Page 59 Troubleshooting Charging Issues If charging cannot start after the car is plugged in a. Check if the red emergency stop button is pressed. . b. Check what charge mode is being used APP/RFID- Charge can only be started/stopped by APP or RFID card, and the charger must be connected to the back office server already.
-
Page 60: Further Support
Give us a call: 0800 599 9582 Choose options > Project EV (1) > Technical Support (2) In the unlikely event that no one is available to answer immediately, you will be placed into a que for 2 minutes. If the que time is exceeded, the call will be put through to a receptionist who will take a message and someone from technical will get back to you as soon as possible. -
Page 61: Warranty
Welcome to Project EV and ATESS, and thanks for choosing our Electric Vehicle charge point. All our products are backed by a 5-year warranty (3-years parts and labour plus 2 years parts) giving you years of trouble-free charging. - Page 62 Warranty Claims under the warranty can only be accepted if the buyer can provide the proof that the malfunctioning or non-conformity of ATESS Products results exclusively from defects in materials and/or workmanship under normal application, installation, and use and service conditions.
- Page 63 Warranty 4. General Conditions for Warranty Claims A. The direct customers who have obtained the ATESS Products shall register the ATESS Products and upload the information within 30 days from the date of receiving the ATESS Products. If the customers fail to register the product before the deadline, the Limited Product Warranty will remain at 3 years.
- Page 64 Warranty 5. Dispute regarding a material defect or a reduced power In case of a dispute regarding the existence of a material defect or reduced power in a warranty claim, ATESS will accept the judgment of an accredited testing institute (which is to be selected by ATESS in advance.) The cost and expenses for the testing shall remain with the Buyer if it is found to be good performance.
- Page 65 Project EV, DC Fast Chargers deliver the fastest EV charging rate currently available. The DC Fast Charger is perfect for high-traffic commercial locations, fleets installations, gas stations, and at locations along major transportation corridors.
- Page 66 Project EV team directly. I need help setting Reserved Charging in order to take advantage of off-peak energy tariff Please check our YouTube channel to watch our tutorials, support site or contact the Project EV team directly.
-
Page 67: Social Media
FOLLOW US ON SOCIAL MEDIA @projectevuk @weareprojectev @projectev... - Page 68 Project EV, enquiries@projectev.co.uk Unit 1 Lakes Court, 0800 599 5982 Lancaster Park, Newborough Road, Burton-On-Trent DE13 9PD www.projectev.co.uk...
Need help?
Do you have a question about the EVA-07S-S and is the answer not in the manual?
Questions and answers